
1. Safety Instructions
Please read all safety instructions carefully before operating the heater. Failure to follow these instructions may result in electric shock, fire, or serious injury.
- Overheating Protection: The heater is equipped with an automatic overheating protection system. If the internal temperature exceeds a safe limit, the heater will automatically shut off. Unplug the unit and allow it to cool before restarting.
- Tilt/Dumping Protection: For your safety, the heater features an automatic shut-off mechanism that activates if the unit tilts more than 45 degrees. Ensure the heater is placed on a stable, level surface to prevent accidental tipping.
- Anti-Scalding Design: The body of the heater incorporates an anti-scalding layer to minimize the risk of burns upon accidental contact. However, always exercise caution as the heating element itself becomes very hot during operation.
- Water Resistance (IPX44): This heater is designed with IPX44 water resistance, making it suitable for outdoor use and resistant to splashing water. Do not immerse the heater in water or expose it to heavy rain.
- Electrical Safety:
- Ensure the power supply voltage matches the heater's requirements.
- Do not operate the heater with a damaged cord or plug.
- Keep the power cord away from heated surfaces.
- Always unplug the heater when not in use or before cleaning.
- Placement: Maintain a safe distance from flammable materials such as furniture, curtains, and other combustibles. Do not cover the heater.
- Children and Pets: Keep children and pets away from the heater during operation.
2. Product Overview
The Teri Stainless Steel Outdoor Electric Heater is a versatile heating solution designed for outdoor and indoor spaces. It features a robust stainless steel construction, adjustable height, and integrated ashtray and table for convenience.

Image 2.1: Main view of the Teri Stainless Steel Outdoor Electric Heater, showcasing its umbrella-shaped heating head, central pole, integrated circular table, and ashtray component. The base provides stability.
2.1 Key Features
- High Power Output: Up to 3000W for rapid and effective heating.
- Adjustable Power Settings: Three power levels (1200W, 1800W, 3000W) for customized warmth.
- Safety Mechanisms: Automatic power-off upon tilting over 45 degrees and overheating protection.
- Durable Construction: Made from high-quality stainless steel for longevity and resistance to outdoor elements.
- Integrated Ashtray and Table: Provides a convenient surface for drinks and an ashtray for social gatherings.
- Adjustable Height: The heater's height can be adjusted to suit various settings.
- Wide Heating Area: Carbon tube heating element provides efficient warmth over 10-40 square meters.
2.2 Dimensions
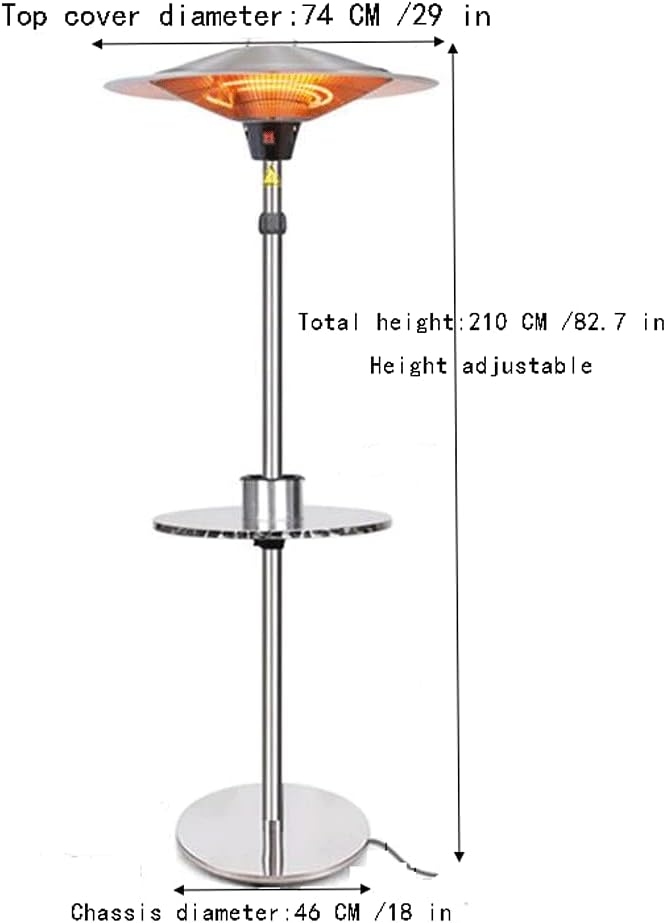
Image 2.2: Diagram illustrating the key dimensions of the heater. The top cover diameter is 74 cm (29 inches), the total height is 210 cm (82.7 inches) and is adjustable, and the chassis diameter is 46 cm (18 inches).
2.3 Component Details

Image 2.3: Close-up view of the heater's base, highlighting the 304 stainless steel thickened bottom plate. This design ensures stable support and prevents shaking during operation.
3. Assembly Instructions
Before assembly, ensure all components are present and undamaged. It is recommended to assemble the heater on a soft, clean surface to prevent scratches.
- Unpack Components: Carefully remove all parts from the packaging. Verify against the packing list (if provided) that all components, including the base, main pole sections, table, ashtray, and heating head, are present.
- Attach Base: Secure the lowest section of the main pole to the heavy-duty base using the provided screws and tools. Ensure it is tightened firmly for stability.
- Assemble Pole Sections: Connect the remaining pole sections, ensuring they are properly aligned and secured. The height adjustment mechanism should be accessible.
- Install Table and Ashtray: Slide the circular table onto the pole at the desired height. The ashtray component typically sits within a designated recess on the table or attaches securely to it.
- Mount Heating Head: Carefully attach the heating head assembly to the top of the main pole. Ensure all electrical connections are secure and the head is firmly seated.
- Adjust Height: If applicable, use the height adjustment mechanism on the pole to set the heater to your preferred operating height. Ensure the locking mechanism is engaged after adjustment.
- Final Check: Before plugging in, visually inspect the entire assembly to ensure all connections are tight, the heater is stable, and there are no loose parts or damaged wires.
4. Operating Instructions
Follow these steps to safely operate your electric heater.
- Placement: Place the heater on a firm, level surface, ensuring it is at a safe distance from walls, furniture, and other flammable objects. Do not place it directly under a power outlet.
- Plug In: Insert the power plug into a suitable electrical outlet. Ensure the outlet meets the heater's power requirements.
- Power On: Locate the power switch, usually on the heating head or control panel. Turn the heater ON.
- Select Power Level: The heater offers three power settings: 1200W, 1800W, and 3000W. Use the control knob or buttons to select the desired heat output. Start with a lower setting and increase as needed.
- 1200W: Low heat, suitable for smaller areas or mild chill.
- 1800W: Medium heat, for moderate warmth.
- 3000W: High heat, for larger areas or colder conditions.
- Enjoy Warmth: The heater will begin to emit heat shortly after being turned on.
- Power Off: To turn off the heater, select the 'OFF' position on the control panel or switch. Unplug the heater from the power outlet when not in use for extended periods.
5. Maintenance and Care
Regular maintenance ensures optimal performance and extends the lifespan of your heater. Always unplug the heater and allow it to cool completely before performing any maintenance.
- Cleaning the Exterior: Wipe the exterior surfaces with a soft, damp cloth. Do not use abrasive cleaners, solvents, or harsh chemicals, as these can damage the finish.
- Cleaning the Heating Element: Gently remove any dust or debris from the heating element using a soft brush or compressed air. Do not touch the heating element directly.
- Ashtray Cleaning: The integrated ashtray can be removed for easy cleaning. Wash with soap and water, then dry thoroughly before replacing.
- Cord and Plug Inspection: Periodically inspect the power cord and plug for any signs of damage. If damage is found, discontinue use and contact customer support.
- Storage: When not in use, especially during off-season, store the heater in a cool, dry place, protected from dust and moisture. Consider covering it to prevent dust buildup.
6. Troubleshooting
If you encounter issues with your heater, refer to the following common problems and solutions.
| Problem | Possible Cause | Solution |
|---|---|---|
| Heater does not turn on. | No power supply, power switch off, or safety feature activated. |
|
| Heater turns off unexpectedly. | Overheating protection or tilt protection activated. |
|
| Insufficient heat output. | Incorrect power setting, large area, or external factors. |
|
7. Technical Specifications
| Product Name | Outdoor/Indoor Electric Heater; Umbrella-shaped Electric Heater; Patio Heater |
| Model Number | B09GVWFKG8 |
| Brand | Teri |
| Heater Size (Diameter x Height) | 74 cm (29 inches) x 210 cm (82.7 inches) |
| Chassis Diameter | 46 cm (18 inches) |
| Height | Adjustable |
| Product Material | Stainless Steel (304 Stainless Steel for base) |
| Net Weight | 19 Kg |
| Gear Power Settings | 1200W / 1800W / 3000W |
| Heating Range | 10-40 square meters |
| Safety Features | Overheating Protection, Dumping and Flameout (Tilt Protection) |
| Water Resistance Rating | IPX44 |
| Form Factor | Dish |
| Mounting Type | Floor Mount |
8. Warranty and Customer Support
For warranty information, product support, or to inquire about replacement parts, please contact your retailer or the manufacturer directly. Keep your purchase receipt as proof of purchase.
Please refer to the original product packaging or the point of purchase for specific warranty terms and conditions applicable to your region.