Introduction
This manual provides comprehensive instructions for the installation, operation, and maintenance of your NovaNic H-JOSHUA-H61-uATX Desktop Motherboard. Please read this manual thoroughly before proceeding with installation to ensure proper setup and to prevent damage to the components.
The NovaNic H-JOSHUA-H61-uATX motherboard is designed for desktop personal computers, supporting Intel Core i5-2131JP compatible processors and DDR4 RAM. It features an Intel H61 Express chipset and an LGA 1200 CPU socket.
Safety Information
- Always disconnect the power supply from the wall outlet before installing or removing any components.
- Wear an anti-static wrist strap to prevent electrostatic discharge (ESD) damage to sensitive components.
- Handle the motherboard by its edges to avoid touching components or circuits.
- Ensure proper ventilation within your PC case to prevent overheating.
- Keep the motherboard away from moisture and extreme temperatures.
Package Contents
Verify that your package contains the following items:
- NovaNic H-JOSHUA-H61-uATX Desktop Motherboard
- I/O Shield (may be pre-attached)
- SATA Data Cables (quantity may vary)
- User Manual (this document)
- Driver CD/DVD or USB drive (if included)
Setup and Installation
1. Motherboard Overview
Familiarize yourself with the layout of the motherboard before installation.
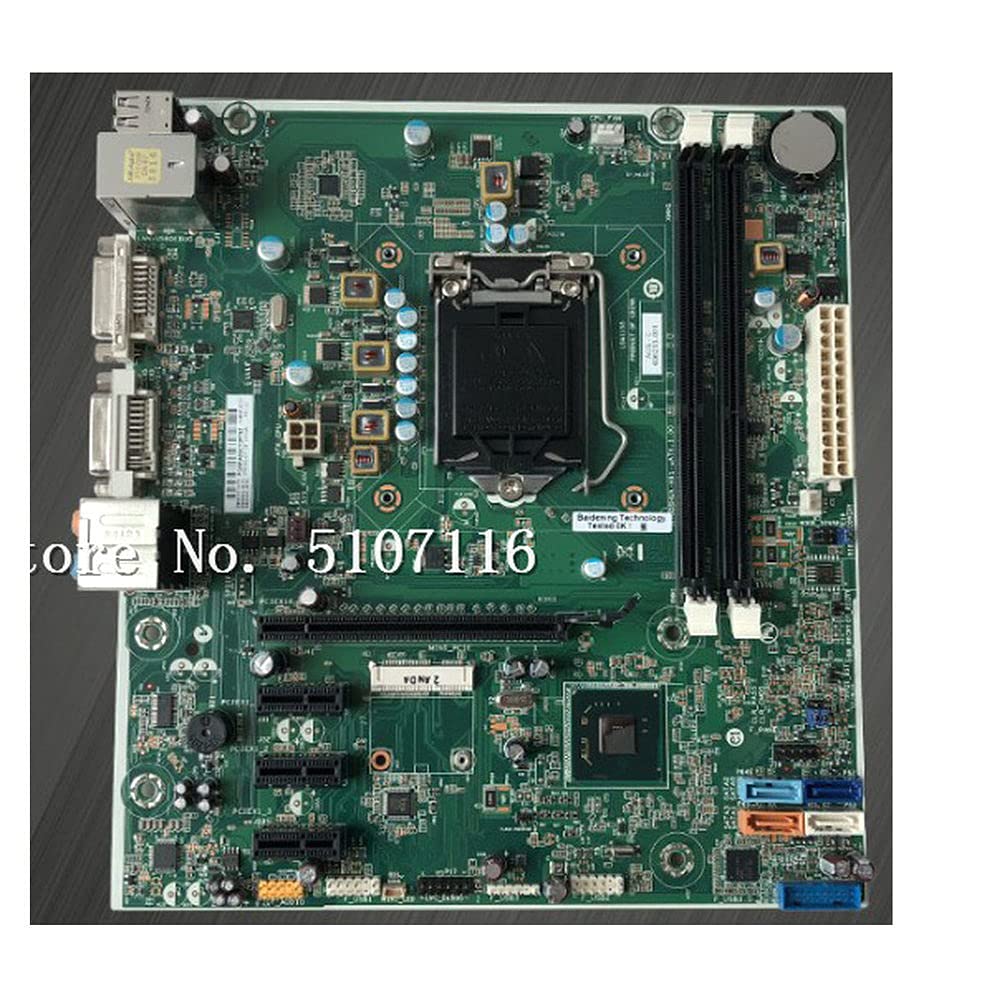
Figure 1: Top-down view of the NovaNic H-JOSHUA-H61-uATX motherboard, showing CPU socket, RAM slots, PCIe slots, and various connectors.
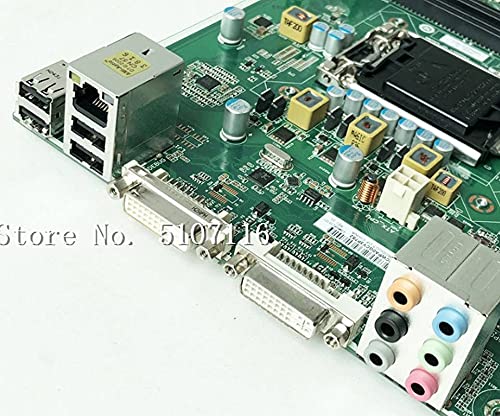
Figure 2: Close-up view of the rear I/O panel, featuring USB ports, Ethernet port, DVI ports, and audio jacks.
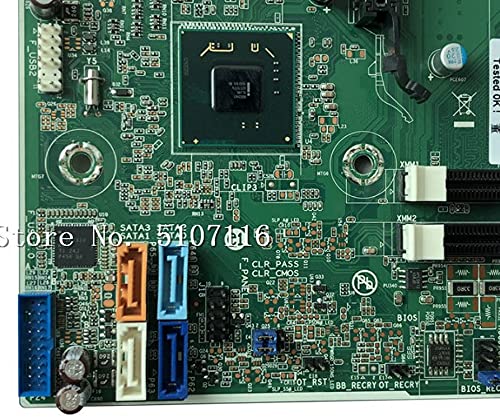
Figure 3: Close-up view of the SATA ports (blue, orange, black) and front panel headers, including USB and audio connectors.
2. Installing the CPU
- Locate the LGA 1200 CPU socket on the motherboard.
- Gently push down the load lever and pull it out to open the CPU socket cover.
- Align the CPU with the socket, ensuring the golden triangle on the CPU matches the triangle on the socket.
- Carefully place the CPU into the socket without forcing it.
- Close the load plate and push the load lever back into place until it clicks.
3. Installing the CPU Cooler
Follow the instructions provided with your CPU cooler for proper installation. Ensure thermal paste is applied correctly and the cooler is securely mounted.
4. Installing RAM (Memory)
- Open the clips at both ends of the DDR4 memory slots.
- Align the notch on the RAM module with the notch in the memory slot.
- Press down firmly on both ends of the RAM module until the clips snap into place.
5. Installing Storage Devices
Connect your SATA hard drives or SSDs to the SATA ports on the motherboard using SATA data cables. Ensure the power cables from your power supply are also connected to the drives.
6. Connecting Power Supply
- Connect the 24-pin ATX main power connector from your power supply to the corresponding port on the motherboard.
- Connect the 4-pin or 8-pin CPU power connector (ATX_CPU) to the port near the CPU socket.
7. Connecting Front Panel Connectors
Connect the power button, reset button, HDD LED, power LED, and front panel audio/USB headers from your PC case to the corresponding pins on the motherboard. Refer to the motherboard diagram for exact pin locations.

Figure 4: Close-up of a label on the motherboard showing product information, including the serial number and part number PCWPA0GCY3P7S2. This label is crucial for identification and support.
Operating Instructions
1. Initial Boot and BIOS/UEFI Setup
After assembling your system, connect a monitor, keyboard, and mouse. Power on the system. During startup, repeatedly press the designated key (usually Del, F2, or F10) to enter the BIOS/UEFI setup utility. Here you can configure boot order, system time, and other hardware settings.
2. Driver Installation
After installing your operating system, install the necessary drivers for the motherboard's components (chipset, audio, LAN, etc.). These drivers are typically provided on a CD/DVD included with the motherboard or can be downloaded from the NovaNic support website.
3. Operating System Installation
Insert your operating system installation media (USB drive or DVD) and follow the on-screen instructions to install the OS. Ensure the boot order in BIOS/UEFI is set to prioritize your installation media.
Maintenance
1. Cleaning
Regularly clean your PC's interior to prevent dust buildup, which can lead to overheating. Use compressed air to remove dust from fans, heatsinks, and motherboard components. Ensure the system is powered off and unplugged before cleaning.
2. BIOS/UEFI Updates
Periodically check the NovaNic support website for BIOS/UEFI updates. Updates can improve system stability, add new features, or fix bugs. Follow the specific instructions provided with the update file carefully to avoid damaging the motherboard.
Troubleshooting
Common Issues and Solutions:
- No Power:
- Check all power connections (24-pin ATX, 4/8-pin CPU, power button header).
- Ensure the power supply switch is in the 'ON' position.
- Test the power supply with another system or a power supply tester.
- No Display:
- Verify the monitor is connected to the correct video output (motherboard or discrete graphics card).
- Reseat the RAM modules. Try booting with only one RAM stick.
- Reseat the graphics card (if applicable).
- Clear CMOS (refer to motherboard manual for jumper/button location).
- System Boots but No OS:
- Check boot order in BIOS/UEFI.
- Ensure the operating system is properly installed on a recognized drive.
- Verify SATA data and power connections to storage drives.
For more complex issues, consult the NovaNic support website or contact technical support.
Specifications
| Feature | Specification |
|---|---|
| Brand | NovaNic |
| Model Number | H61-uATX H61 696233-001 |
| CPU Socket | LGA 1200 |
| Compatible Processors | Intel Core i5-2131JP |
| Chipset Type | Intel H61 Express |
| RAM Memory Technology | DDR4 |
| Memory Clock Speed | 2133 MHz |
| Memory Storage Capacity | 8 GB |
| Main Power Connector Type | 24-Pin |
| Compatible Devices | Personal Computer |
| Platform | Not Machine Specific |
| ASIN | B09GMPXY4C |
| Manufacturer | NovaNic |
| Date First Available | September 18, 2021 |
Warranty Information
NovaNic products are manufactured to high-quality standards. This motherboard comes with a limited warranty against defects in materials and workmanship. Please refer to the warranty card included with your product or visit the official NovaNic website for detailed warranty terms and conditions, including duration and coverage.
Technical Support
If you encounter any issues that cannot be resolved using this manual or the troubleshooting section, please contact NovaNic technical support. Have your product model number (H61-uATX H61 696233-001) and serial number (e.g., PCWPA0GCY3P7S2, found on the motherboard label) ready when contacting support.
For the most up-to-date support resources, FAQs, and driver downloads, please visit the official NovaNic support website.