
1. Introduction
Thank you for choosing the SHOPPINGALL SA-D285 Dual Monitor Standing Mount. This manual provides detailed instructions for assembly, operation, and maintenance to ensure safe and optimal use of your monitor mount. Please read this manual thoroughly before installation and retain it for future reference.
2. Safety Information
- Ensure all components are present and undamaged before assembly. Do not use if any parts are missing or defective.
- Verify that your desk surface can support the combined weight of the mount and your monitors.
- Do not exceed the maximum weight capacity of 17.6 lbs (8 kg) per arm.
- Ensure monitors are within the supported size range of 13"-32".
- Always use the specified VESA mounting patterns (75x75mm or 100x100mm).
- Tighten all screws securely, but do not overtighten to avoid stripping threads.
- Keep children and pets away during assembly.
3. Package Contents
Please check to ensure all parts are included in your package:
- Main Pole (31.5" / 810mm)
- Monitor Arms (x2)
- VESA Plates (x2)
- Desk Clamp Base
- Grommet Mount Components
- Cable Management Clips
- Hardware Kit (screws, washers, Allen keys)
4. Specifications
| Model Number | SA-D285 |
| Material | Metal |
| Color | White |
| Screen Size Compatibility | 13" - 32" per monitor |
| Weight Capacity | Up to 17.6 lbs (8 kg) per arm |
| VESA Compatibility | 75x75mm, 100x100mm |
| Pole Height | 31.5" (810mm) |
| Adjustability | Tilt: -35° to +90°, Swivel: ±180°, Rotation: 360° |
| Mounting Type | C-Clamp or Grommet |
The mount supports two monitors, each up to 32 inches in size and 17.6 lbs in weight. The extra-tall 31.5-inch pole allows for a wide range of height adjustments, including vertical stacking of monitors.

Image: SHOPPINGALL SA-D285 Dual Monitor Mount showing overall dimensions, including the 31.9 inch pole height and 15.5 inch arm reach.
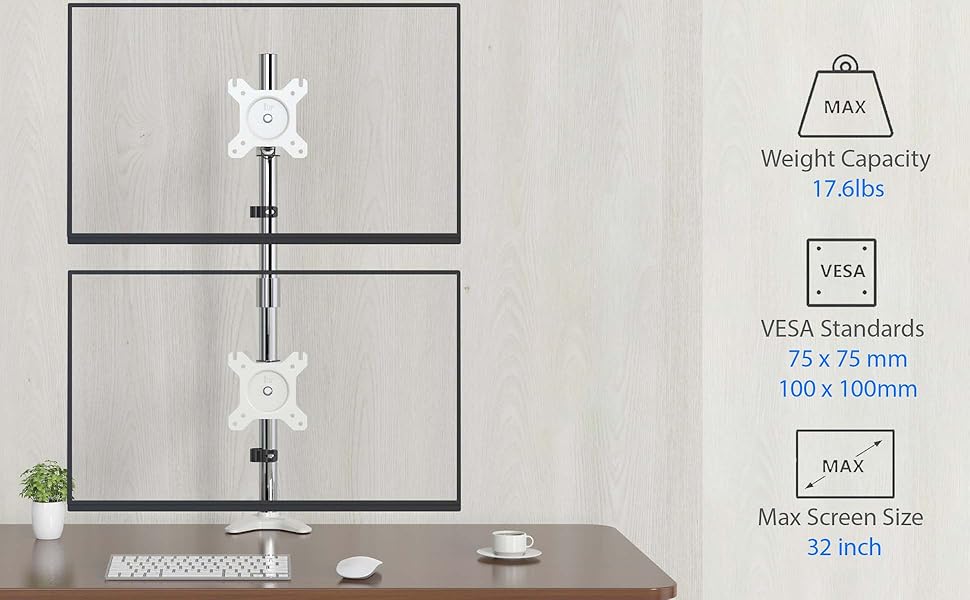
Image: The SA-D285 dual monitor mount supporting two monitors, highlighting its weight capacity (17.6 lbs), VESA standards (75x75mm, 100x100mm), and maximum screen size (32 inches).
5. Setup and Installation
The SA-D285 mount offers two installation options: C-Clamp and Grommet Mounting. Choose the method best suited for your desk.
5.1. Choose Your Mounting Option

Image: Illustration of C-Clamp and Grommet mounting options. C-Clamp supports desk thickness up to 3.3 inches, and Grommet mounting supports desk thickness up to 2.5 inches.
C-Clamp Installation:
- Attach the C-clamp base to the edge of your desk. Ensure the desk thickness is no more than 3.3 inches.
- Tighten the clamp screw until the base is firmly secured to the desk.
Grommet Mounting Installation:
- If your desk has a grommet hole, insert the grommet base through the hole. Ensure the desk thickness is no more than 2.5 inches.
- Secure the grommet base from underneath the desk using the provided plate and nut.
5.2. General Installation Steps

Image: Four-step visual guide for quick and easy installation: 1. Install Pole to Desk, 2. Attach Arm to Pole, 3. Attach VESA to Monitor, 4. Final setup with two monitors.
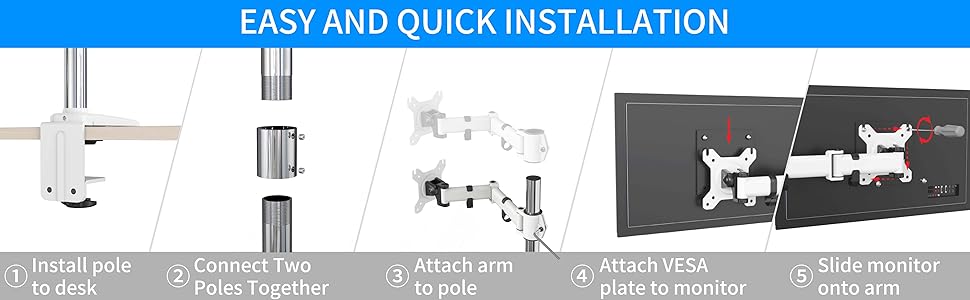
Image: Detailed five-step installation guide: 1. Install pole to desk, 2. Connect two poles together, 3. Attach arm to pole, 4. Attach VESA plate to monitor, 5. Slide monitor onto arm.
- Install Pole to Desk: Secure the main pole into the chosen C-Clamp or Grommet base. Ensure it is upright and stable.
- Connect Two Poles Together (if applicable): If your model includes a two-part pole, connect the sections firmly.
- Attach Arms to Pole: Slide the monitor arms onto the main pole at your desired heights. Use the provided Allen key to tighten the arm collars.
- Attach VESA Plate to Monitor: Secure the VESA plate to the back of your monitor using the appropriate screws from the hardware kit. Ensure the VESA pattern (75x75mm or 100x100mm) matches your monitor.
- Slide Monitor onto Arm: Carefully slide the monitor (with VESA plate attached) onto the end of the monitor arm. Ensure it clicks into place or is secured with the locking mechanism. Repeat for the second monitor.
6. Operating Instructions
Once installed, your SHOPPINGALL SA-D285 mount allows for flexible positioning of your monitors to optimize your viewing experience and ergonomic setup.
6.1. Height Adjustment
The extra-tall 31.5" pole provides a wide range of vertical adjustment. To change the height of an arm, loosen the collar on the pole, slide the arm to the desired position, and then re-tighten the collar securely. This feature supports both side-by-side and vertically stacked monitor configurations.
6.2. Monitor Adjustments (Tilt, Swivel, Rotation)

Image: Visual representation of monitor adjustment capabilities: 360° rotation, -35° to 90° tilt, and ±180° swivel.
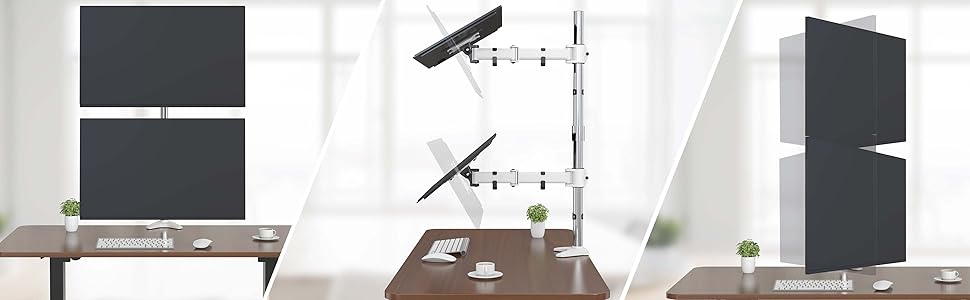
Image: Three panels illustrating monitor movement: side-by-side, tilted and swiveled, and vertically stacked.
- Tilt: The monitor can be tilted from -35° (downward) to +90° (upward) to reduce glare and achieve optimal viewing angles. Loosen the tilt knob, adjust, and re-tighten.
- Swivel: Each arm can swivel ±180° at the pole connection and at the VESA plate, allowing you to share your screen or adjust for different tasks.
- Rotation: The VESA plate allows for a full 360° rotation, enabling you to switch your monitor between landscape and portrait orientation with ease.
7. Cable Management
The SA-D285 includes integrated cable management clips along the arms and pole. Route your monitor and power cables through these clips to keep your workspace tidy and organized. This helps prevent cable clutter and potential damage.
8. Maintenance
- Regularly check all screws and connections to ensure they remain tight and secure.
- Clean the mount with a soft, damp cloth. Avoid abrasive cleaners or solvents that could damage the finish.
- Inspect the mount periodically for any signs of wear or damage. If any issues are found, discontinue use and contact customer support.
9. Troubleshooting
9.1. Monitor is not stable or sags
- Ensure all mounting screws for the VESA plate and arm connections are securely tightened.
- Verify that the desk clamp or grommet mount is firmly attached to the desk.
- Check if the monitor's weight exceeds the maximum capacity of 17.6 lbs (8 kg) per arm.
9.2. Difficulty adjusting monitor position
- For tilt adjustments, ensure the tilt knob is sufficiently loosened before attempting to move the monitor. Re-tighten after adjustment.
- For height adjustments, loosen the arm collar on the pole before sliding the arm. Re-tighten firmly once the desired height is reached.
9.3. Desk scratches from clamp
- The C-clamp base includes an anti-scratch pad. Ensure this pad is properly positioned between the clamp and your desk surface during installation.
10. Warranty and Support
For warranty information or technical support, please refer to the product packaging or contact SHOPPINGALL customer service directly. Contact information can typically be found on the manufacturer's website or through your point of purchase.
