
1. Introduction and Package Contents
The QYT KT-8900 GMRS Mobile Radio is a compact and powerful two-way radio designed for reliable communication across various environments, including farms, ranches, and overlanding adventures. It operates on GMRS frequencies and features NOAA Weather Scan and Alert capabilities, privacy codes, and dual-band reception with dual standby.
1.1 Package Contents
Please verify that all items listed below are included in your package:
- 1x QYT KT-8900 Mobile Transceiver
- 1x Microphone with DTMF Keypad
- 1x 2.8 ft DC Cable with Cigarette Plug Connector
- 1x Mounting Bracket (Fuse and Screws included)
- 1x Programming Cable

Image 1.1: The QYT KT-8900 GMRS Mobile Radio with its integrated control microphone.

Image 1.2: All components included in the QYT KT-8900 GMRS Mobile Radio package.
2. Key Features
The QYT KT-8900 GMRS Mobile Radio offers a range of features designed for optimal performance and user convenience:
- Full 25-Watt GMRS Mobile Radio: Operates on GMRS frequencies with 15 GMRS channels and 8 repeater channels, compatible with all FRS and GMRS radios. Output power: 25W/20W (VHF/UHF).
- Wide Frequency Range: VHF: 136-174MHz / UHF: 400-480MHz.
- FCC Licensed GMRS Channels: The GMRS channels are licensed by the FCC (FCC ID: 2AV62KT-8900) for personal and business use, offering a range of several miles depending on conditions.
- NOAA Weather Scan + Alert: Automatically scans available weather band channels and locks onto the strongest signal to provide severe weather updates and alerts.
- CTCSS/DCS Privacy Codes: Allows selection of specific codes for channels to prevent unwanted transmissions.
- Compact Design: A mini car GMRS radio, ideal for overlanders, off-roaders, farmers, and RV users.
3. Component Identification
3.1 Front Panel

Image 3.1: Front view of the QYT KT-8900 radio with key components labeled.
| No. | Component | Description |
|---|---|---|
| ① | Antenna Connector | Connects to the external antenna. |
| ② | CALL Button | Initiates a call or activates a specific function. |
| ③ | MONI Button | Monitors the current channel for activity. |
| ④ | Power Button | Turns the radio on or off. |
| ⑤ | Speaker | Audio output for received transmissions. |
| ⑥ | Microphone Port | Connects the control microphone. |
| ⑦ | Programming Port | Used for connecting the programming cable to a computer. |
| ⑧ | FM Button | Activates the FM radio function. |
| ⑨ | EXIT/AB Button | Exits menu or switches between A/B display. |
| ⑩ | V/M Button | Switches between VFO (Frequency) and Memory (Channel) modes. |
| ⑪ | Volume/Power Knob | Adjusts audio volume and serves as the power switch. |
3.2 Rear Panel

Image 3.2: Rear view of the QYT KT-8900 radio, showing power and antenna connections.
| No. | Component | Description |
|---|---|---|
| ① | External Speaker Jack | Connects an optional external speaker. |
| ② | DC Power Input | Connects the DC power cable for power supply. |
| ③ | Cooling Fan | Dissipates heat during operation. |
| ④ | Antenna Connector (SO-239) | Connects the external antenna cable. |
3.3 Control Microphone

Image 3.3: The control microphone with its DTMF keypad.
| No. | Component | Description |
|---|---|---|
| ① | MENU Button | Accesses the radio's menu system. |
| ② | UP Button | Navigates up through menus or increases frequency/channel. |
| ③ | DOWN Button | Navigates down through menus or decreases frequency/channel. |
| ④ | EXIT/AB Button | Exits menu or switches between A/B display. |
| ⑤ | Keypad | Used for direct frequency entry, DTMF tones, and menu selection. |
| ⑥ | PTT (Push-To-Talk) Button | Press and hold to transmit, release to receive. |
4. Setup and Installation
4.1 Power Connection
Connect the provided DC power cable to the DC Power Input port on the rear of the radio (labeled ② in Image 3.2). Ensure the connection is secure. The other end of the cable, with the cigarette plug connector, should be plugged into your vehicle's 12V DC power outlet. The radio requires 13.8 Volts (DC) for optimal operation.
4.2 Antenna Connection
Connect your GMRS antenna to the SO-239 antenna connector on the rear of the radio (labeled ④ in Image 3.2). Ensure the antenna is properly tuned for the GMRS frequencies to prevent damage to the radio and ensure efficient transmission. A properly matched antenna is crucial for performance.
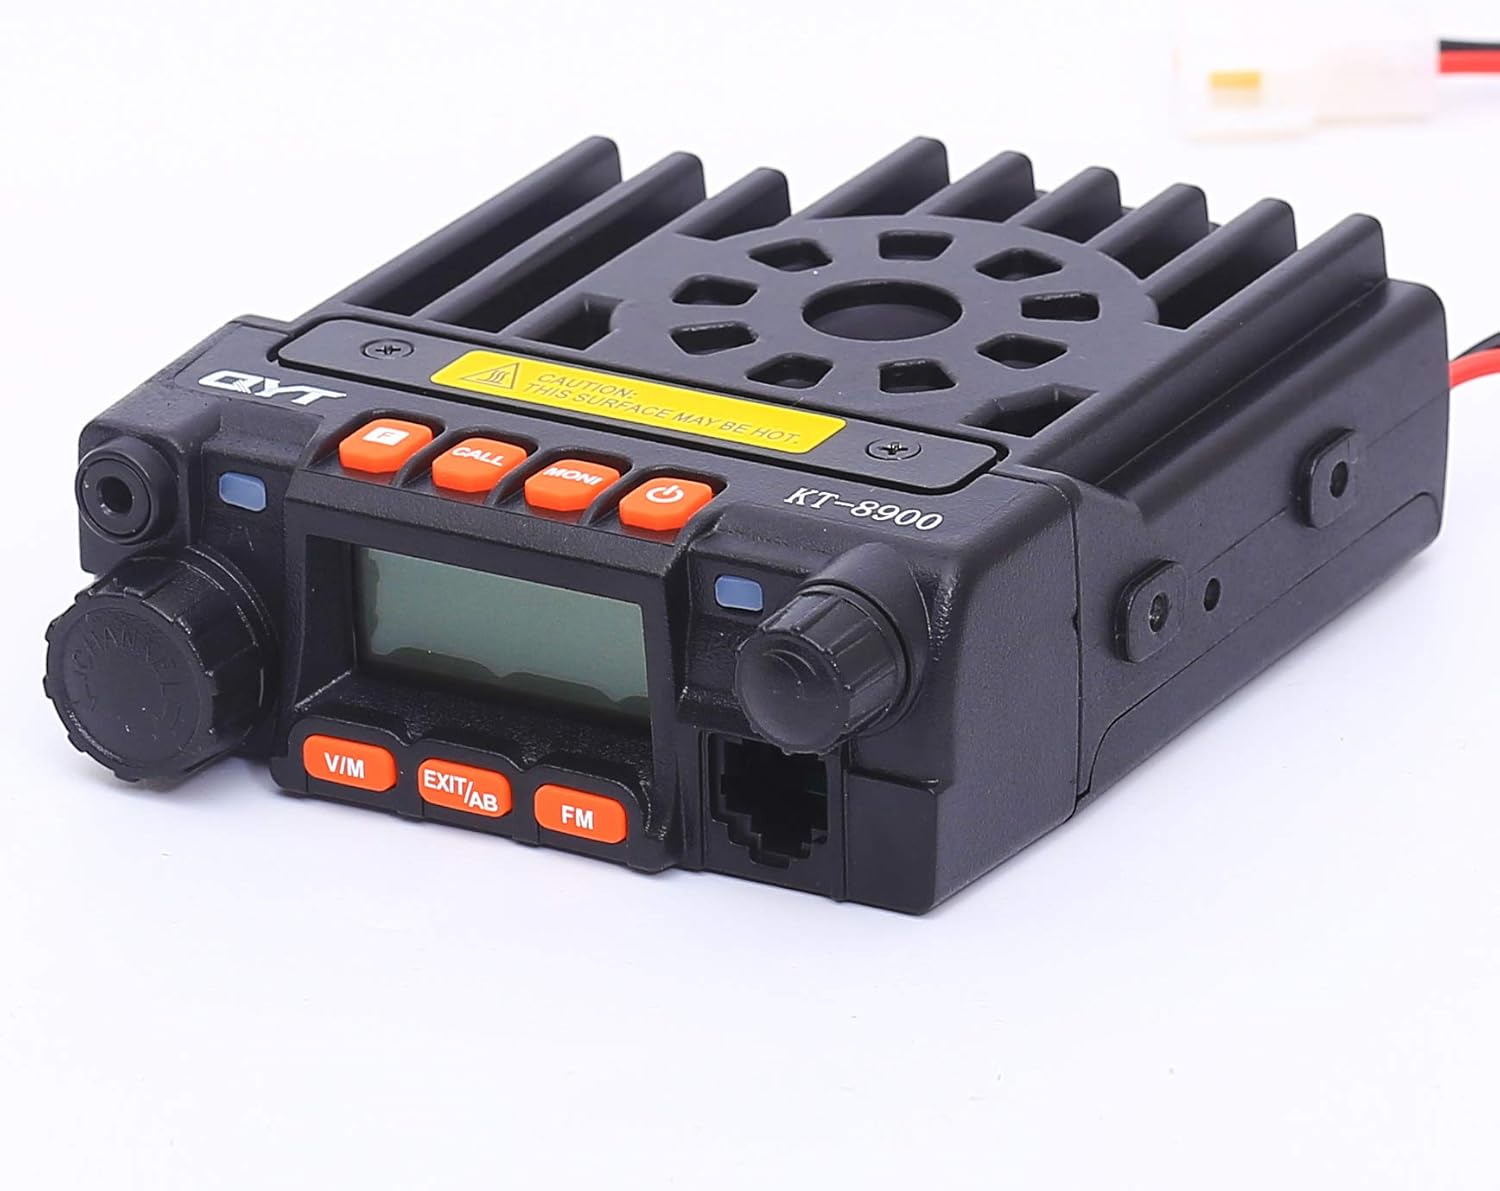
Image 4.1: Side view of the QYT KT-8900 radio, showing its compact size.
4.3 Mounting
Use the included mounting bracket and screws to securely install the radio in your desired location within your vehicle or setup. Ensure the mounting location allows for adequate ventilation, especially around the cooling fan on the rear of the unit, and easy access to controls and connections.

Image 4.2: Rear view of the QYT KT-8900 radio, highlighting the cooling fan.
5. Basic Operation
5.1 Power On/Off
To power on the radio, rotate the Volume/Power Knob (⑪ in Image 3.1) clockwise until the display illuminates. To power off, rotate the knob counter-clockwise until it clicks.
5.2 Volume Adjustment
Adjust the audio output volume by rotating the Volume/Power Knob (⑪ in Image 3.1) clockwise to increase and counter-clockwise to decrease.
5.3 Channel Selection
The radio supports both VFO (Frequency) mode and Memory (Channel) mode. Press the V/M button (⑩ in Image 3.1) to switch between these modes. In Memory mode, use the UP/DOWN buttons on the microphone (② and ③ in Image 3.3) to cycle through programmed channels. In VFO mode, use the keypad on the microphone (⑤ in Image 3.3) to directly enter frequencies.
5.4 Transmitting and Receiving
To transmit, press and hold the PTT (Push-To-Talk) button on the side of the microphone (⑥ in Image 3.3). Speak clearly into the microphone. Release the PTT button to return to receive mode. Ensure you are on an appropriate GMRS channel before transmitting.
5.5 Dual Band Receiver Dual Standby
The KT-8900 can monitor two different frequencies (VHF and UHF) simultaneously. The display will show both frequencies. The radio will automatically switch to the active frequency when a signal is detected. You can select which frequency is the primary transmit frequency using the A/B function, typically accessed via the EXIT/AB button (⑨ in Image 3.1 or ④ in Image 3.3).
5.6 NOAA Weather Scan and Alert
To activate NOAA Weather Scan, navigate through the radio's menu system. Once activated, the radio will automatically scan available NOAA weather channels. If a severe weather alert is broadcast, the radio will sound an alarm to notify you.
5.7 Privacy Codes (CTCSS/DCS)
The radio supports CTCSS (Continuous Tone-Coded Squelch System) and DCS (Digital Coded Squelch) privacy codes. These codes help filter out unwanted transmissions by only opening the squelch when a signal with the matching tone/code is received. Refer to the detailed menu guide for setting these codes on specific channels.
6. Advanced Functions: Programming
6.1 Programming the Radio
While some basic settings can be adjusted directly on the radio, advanced functions, such as custom channel programming, repeater offsets, and specific privacy code assignments, are best managed using programming software. The QYT KT-8900 can be programmed using a computer and the included programming cable.
Connect the programming cable to the Programming Port (⑦ in Image 3.1) on the front of the radio and to a USB port on your computer. You will need to install the appropriate driver for the programming cable and the QYT programming software. Alternatively, the radio is known to be compatible with third-party programming software like CHIRP, which offers a user-friendly interface for managing radio settings.
Note: Ensure you have the correct software version and drivers for your operating system. Incorrect programming can lead to radio malfunction or operation outside of legal parameters.
7. Maintenance
7.1 Cleaning
Regularly clean the radio's exterior with a soft, damp cloth. Avoid using harsh chemicals or abrasive cleaners, as these can damage the casing and display. Ensure all ports are free of dust and debris.
7.2 Storage
When not in use for extended periods, store the radio in a cool, dry place away from direct sunlight and extreme temperatures. Disconnect it from power sources and ensure the antenna is removed or properly secured.
7.3 Antenna Care
Periodically check your antenna and its connection for any signs of wear or damage. A damaged antenna can significantly reduce the radio's performance and potentially cause damage to the radio's transmitter.
8. Troubleshooting
This section addresses common issues you might encounter with your QYT KT-8900 radio.
| Problem | Possible Cause | Solution |
|---|---|---|
| Radio does not power on. | No power supply; loose power cable; blown fuse. | Check power connection; ensure vehicle's 12V outlet is active; inspect and replace fuse in DC cable if necessary. |
| Cannot transmit or transmit power is low. | Antenna not connected or damaged; incorrect frequency/channel; SWR issue; radio in receive-only mode. | Ensure antenna is securely connected and in good condition; verify you are on a GMRS transmit-enabled channel; check SWR with an external meter; ensure radio is not in a scan or monitor mode. |
| Poor reception or static. | Weak signal; antenna issue; high interference; squelch level too high. | Adjust squelch level; check antenna connection and position; move away from sources of electrical interference. |
| Microphone buttons unresponsive. | Microphone not fully plugged in; microphone cable damaged. | Ensure microphone cable is securely connected to the radio's microphone port. |
| Programming software issues. | Incorrect drivers; software compatibility; faulty programming cable. | Install correct USB drivers for the programming cable; try different USB ports; ensure software is compatible with your OS; consider using alternative programming software like CHIRP. |
9. Technical Specifications
Below are the key technical specifications for the QYT KT-8900 GMRS Mobile Radio:
| Specification | Value |
|---|---|
| Brand | QYT |
| Model Number | KT-8900-BLACK |
| Item Weight | 14.4 ounces (0.9 Pounds) |
| Product Dimensions | 4.65 x 3.86 x 1.38 inches |
| Country of Origin | China |
| Display Type | LCD |
| Number of Channels | 200 |
| Frequency Range | VHF: 136-174MHz / UHF: 400-480MHz (GMRS specific channels) |
| Output Power | 25W/20W (VHF/UHF) |
| Tuner Technology | UHF, VHF |
| Voltage | 13.8 Volts (DC) |
| Water Resistance Level | Not Water Resistant |
| FCC ID | 2AV62KT-8900 |
10. Warranty and Support
10.1 Warranty Information
The QYT KT-8900 GMRS Mobile Radio typically comes with a 1-year manufacturer's warranty from the date of purchase. This warranty covers defects in materials and workmanship under normal use. Please retain your proof of purchase for warranty claims.
Note: The warranty may not cover damage caused by improper installation, misuse, unauthorized modifications, or natural disasters.
10.2 Customer Support
For technical assistance, troubleshooting beyond this manual, or warranty inquiries, please contact QYT customer support. Refer to the contact information provided on the product packaging or the official QYT website.