1. Introduction
Thank you for choosing the 01 Fingerprint Smart Padlock. This innovative padlock offers keyless security, utilizing advanced fingerprint recognition technology for quick and convenient access. Its portable and lightweight design makes it ideal for securing various items such as boxes, wardrobes, backpacks, and luggage. This manual provides detailed instructions on how to set up, operate, and maintain your new fingerprint lock.
2. Safety Information
Please read all safety instructions carefully before using the product.
- Do not attempt to disassemble or modify the lock. This may damage the device and void the warranty.
- Keep the lock away from extreme temperatures, direct sunlight, and corrosive liquids.
- Ensure the charging port is dry before connecting the USB cable.
- This product is designed for general security purposes and should not be used for high-security applications where extreme force or specialized tools could be used to bypass it.
- Keep out of reach of children to prevent accidental damage or misuse.
3. Package Contents
Verify that all items are present in the package:
- 1 x Fingerprint Lock
- 1 x USB Cable
- 1 x User Manual
4. Product Overview
Familiarize yourself with the components of your 01 Fingerprint Smart Padlock.
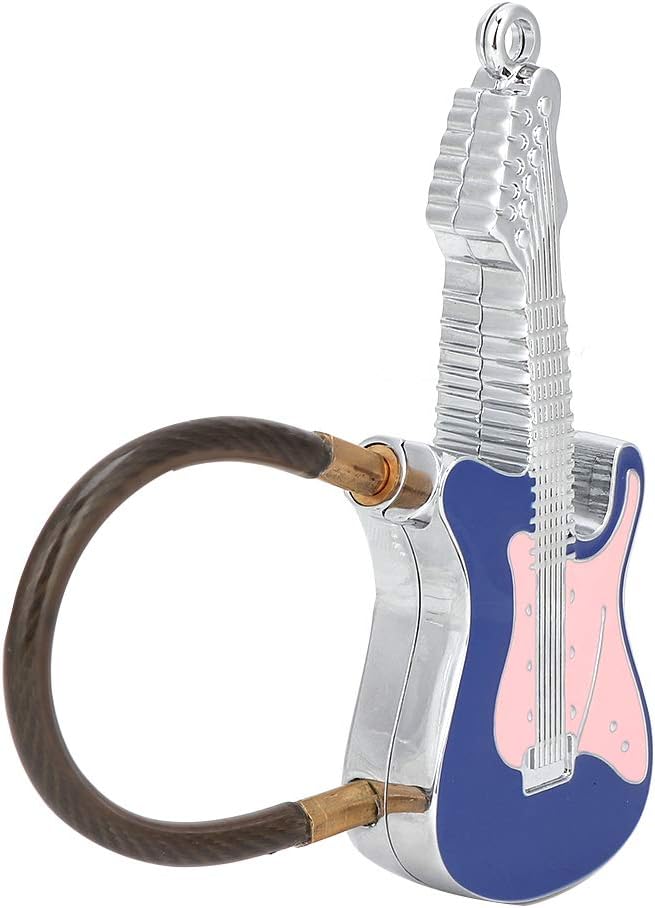
Figure 4.1: The 01 Fingerprint Smart Padlock, featuring a unique guitar-shaped body and a flexible cable shackle. The fingerprint sensor is located on the front of the guitar body.

Figure 4.2: Rear view of the 01 Fingerprint Smart Padlock, highlighting its sleek metal construction.
- Fingerprint Sensor: Located on the front of the guitar body, used for fingerprint recognition.
- Cable Shackle: Flexible steel cable for securing items.
- USB Charging Port: Typically located on the side or bottom for charging the internal battery.
- Indicator Light: Provides status feedback (e.g., charging, unlocking, fingerprint registration).
5. Setup
5.1 Charging the Lock
Before first use, fully charge the fingerprint lock.
- Connect the provided USB cable to the lock's charging port.
- Connect the other end of the USB cable to a USB power adapter (e.g., phone charger, computer USB port).
- The indicator light will typically show red during charging and turn off or green when fully charged.
- A full charge provides up to 2 months of working time.

Figure 5.1: The lock features low power consumption and a long-lasting built-in lithium battery, easily rechargeable via USB.
5.2 Registering the First Fingerprint (Administrator)
The first fingerprint registered will be the administrator fingerprint, which is required to add or delete other user fingerprints.
- Ensure the lock is charged.
- Press and hold the fingerprint sensor for approximately 5-8 seconds until the indicator light turns blue and flashes.
- Lift your finger and then repeatedly place and lift the same finger on the sensor from different angles (typically 5-10 times) until the indicator light turns green. This registers your fingerprint.
- If registration fails, the light may flash red. Try again.
- Once the first fingerprint is successfully registered, the lock is ready for use.
5.3 Registering Additional Fingerprints (Users)
The lock can store up to 10 fingerprints in total (1 administrator + 9 users).
- Wake up the lock by touching the sensor briefly.
- Place the administrator's registered finger on the sensor. Once recognized (green light), keep the administrator's finger on the sensor.
- While the administrator's finger is still on the sensor, the light will turn blue and flash. Now, remove the administrator's finger.
- Immediately place the new user's finger on the sensor and repeatedly place and lift it from different angles (5-10 times) until the indicator light turns green.
- Repeat for all desired user fingerprints.
6. Operating the Lock
6.1 Unlocking
To unlock the padlock:
- Place a registered finger on the fingerprint sensor.
- The indicator light will turn green, and the lock will unlock within 0.03 seconds.
- If the fingerprint is not recognized, the light will flash red. Try again with a registered finger.

Figure 6.1: Unlock the padlock quickly and easily by placing a registered finger on the sensor. The lock boasts a recognition time of less than 0.03 seconds.
6.2 Locking
To lock the padlock, simply push the cable shackle back into the lock body until it clicks into place. The lock will automatically secure itself.
6.3 Deleting All Fingerprints
To reset the lock and delete all registered fingerprints:
- Place the administrator's registered finger on the sensor and hold it.
- The indicator light will turn blue, then flash blue, and eventually turn red and flash rapidly.
- While the red light is flashing, remove the administrator's finger. All fingerprints are now deleted.
- You will need to register a new administrator fingerprint to use the lock again (refer to Section 5.2).
7. Maintenance
Proper maintenance ensures the longevity and optimal performance of your fingerprint lock.
- Cleaning: Wipe the lock body and fingerprint sensor with a soft, dry cloth. Do not use abrasive cleaners or solvents.
- Battery Care: Recharge the lock when the low battery indicator appears (if applicable) or when performance degrades. Avoid completely draining the battery for extended periods.
- Storage: Store the lock in a cool, dry place when not in use.
- Water Resistance: The lock is rated IP66 weatherproof, meaning it is protected against powerful water jets. However, it is not designed for submersion. Avoid prolonged exposure to heavy rain or direct water spray.

Figure 7.1: The 01 Fingerprint Smart Padlock boasts an IP66 weatherproof rating, providing protection against dust and strong water jets, making it suitable for various environments.
8. Troubleshooting
If you encounter issues with your fingerprint lock, refer to the following common problems and solutions:
| Problem | Possible Cause | Solution |
|---|---|---|
| Lock does not unlock. | Fingerprint not recognized; low battery. | Ensure your finger is clean and dry. Try different angles. Recharge the lock. Ensure you are using a registered fingerprint. |
| Cannot register new fingerprints. | Not using administrator fingerprint; memory full. | Ensure you are using the administrator fingerprint to initiate registration. The lock stores up to 10 fingerprints; consider deleting old ones if full. |
| Indicator light not working. | Low battery; device malfunction. | Charge the lock. If the issue persists after charging, contact customer support. |
| Lock is unresponsive. | Completely drained battery. | Connect to a power source and allow it to charge for at least 30 minutes before attempting to use it. |
9. Specifications
Detailed technical specifications for the 01 Fingerprint Smart Padlock.
| Feature | Detail |
|---|---|
| Brand | 01 |
| Model Number | 01e7ay8zq01i6332 |
| Material | Metal |
| Lock Type | Biometric (Fingerprint) |
| Fingerprint Recognition | Support 360° arbitrary direction push type |
| Recognition Time (Unlocking) | <0.03 seconds |
| False Rejection Rate (FRR) | <1% |
| False Acceptance Rate (FAR) | <0.002% |
| Fingerprint Storage Capacity | 10 groups (1 administrator + 9 users) |
| Battery Type | Built-in 100MAH Polymer Lithium Battery |
| Battery Life | Up to 2 months after full charge |
| Charging Port | USB |
| Working Temperature | -20°C to +50°C |
| Weatherproof Rating | IP66 |
| Dimensions (approx.) | 85 x 32 x 12 mm / 3.35 x 1.26 x 0.47 inches |
| Weight (approx.) | 54 g / 1.9 oz |
| Wirerope Expanded Length (approx.) | 12 cm / 4.7 inches |

Figure 9.1: The compact and lightweight design of the lock makes it suitable for securing various items like backpacks.

Figure 9.2: The lock's portable nature allows it to be used on luggage, providing security for personal belongings during travel.
10. Warranty and Support
The manufacturer provides a warranty for this product. Please refer to the warranty card included in your package for specific terms and conditions.
For technical support, troubleshooting assistance, or warranty claims, please contact the retailer or manufacturer directly. Contact information can typically be found on the product packaging or the retailer's website.
Note: The product description mentions a "100% WARRANTY" for 90 days for unconditional return and refund. For specific details, please refer to the purchase platform or contact the seller.