Introduction
Thank you for choosing the DROK 0-24V 20A 480W Buck Converter. This adjustable DC power supply is designed for various applications requiring a stable and variable DC voltage output. This manual provides essential information for the safe and efficient operation of your device, including setup, operating instructions, maintenance, and troubleshooting.
Safety Information
Please read and understand all safety instructions before operating this device. Failure to follow these instructions may result in electric shock, fire, or serious injury.
- Input Voltage Selection: Before connecting the power supply to the mains, ensure the 110V/220V input voltage selector switch is set correctly for your local power grid. Incorrect selection can cause severe damage to the unit.
- Proper Wiring: All wiring connections must be secure and made with appropriate gauge wires to handle the maximum current. Loose connections can lead to overheating and fire hazards.
- Ventilation: Ensure adequate ventilation around the power supply. Do not block the cooling fan or air vents. Overheating can reduce performance and lifespan.
- Indoor Use Only: This device is designed for indoor use in a dry environment. Do not expose it to moisture, rain, or excessive humidity.
- Grounding: Always connect the ground terminal to a proper earth ground to prevent electric shock.
- Professional Installation: If you are unsure about wiring or electrical safety, consult a qualified electrician.
- Load Compatibility: Ensure the connected load does not exceed the maximum output current of 20A.
Product Overview
The DROK 24V 480W Power Supply is a versatile and robust device featuring a wide adjustable output voltage range and comprehensive protection mechanisms.
Key Features:
- Adjustable Output Voltage: Provides a DC output voltage range from 0V to 24V, with a precision of 0.1V, suitable for various 5V, 9V, 12V, and 24V devices.
- Dual LED Display: Equipped with an LED screen that clearly displays both the output voltage and output current in real-time.
- Efficient Cooling: Features an integrated heat sink and an automatic cooling fan to maintain optimal operating temperature, activating with minimal noise during high power operation.
- Protection Mechanisms: Includes Over Load Protection, Over Voltage Protection, and Short Circuit Protection to safeguard connected devices and the power supply itself.
- Easy Operation: Simple to use with a built-in potentiometer for adjusting output parameters. No complex installation required.
Components:
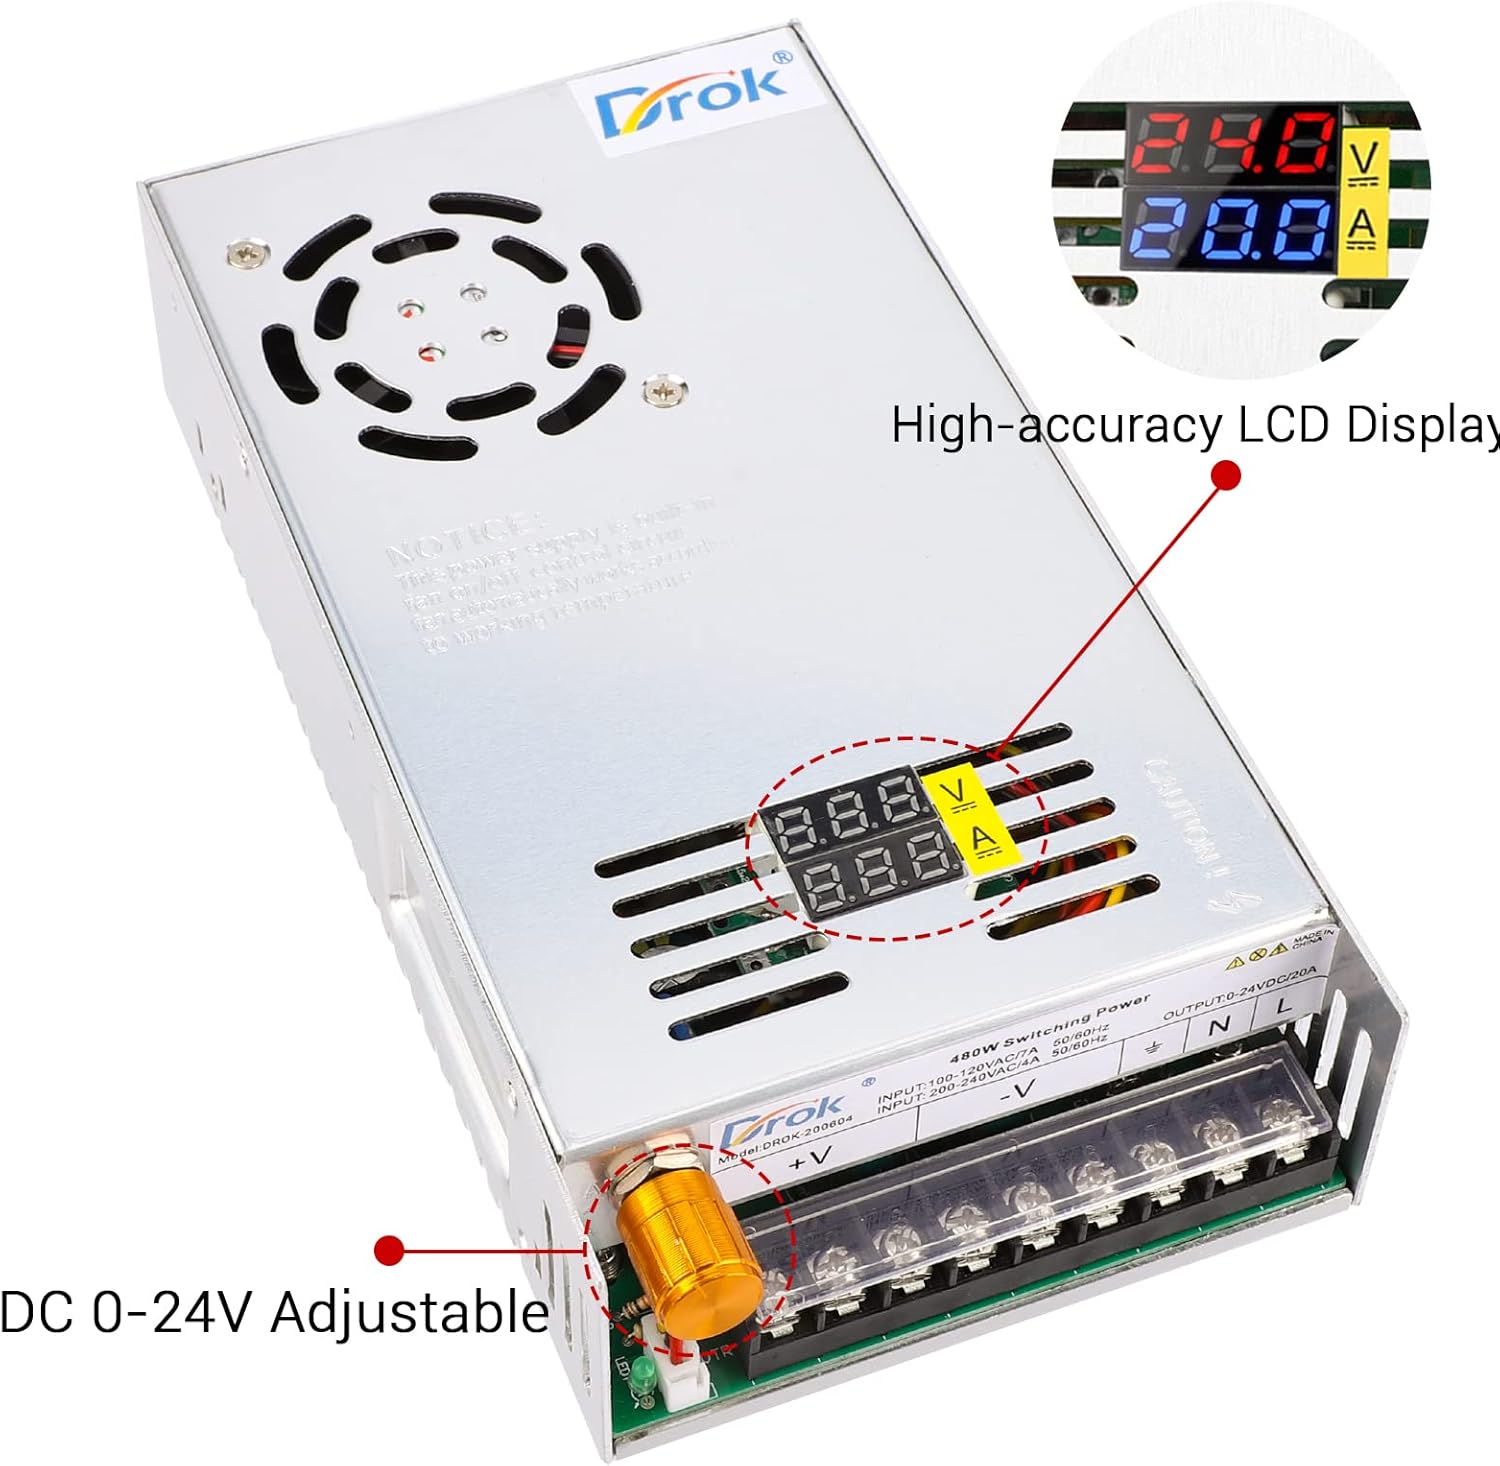
Figure 1: Front view of the DROK 24V Power Supply, highlighting the adjustable voltage knob and the dual LED display for voltage and current. The display shows output voltage in volts (V) and output current in amperes (A).

Figure 2: Detailed view of the terminal block connections. From left to right, these include output terminals for positive (+V) and negative (-V) DC, and input terminals for Neutral (N), Line (L), and Earth Ground. The voltage adjustment potentiometer is also visible.

Figure 3: Dimensional drawing of the DROK 24V Power Supply, showing its length (214mm / 8.42in), width (112.82mm / 4.44in), and height (49.5mm / 1.95in). This image also indicates the location of the 110V/220V input voltage selector switch.
Setup
1. Initial Inspection
Unpack the power supply and inspect it for any signs of physical damage. If any damage is found, do not proceed with installation and contact customer support.
2. Input Voltage Selection (CRITICAL STEP)
The power supply has a switch to select between 110V AC and 220V AC input voltage. Before connecting the power supply to any AC source, ensure this switch is set to match your local mains voltage. The default setting may be 220V. Refer to Figure 3 for the location of this switch.
- For 110V-120V AC regions (e.g., North America), set the switch to 110V.
- For 220V-240V AC regions (e.g., Europe, Middle East), set the switch to 220V.
WARNING: Operating the unit with an incorrect voltage selection can cause irreversible damage to the power supply and connected devices.
3. Wiring Connections
Refer to Figure 2 for the terminal block layout. Ensure all connections are made securely and correctly.
- AC Input:
- Connect the Live (L) wire from your AC source to the 'L' terminal.
- Connect the Neutral (N) wire from your AC source to the 'N' terminal.
- Connect the Earth Ground wire to the '⊗' (ground) terminal.
- DC Output:
- Connect the positive (+) wire of your load to the '+V' terminal.
- Connect the negative (-) wire of your load to the '-V' terminal.
Use appropriate wire gauges for your application. For the maximum 20A output, ensure wires are capable of handling this current safely.
Operating Instructions
1. Powering On
After all connections are made and the input voltage switch is correctly set, apply AC power to the unit. The dual LED display will illuminate, showing the current output voltage and current.
2. Adjusting Output Voltage
Rotate the potentiometer knob (refer to Figure 1) to adjust the DC output voltage. Turn clockwise to increase voltage and counter-clockwise to decrease it. The LED display will show the adjusted voltage in real-time. The voltage precision is 0.1V.
3. Monitoring Output
The dual LED display provides continuous monitoring of the output voltage (in Volts) and the current drawn by the load (in Amperes). Note that the maximum current is 20A, but the actual current displayed will depend on the connected load and cannot be regulated directly by the power supply.
Maintenance
- Cleaning: Keep the power supply clean and free from dust. Use a soft, dry cloth for cleaning. Do not use liquid cleaners or solvents.
- Ventilation: Regularly check that the cooling fan and ventilation openings are not obstructed. Ensure proper airflow to prevent overheating.
- Fan Operation: The cooling fan operates automatically when the internal temperature reaches a certain threshold, especially during high power output. A slight noise from the fan is normal during operation.
- Storage: When not in use for extended periods, store the power supply in a cool, dry place away from direct sunlight and moisture.
Troubleshooting
If you encounter issues with your DROK power supply, refer to the table below for common problems and solutions.
| Problem | Possible Cause | Solution |
|---|---|---|
| No power, display off | No AC input; Incorrect input voltage switch setting; Internal fuse blown. | Check AC power connection. Verify 110V/220V switch setting. If fuse is suspected, contact support. |
| No DC output voltage | Output short circuit; Overload protection activated; Voltage set to 0V. | Check load for short circuits. Reduce load if overloaded. Adjust voltage potentiometer. |
| Incorrect output voltage displayed | Potentiometer not adjusted correctly. | Rotate the voltage adjustment potentiometer until the desired voltage is displayed. |
| Cooling fan not running | Low power output (fan activates automatically at higher temperatures/loads); Fan obstructed. | This is normal for low loads. If unit is hot and fan is not running, check for obstructions. |
| Output current is lower than expected | Load resistance is too high; Overload protection. | The current is determined by the load. Ensure your load is drawing the expected current. Check for overload conditions. |
Specifications
| Specification | Value |
|---|---|
| Model Number | 20050 |
| Input Voltage | AC 110V/220V (selectable) |
| Output Voltage | DC 0-24V (adjustable) |
| Output Current | 20A (maximum) |
| Output Power | 480W |
| Voltage Precision | 0.1V |
| Product Dimensions | 5 x 11.5 x 5 cm (5D x 11.5W x 5H centimeters) |
| Weight | 848 g |
| Safety Standard | UL |
| Mounting Type | Surface Mount |
Warranty and Support
Warranty Information
This DROK power supply comes with a 1-year warranty from the date of purchase. This warranty covers manufacturing defects and ensures the product performs as described under normal use. Please retain your proof of purchase for warranty claims.
Customer Support
For technical assistance, troubleshooting beyond this manual, or warranty inquiries, please contact DROK customer service. You can typically find contact information on the official DROK website or through your original retailer. When contacting support, please have your product model number (20050) and purchase details ready.


