
Introduction
Thank you for purchasing the TOFU Laser Christmas Projector Lights Outdoor. This manual provides essential information for the safe and effective operation, installation, and maintenance of your projector. Please read these instructions thoroughly before use and retain them for future reference.
Safety Information
- Laser Radiation: This product emits laser radiation. Avoid direct eye exposure to the laser beam. Do not stare into the aperture.
- Power Source: Use only the provided power adapter. Ensure the voltage matches the product specifications.
- Outdoor Use: The projector is designed for outdoor use and is IP65 waterproof. However, ensure the power adapter connection is protected from direct water exposure.
- Temperature Range: Operate the projector within the specified temperature range of -20°C to 40°C (-4°F to 104°F).
- Children: Keep the projector and its accessories out of reach of children.
- Ventilation: Do not cover the projector during operation to ensure proper ventilation.
Product Overview and Package Contents
The TOFU Laser Christmas Projector is designed to display festive patterns for various occasions. Before installation, verify that all components are present and undamaged.

Image: The product packaging list showing the projector unit, ground stake, round base, power adapter, remote control, and user manual.
Package Includes:
- Laser Projector Unit
- Ground Stake
- Round Base
- Power Adapter
- Remote Control
- Instruction Manual
Specifications
| Feature | Specification |
|---|---|
| Model Number | Li00025US |
| Dimensions (L x W x H) | 7.11 x 6.35 x 27.94 cm |
| Weight | 521.91 grams (18.41 Ounces) |
| Voltage | 120 Volts |
| Max Light Source Power | 6 Watts |
| Number of Light Sources | 1 |
| Color Rendering Index (CRI) | 95 |
| Waterproof Rating | IP65 (Projector Unit) |
| Operating Temperature | -20°C to 40°C (-4°F to 104°F) |
Setup
1. Installation Methods
The projector offers three primary installation options to suit your needs:
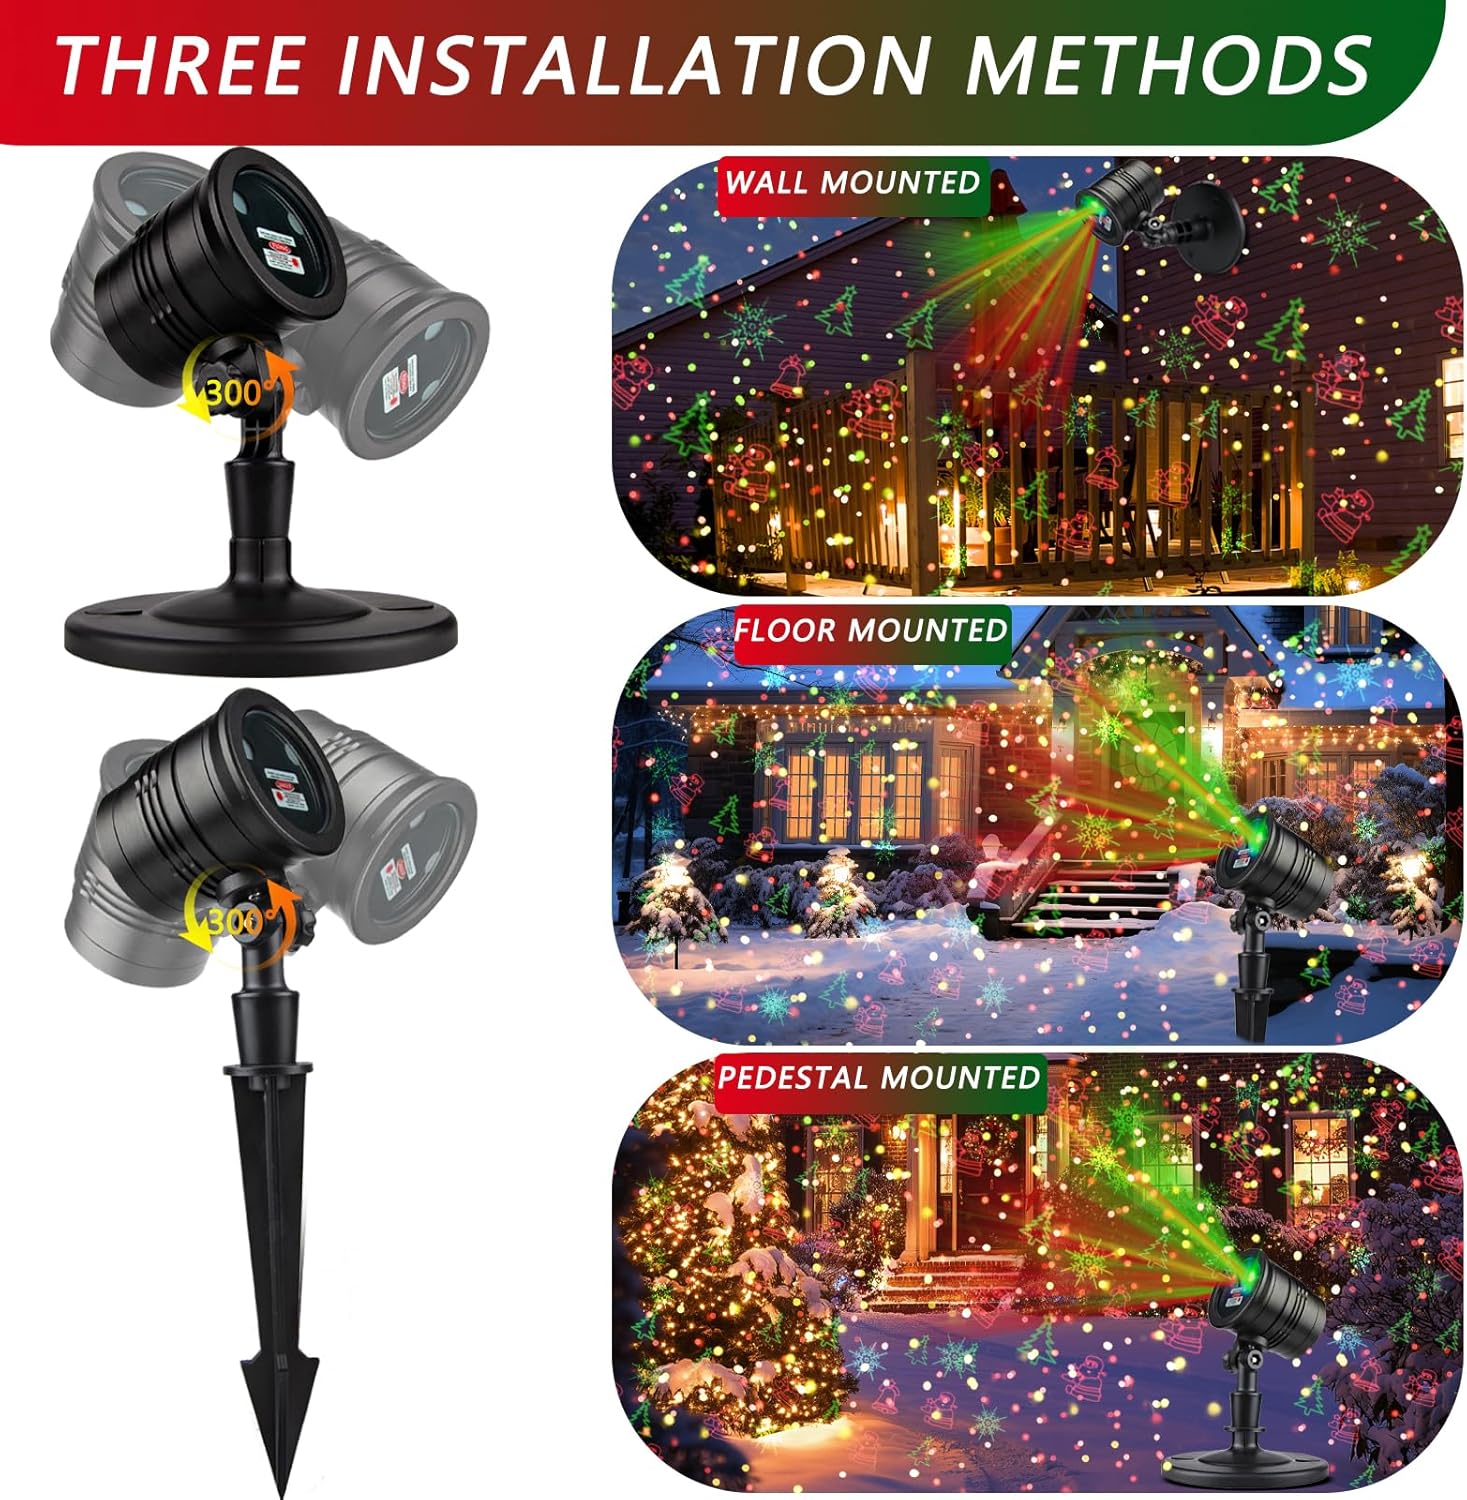
Image: Visual guide demonstrating three installation methods: wall-mounted, floor-mounted (using the round base), and pedestal-mounted (using the ground stake).
- Ground Stake Installation: Attach the projector to the ground stake. Insert the stake firmly into soft ground (e.g., lawn, garden bed). Adjust the projection angle as desired.
- Round Base Installation: Attach the projector to the round base. Place the base on a flat, stable surface such as a patio, deck, or indoor floor.
- Wall Mounted Installation: Secure the round base to a wall using appropriate screws (not included). Attach the projector to the mounted base and adjust the angle.
2. Placement Considerations
Optimal projection results depend on distance and coverage area.

Image: A graph illustrating the relationship between projection distance and the resulting coverage area. For example, at 9.8ft, coverage is approximately 487.5 sq.ft, while at 33ft, it can reach up to 3900 sq.ft.
- Projection Distance: Position the projector at a distance that achieves your desired coverage area. Refer to the provided chart for guidance.
- Angle Adjustment: The projector head can be rotated up to 300 degrees to direct the light patterns precisely.
3. Power Connection
Connect the power adapter to the projector and then plug the adapter into a standard 120V outdoor-rated power outlet. Ensure the connection is secure and protected from moisture.
Operating Instructions
1. Remote Control Functions
The included remote control allows for convenient operation of the projector's features.

Image: A detailed view of the remote control, highlighting buttons for Power On/Off, Light Mode, Light Flash, Rotation Speed (+/-), Run Time Setting (2H, 4H, 6H, 8H), and Cancel Run Time Setting (RESET).
- Power On/Off: Press the power button to turn the projector on or off.
- Light Mode: Cycle through different projection patterns.
- Light Flash: Activate or deactivate the flashing effect.
- Rotation Speed: Use the '+' and '-' buttons to adjust the speed of the rotating patterns.
- Run Time Setting: Set a timer for the projector to automatically turn off after 2, 4, 6, or 8 hours.
- Cancel Run Time Setting (RESET): Press this button to cancel any active timer setting.
2. Usage Environment (Indoor/Outdoor)
The projector is versatile and can be used in various settings.

Image: A collage showing the projector's versatility, with examples of it being used for Christmas decorations, outdoor landscape lighting, and indoor ambiance.
- Outdoor Use: Ideal for projecting patterns onto houses, trees, or garden areas.
- Indoor Use: Can be used to create festive ambiance in rooms or halls.
Maintenance
1. Cleaning
- Ensure the projector is unplugged before cleaning.
- Wipe the exterior with a soft, damp cloth. Do not use abrasive cleaners or solvents.
- Gently clean the lens with a soft, dry cloth to maintain clear projection.
2. Storage
- Store the projector in a cool, dry place when not in use.
- Keep it in its original packaging or a protective container to prevent damage.
3. Weather Resistance
The projector unit is rated IP65 waterproof and designed to withstand various weather conditions.

Image: A four-panel image showing the projector being sprayed with water (IP65 Waterproof), operating in hot conditions (104°F/40°C), and operating in cold, snowy conditions (-4°F/-20°C).
- Waterproof: The projector unit is protected against dust and low-pressure water jets from any direction.
- Temperature: It can operate effectively in temperatures ranging from -20°C to 40°C (-4°F to 104°F).
- Always ensure the power adapter and its connection to the main power source are protected from direct exposure to heavy rain or snow.
Troubleshooting
- No Light Output:
- Check if the power adapter is securely connected to both the projector and the power outlet.
- Ensure the power outlet is functional.
- Verify the projector is turned on using the remote control.
- Patterns Not Moving or Flashing:
- Use the 'Rotation speed' buttons on the remote to adjust movement.
- Press the 'Light flash' button to toggle the flashing effect.
- Remote Control Not Working:
- Ensure there are no obstructions between the remote and the projector.
- Check the battery in the remote control and replace if necessary.
- Dim or Unclear Projection:
- Clean the projector lens.
- Reduce the projection distance to the surface.
- Ensure the ambient light is low for best visibility.
Warranty and Support
This product comes with a standard manufacturer's warranty. For specific warranty details, please refer to the purchase documentation or contact your retailer. If you encounter any issues or require technical assistance, please contact TOFU customer support through your purchase platform.