
Product Overview
The Makita XAG25Z-R is an 18V LXT Brushless Lithium-Ion 4-1/2 inch / 5 inch Cordless X-LOCK Angle Grinder, designed for efficient and durable operation. This tool features advanced technologies for enhanced performance, safety, and user convenience.

Figure 1: Makita XAG25Z-R Cordless X-LOCK Angle Grinder (Tool Only)
Key Features:
- Efficient and Durable Motor: Equipped with a BL Brushless Motor that operates cooler and more efficiently, extending tool life and delivering 8,500 RPM.
- Quick Change System: Features the X-LOCK system for tool-free wheel changes with a simple snap-on mounting and pull release lever.
- Enhanced Safety: Active Feedback-sensing Technology (AFT) automatically shuts off the motor if the wheel rotation is suddenly forced to stop.
- Smart Performance: Automatic Speed Change technology adjusts speed and torque for optimal performance, while soft start ensures smooth start-ups.
- Easy to Use: Tool-less guard adjustment, slide switch with lock-on, rubberized soft grip, and a compact, ergonomic design for operator convenience.

Figure 2: Overview of XAG25Z-R features, highlighting the X-LOCK system, 3-stage L.E.D. battery gauge, slide switch with lock-on, and quick guard rotation.
Safety Information
Always observe basic safety precautions when using power tools to reduce the risk of fire, electric shock, and serious personal injury. Read all warnings and instructions before operating this tool.
- Always wear eye protection, such as safety glasses or goggles, and hearing protection.
- Use appropriate respiratory protection, especially when grinding materials that produce fine dust.
- Ensure the workpiece is securely clamped or held to prevent movement during operation.
- Keep hands and body clear of the rotating wheel.
- Do not operate the grinder without the guard properly installed and adjusted.
- Disconnect the battery pack before making any adjustments, changing accessories, or storing the tool.
- Be aware of the Active Feedback-sensing Technology (AFT) which will shut off the motor if the wheel binds. This is a safety feature.
Setup
1. Battery Installation
This tool is sold as "Tool Only" and requires an 18V LXT Lithium-Ion battery (not included). Ensure the battery is fully charged before use.
- Align the battery pack with the battery port on the tool.
- Slide the battery into the port until it clicks securely into place.
- To remove, press the release button on the battery pack and slide it out.
2. X-LOCK Wheel Installation and Removal
The X-LOCK system allows for quick, tool-free accessory changes.
Installation:
- Ensure the tool is off and the battery is removed.
- Align the X-LOCK interface on the accessory (grinding wheel, cutting disc, etc.) with the X-LOCK flange on the grinder.
- Press the accessory firmly onto the flange until it clicks into place. A distinct click indicates it is securely locked.

Figure 3: Installing an X-LOCK accessory by pressing it onto the grinder's flange.
Removal:
- Ensure the tool is off and the battery is removed.
- Locate the X-LOCK release lever on the grinder.
- Pull the release lever to disengage the accessory. The accessory will then lift off easily.
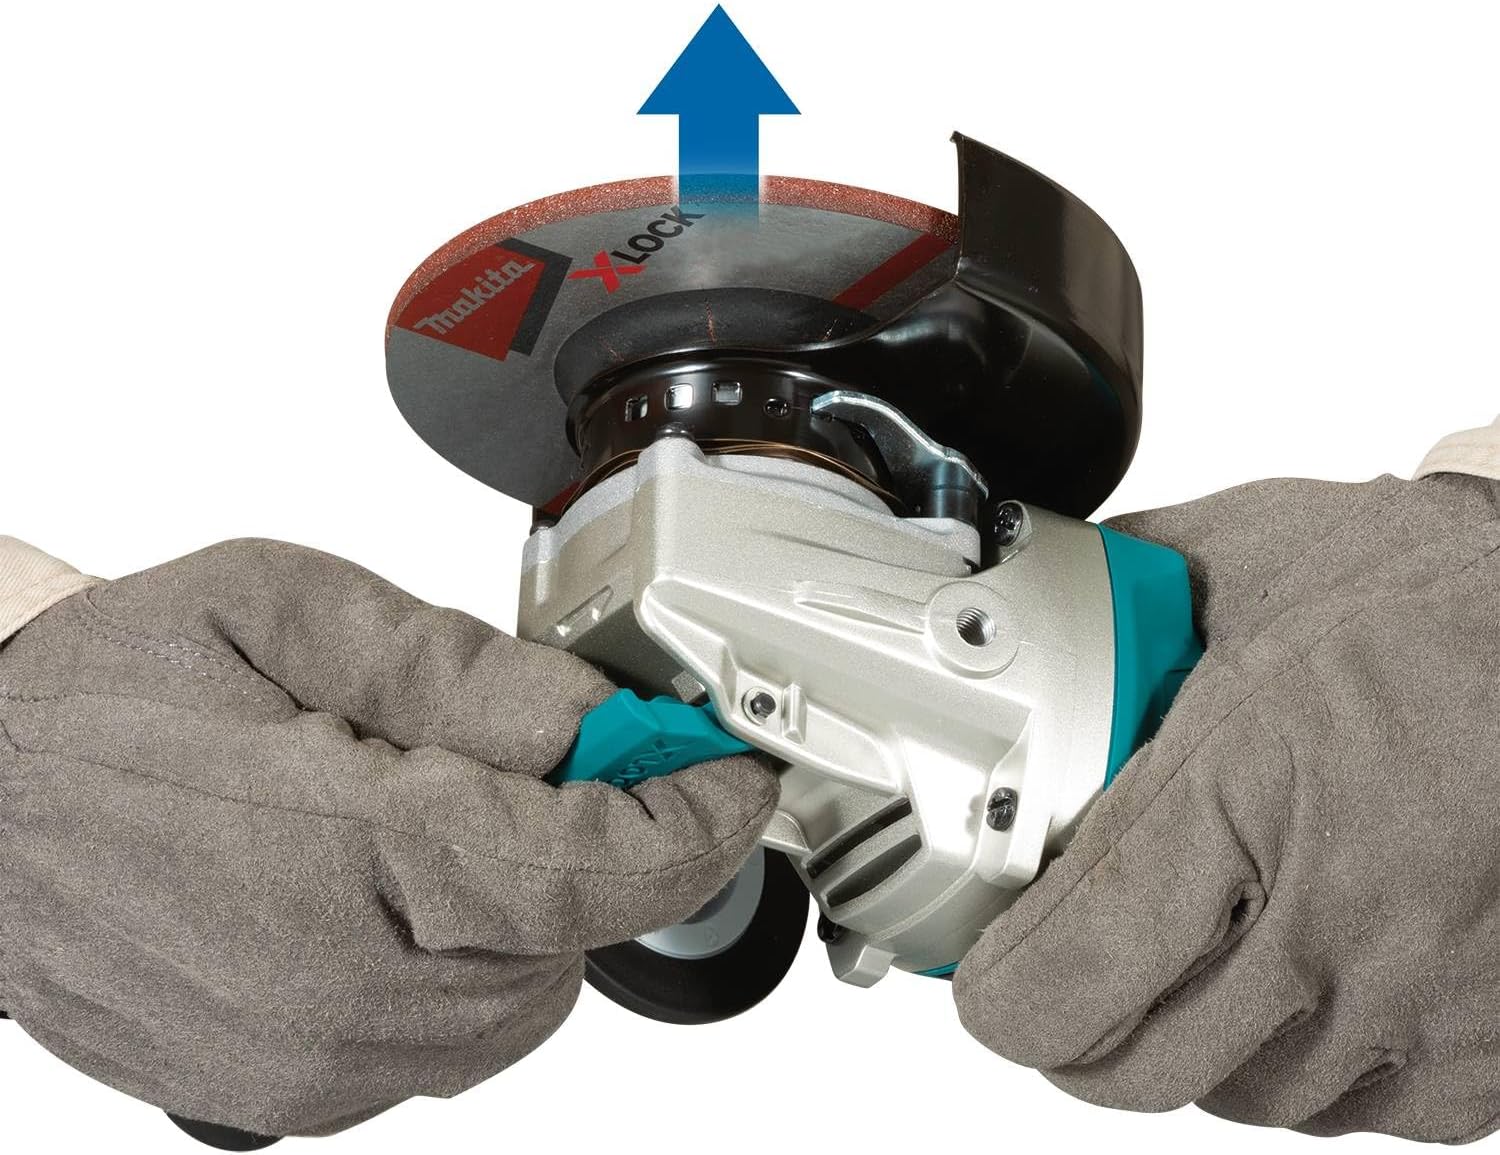
Figure 4: Removing an X-LOCK accessory by pulling the release lever.

Figure 5: The X-LOCK mechanism on the grinder, visible after the accessory has been removed.
3. Guard Adjustment
The guard can be adjusted quickly without tools for enhanced productivity and safety.
- Ensure the tool is off and the battery is removed.
- Locate the guard adjustment lever or button.
- Press or release the mechanism and rotate the guard to the desired position to protect against sparks and debris.
- Release the mechanism to lock the guard in place.
Operating Instructions
1. Powering On/Off
The grinder features a slide switch with a lock-on function for continuous operation.
- To turn on: Slide the switch forward. For continuous operation, push the front of the switch down to engage the lock-on feature.
- To turn off: If locked on, push the rear of the switch to release the lock-on and slide it back to the OFF position. If not locked on, simply slide the switch back to the OFF position.
2. Battery Charge Level Indicator
The 3-stage L.E.D. gauge indicates the battery charge level, allowing you to monitor power during operation.

Figure 6: The 3-stage L.E.D. gauge indicating battery charge level.
- Three lights: Full charge.
- Two lights: Medium charge.
- One light: Low charge, recharge battery soon.
- Flashing one light: Battery almost depleted, recharge immediately.
3. Automatic Speed Change Technology
This technology automatically adjusts the motor speed and torque during operation based on the load, ensuring optimum performance and efficiency for various applications.
4. Active Feedback-sensing Technology (AFT)
AFT is a safety feature that turns the motor off if the wheel rotation is suddenly forced to stop (e.g., due to kickback or binding). This helps prevent injury and damage to the tool.

Figure 7: Active Feedback-sensing Technology (AFT) for enhanced safety.
Maintenance
Regular maintenance ensures the longevity and optimal performance of your Makita angle grinder.
1. General Cleaning
- Always disconnect the battery pack before cleaning.
- Clean the tool's air vents regularly to prevent overheating. Use compressed air if available.
- Wipe down the tool with a soft, damp cloth. Do not use harsh chemicals or abrasive cleaners.
- Remove any debris or dust from the X-LOCK flange and guard mechanism.
2. Brushless Motor
The BL Brushless Motor eliminates carbon brushes, meaning there are no brushes to inspect or replace, simplifying maintenance and extending motor life.

Figure 8: Internal view of the Brushless Motor, which runs cooler and more efficiently.
3. Storage
Store the tool in a clean, dry place, out of reach of children. Remove the battery pack before storing for extended periods.
Troubleshooting
| Problem | Possible Cause | Solution |
|---|---|---|
| Tool does not start. | Battery not inserted correctly or discharged. | Ensure battery is fully seated. Check battery charge level using the LED indicator and recharge if necessary. |
| Tool stops suddenly during operation. | Active Feedback-sensing Technology (AFT) activated due to wheel binding or overload. | Release the switch, remove the tool from the workpiece, and clear any obstruction. Restart the tool. Reduce pressure or adjust cutting angle. |
| Reduced power or performance. | Low battery charge. Overheating. | Recharge battery. Allow tool to cool down. Ensure air vents are clear. |
| X-LOCK accessory not locking securely. | Debris in X-LOCK mechanism. Accessory not fully aligned. | Clean the X-LOCK flange on the tool and the accessory. Ensure proper alignment and press firmly until a click is heard. |
Specifications
| Attribute | Value |
|---|---|
| Brand | Makita |
| Model Number | XAG25Z |
| Power Source | Battery Powered (18V LXT Lithium-Ion) |
| Maximum Rotational Speed | 8,500 RPM |
| Item Weight | 4.19 pounds (approx. 1900 Grams) |
| Package Dimensions | 14.48 x 12.8 x 5.83 inches |
| UPC | 656942368885 |
| Special Features | BL Brushless Motor, X-LOCK Quick Change System, Active Feedback-sensing Technology (AFT), Automatic Speed Change Technology, Tool-less Guard Adjustment |
Warranty and Support
This Makita XAG25Z-R angle grinder comes with a 90 days limited warranty. This warranty covers defects in material and workmanship under normal use.
For warranty claims, technical support, or service inquiries, please contact Makita customer service or visit their official website. Keep your proof of purchase for warranty validation.
For the most up-to-date support information, please refer to the official Makita website or the documentation included with your product at the time of purchase.


