
Introduction
Thank you for choosing the Toolour Helping Hands Soldering Clamp. This versatile tool is designed to assist with various precision tasks such as soldering, welding, repairing, and DIY projects. It features a 19.7-inch magic arm with flexible articulating joints, equipped with multiple clamps to securely hold components like PCBs, hot air guns, wires, and glass, freeing your hands for detailed work. This manual provides essential information on product components, setup, operation, maintenance, and troubleshooting to ensure optimal performance and longevity of your device.
Package Contents
Carefully unpack the box and ensure all items listed below are present and in good condition.
- 1 x 19.7-inch Magic Arm
- 1 x 2.16-inch Camera Mount Clamp with 1/4" and 3/8" threads
- 1 x 2.56-inch Metal Desk Clamp
- 2 x Replaceable Rubber Pads

Figure 1: Package Contents
Product Features
- 19.7-inch Adjustable Magic Arm: Constructed from lightweight aluminum alloy, this articulating arm provides extended reach and stability. The intermediate meshing teeth and wing nut design ensure secure positioning.
- Multifunction Super Clamps: Includes a 2.16-inch camera mount clamp with 1/4" and 3/8" threads for attaching various equipment, and a 2.56-inch bidirectional metal desk clamp for secure mounting to surfaces up to 2.56 inches thick.
- 360° Rotating Ball Heads: Features ball head joints that allow for 360-degree rotation, enabling precise angle adjustments for optimal working positions.
- Protective Rubber Pads: Soft rubber pads on the clamps prevent scratching of delicate items and enhance grip stability. Replaceable pads are included for long-term use.
- Optimal Load Bearing: Designed to securely hold items weighing less than 2.2 lbs (1 kg).

Figure 2: Product Overview

Figure 3: 360° Rotating Design

Figure 4: Clamp Thread Holes and Opening Range
Video 1: Demonstration of the Toolour Magic Arm's flexibility and stability, showcasing its 360-degree adjustability and secure clamping mechanism.
Setup Instructions
- Attach the Metal Desk Clamp: Secure the 2.56-inch metal desk clamp to the edge of a stable workbench or table. Ensure the surface thickness does not exceed 2.56 inches. Tighten the screw firmly until the clamp is stable.
- Connect the Magic Arm: Insert one end of the 19.7-inch magic arm into the designated slot on the metal desk clamp. Tighten the wing nut on the magic arm to secure it in place.
- Attach the Super Clamp: Connect the 2.16-inch super clamp to the other end of the magic arm using the 1/4" screw. Ensure it is tightened securely.
- Adjust Position: Loosen the wing nuts on the magic arm's ball joints to adjust the arm to your desired angle and position. Once positioned, tighten the wing nuts to lock the arm in place.
- Apply Rubber Pads: If not already installed, place the replaceable rubber pads inside the jaws of the super clamp and the desk clamp to protect your workpieces and enhance grip.

Figure 5: Example Setup for Soldering
Operating Instructions
- Secure the Base: Ensure the metal desk clamp is firmly attached to a stable surface.
- Position the Magic Arm: Loosen the wing nuts on the magic arm to adjust its length and angle. The 360° rotating ball heads allow for flexible positioning.
- Clamp Your Workpiece: Use the super clamp to hold your desired item, such as a PCB, hot air gun, wires, or glass. Ensure the item is within the clamp's 2.16-inch opening range and does not exceed the 2.2 lbs (1 kg) weight limit. The rubber pads will help secure the item and prevent damage.
- Lock Position: Once the workpiece is securely clamped and positioned, tighten all wing nuts on the magic arm and clamps to lock them in place. This prevents movement during your work.
- Begin Work: With your workpiece held steadily, you can now perform tasks like soldering, welding, or detailed repairs with both hands free.

Figure 6: Various Applications of the Helping Hands Clamp

Figure 7: Multifunctional Use Cases
Maintenance
- Cleaning: Wipe down the magic arm and clamps with a dry or slightly damp cloth after each use to remove dust, solder residue, or other debris. Avoid using harsh chemicals that may damage the finish.
- Rubber Pad Replacement: The product includes two replaceable rubber pads. If the existing pads show signs of wear, abrasion, or lose their grip, replace them with the new ones to maintain optimal protection and stability for your workpieces.
- Storage: Store the helping hands clamp in a clean, dry environment when not in use to prevent corrosion and damage.
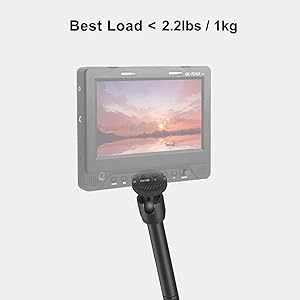
Figure 8: Replaceable Rubber Pads
Troubleshooting
- Arm is not holding position: Ensure all wing nuts on the magic arm's ball joints are fully tightened after adjusting the position. The internal meshing teeth require firm tightening for stability.
- Clamp is slipping on the table: Verify that the metal desk clamp is securely fastened to a stable surface and that the surface thickness is within the 2.56-inch limit. Check if the rubber pads are clean and intact.
- Workpiece is slipping from the super clamp: Ensure the workpiece is properly seated within the clamp jaws and that the clamp is tightened sufficiently. Confirm the workpiece weight does not exceed 2.2 lbs (1 kg). Replace rubber pads if they are worn.
- Difficulty adjusting the arm: Loosen the wing nuts adequately before attempting to reposition the arm. If movement is still stiff, check for any obstructions or debris in the joints.
Specifications
| Attribute | Value |
|---|---|
| Brand | Toolour |
| Model Number | CMS2M-US |
| Item Weight | 1.59 Pounds |
| Magic Arm Length | 19.7 inches (500mm) |
| Max Payload | 2.2 lbs (1 kg) |
| Materials | Aluminum Alloy |
| Super Clamp Opening Range | Up to 2.16 inches (55mm) |
| Desk Clamp Opening Range | Up to 2.56 inches (65mm) |
| Included Components | Magic Arm, Super Clamp, Metal Desk Clamp, Rubber Pads |
Warranty and Support
Toolour provides a 1-year after-sales service for this product. If you encounter any issues or have questions regarding the use, maintenance, or performance of your Toolour Helping Hands Soldering Clamp, please contact our customer support team. We are committed to resolving any problems you may experience.
For assistance, please refer to the contact information provided with your purchase or visit the official Toolour website.