1. Introduction
This manual provides essential information for the safe and efficient operation of your SHINCO WIFI Portable Dehumidifier, model SDZ1-50D. Please read it thoroughly before using the appliance and retain it for future reference. This dehumidifier is designed to remove excess moisture from the air, helping to create a healthier and more comfortable indoor environment. It features a powerful compressor, multiple drainage options, and smart control capabilities.

Figure 1.1: Front view of the SHINCO WIFI Portable Dehumidifier SDZ1-50D. This image displays the unit's compact design, control panel, and visible water tank level indicator.

Figure 1.2: Overview of key features including 50L/day dehumidification, 24-hour timer, automatic humidity capture, and quiet operation.
2. Safety Instructions
Please observe the following safety precautions to prevent injury or damage to the appliance:
- Always connect the unit to a grounded power outlet with the correct voltage (220V).
- Do not operate the dehumidifier with a damaged power cord or plug.
- Keep the appliance away from water and other liquids. Do not immerse it.
- Ensure adequate ventilation around the unit. Do not block air inlets or outlets.
- Do not insert objects into the air vents.
- Unplug the unit before cleaning or performing any maintenance.
- This appliance is not intended for use by persons with reduced physical, sensory, or mental capabilities unless supervised.
- Do not use the dehumidifier in areas where flammable gases or liquids are stored.
3. Product Components
Familiarize yourself with the main parts of your dehumidifier:
- Control Panel with Digital Display
- Air Outlet
- Air Inlet with Filter
- Water Tank (7L capacity)
- Continuous Drainage Outlet
- Lift Pump Drainage Outlet
- Power Cord
- Casters for mobility

Figure 3.1: Rear view showing the continuous drainage port and a top view with the water tank removed, illustrating internal components.
3.1 Control Panel
The control panel allows you to manage all functions of the dehumidifier.

Figure 3.2: Close-up of the control panel, displaying buttons for power, mode selection, humidity adjustment, fan speed, internal cleaning, and timer.

Figure 3.3: Detail of the power button and digital display, which shows current humidity levels or timer settings.
4. Setup
4.1 Unpacking
- Carefully remove the dehumidifier from its packaging.
- Remove all packing materials and ensure no components are missing.
- Inspect the unit for any damage incurred during shipping. If damaged, do not operate and contact customer support.
4.2 Placement
- Place the dehumidifier on a flat, stable surface.
- Ensure there is at least 20 cm (8 inches) of space around the unit for proper airflow.
- Avoid placing the unit near heat sources, in direct sunlight, or in areas exposed to splashing water.
- The unit is equipped with casters for easy movement.
4.3 Power Connection
- Plug the power cord into a suitable 220V grounded electrical outlet.
- Do not use extension cords or multi-plugs.
5. Operating Instructions
5.1 Power On/Off
- Press the Power button (
 ) on the control panel to turn the unit on or off.
5.2 Mode Selection
Press the Mode button () to cycle through available modes:
- Auto Mode: The unit will automatically operate to maintain the set humidity level (30% to 80% RH). It will turn off when the target humidity is reached and restart if humidity rises.
- Laundry Mode: Designed to absorb excess moisture from clothes, reducing drying time.
- Defrost Mode: The unit features an automatic defrost mode for efficient operation even at low temperatures (down to 5°C).
5.3 Humidity Setting
- In Auto Mode, press the Humidity button () to adjust the desired humidity level between 30% and 80% in 5% increments.
5.4 Fan Speed
- Press the Fan Speed button () to select between High and Low fan speeds.
5.5 Timer Function
- Press the Timer button () to set the operating time from 1 to 24 hours. The unit will automatically turn off after the set time.

Figure 5.1: Illustration of the timer function, allowing scheduled operation for convenience.
5.6 Internal Cleaning Function
- Press the Clean button () to activate the internal drying function, which helps prevent mold and odors inside the unit.
5.7 WIFI Control (Smart Home App)
Control your dehumidifier remotely using the Smart Home application on your smartphone.
- Download the "Smart Home" app from your device's app store.
- Follow the in-app instructions to pair your dehumidifier with your Wi-Fi network.
- Once connected, you can power on/off, change modes, set humidity, and manage the timer from your phone.

Figure 5.2: Screenshot of the Smart Home app interface, demonstrating remote control capabilities for the dehumidifier.
6. Drainage Options
Your dehumidifier offers three methods for water removal:
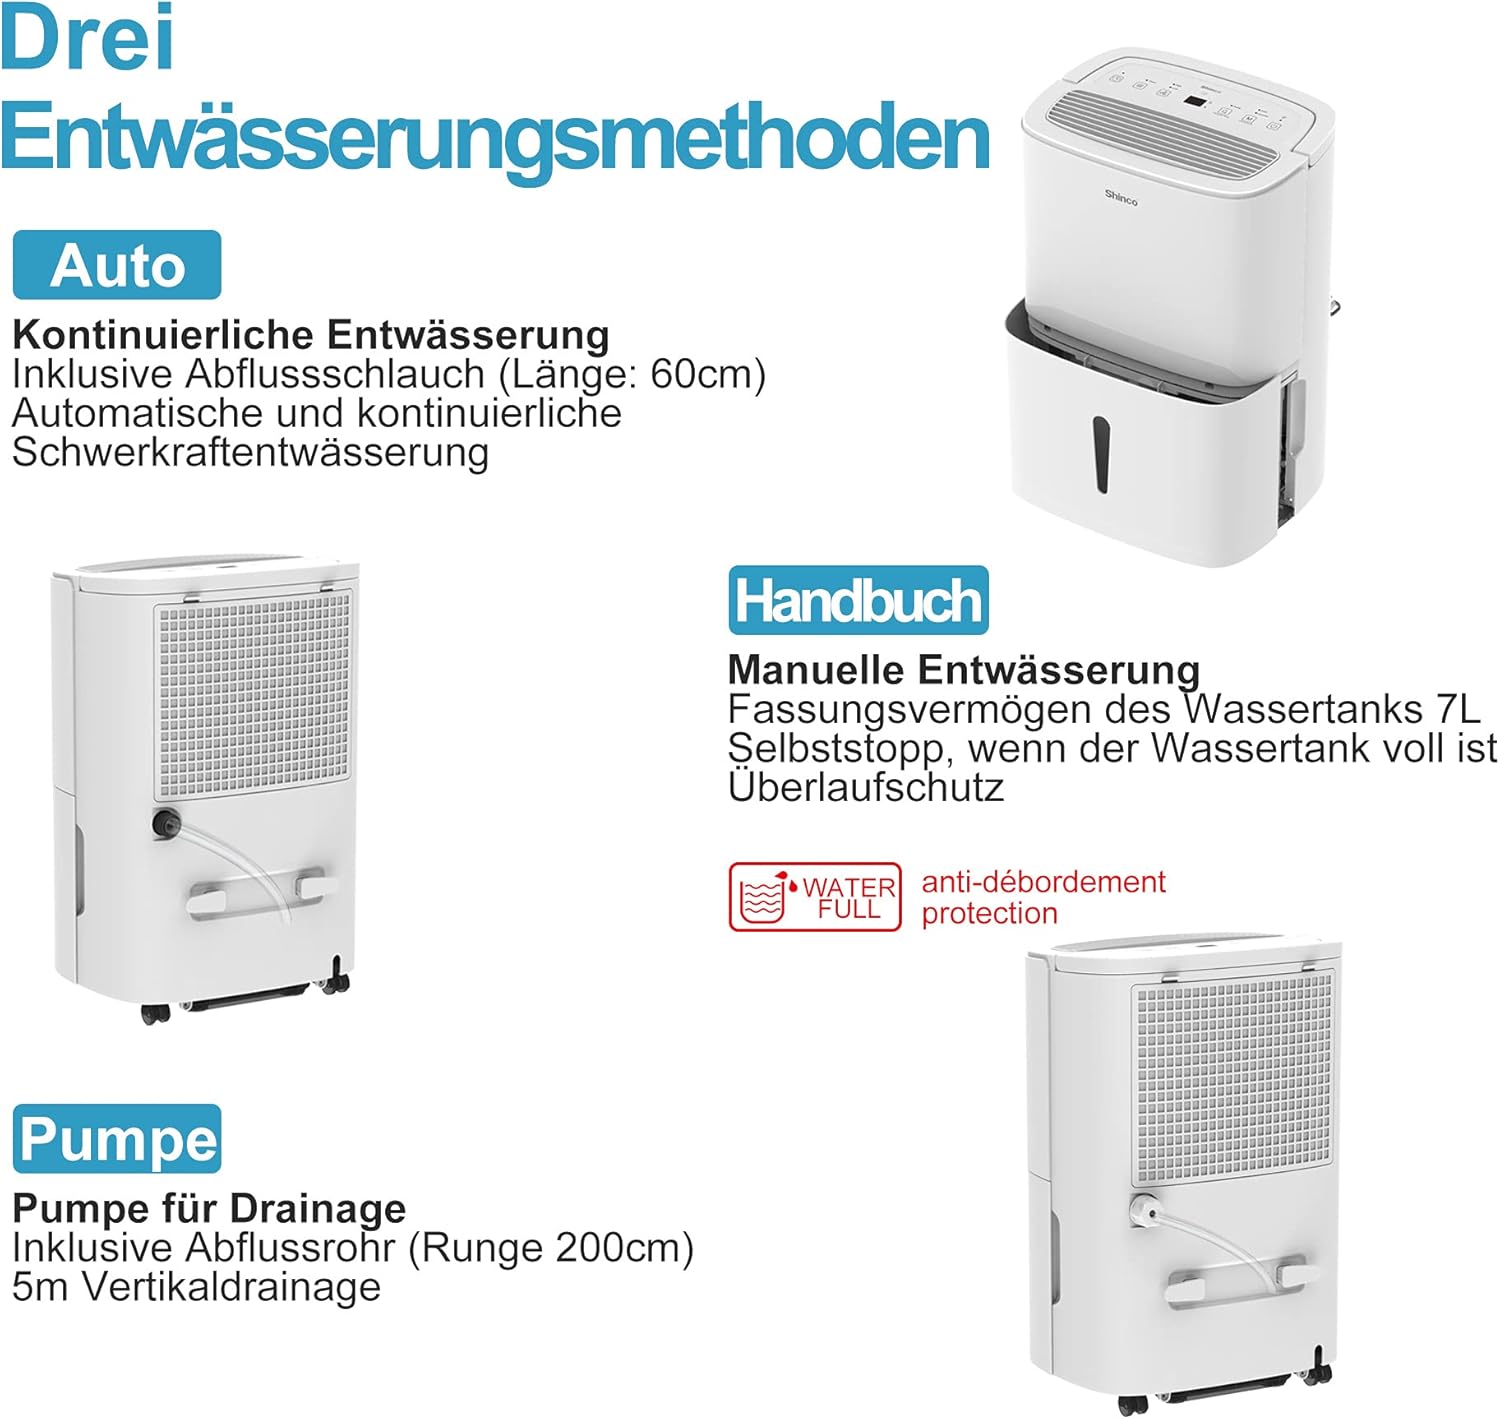
Figure 6.1: Visual representation of the three drainage options: manual tank, continuous gravity drainage, and lift pump drainage.
6.1 Manual Drainage (Water Tank)
- The dehumidifier collects water in its removable 7-liter tank.
- When the tank is full, the unit will automatically stop operating, and an indicator light will illuminate.
- Carefully remove the tank, empty the collected water, and reinsert it securely.

Figure 6.2: The display showing a 'Full' indicator, signaling that the water tank needs to be emptied.
6.2 Continuous Gravity Drainage
- For continuous operation without emptying the tank, attach the provided 60 cm drainage hose to the continuous drainage outlet on the back of the unit.
- Ensure the hose is sloped downwards to allow water to drain by gravity into a floor drain or suitable container.
6.3 Lift Pump Drainage
- The unit includes a lift pump and a 2-meter drainage hose for situations where gravity drainage is not possible.
- Connect the 2-meter hose to the lift pump drainage outlet. The pump can discharge water vertically up to 5 meters.
7. Maintenance
Regular maintenance ensures optimal performance and longevity of your dehumidifier.
7.1 Cleaning the Air Filter
The dehumidifier is equipped with an active carbon filter to purify the air. Clean the filter regularly.
- Turn off and unplug the unit.
- Remove the air filter from the back of the unit.
- Clean the filter with a vacuum cleaner or wash it with warm, soapy water. Rinse thoroughly and allow it to air dry completely before reinserting.
- Replace the filter.

Figure 7.1: Illustration of how to remove and clean the air filter, showing both the pre-filter and the active carbon filter.
7.2 Cleaning the Unit Exterior
- Wipe the exterior of the unit with a soft, damp cloth.
- Do not use harsh chemicals, abrasive cleaners, or solvents.
8. Troubleshooting
If you encounter issues, refer to the following table before contacting customer support:
| Problem | Possible Cause | Solution |
|---|---|---|
| Unit does not turn on | No power supply Power cord not properly connected | Check power outlet and plug connection Ensure the outlet is functional |
| No dehumidification | Water tank full Air filter clogged Room temperature too low | Empty water tank Clean air filter Ensure room temperature is above 5°C |
| Unit is noisy | Unit not on a level surface Air filter clogged | Place unit on a flat, stable surface Clean air filter |
| Water leaks | Water tank not properly inserted Continuous drainage hose loose or blocked | Reinsert water tank correctly Check hose connection and clear any blockages |
| WiFi connection fails | Incorrect Wi-Fi password Router too far App not updated | Verify Wi-Fi password Move unit closer to router or use a Wi-Fi extender Update Smart Home app |
9. Specifications
Technical details for the SHINCO WIFI Portable Dehumidifier SDZ1-50D:
| Feature | Specification |
|---|---|
| Model Number | SDZ1-50D |
| Dehumidification Capacity | 50 Liters/Day |
| Rated Power | 750 Watts |
| Voltage | 220 Volts |
| Water Tank Capacity | 7 Liters |
| Noise Level | 49 dB |
| Dimensions (L x W x H) | 29 x 39.5 x 52 cm |
| Weight | 19 Kilograms |
| Refrigerant | R290 |
| Recommended Room Size | Up to 55 m² (approx. 592 sq ft) |
| Included Components | Dehumidifier, Drain Hose, Instruction Manual |

Figure 9.1: Diagram illustrating the physical dimensions of the dehumidifier and a summary of its technical specifications.
10. Warranty and Support
For warranty information or technical support, please refer to the warranty card included with your product or contact SHINCO customer service through their official website or the contact details provided in your purchase documentation. Please have your model number (SDZ1-50D) and purchase date ready when contacting support.


