1. Introduction
This instruction manual provides detailed guidance for the installation, operation, and maintenance of the FKG Front Load Washer Tub Bearing and Seal Kit, Model GL-963. Please read this manual thoroughly before beginning any installation or repair work to ensure proper procedure and safety.
This kit is designed to replace worn or damaged tub bearings and seals in compatible front-load washing machines, restoring smooth and quiet operation.
2. Product Overview
The FKG Front Load Washer Tub Bearing and Seal Kit (Model GL-963) includes the necessary components to repair the tub bearing system of various front-load washing machines. The kit typically consists of two bearings and one tub seal, along with bearing grease.

Figure 2.1: Complete FKG Tub Bearing and Seal Kit, including two bearings, one seal, and a tube of bearing grease.
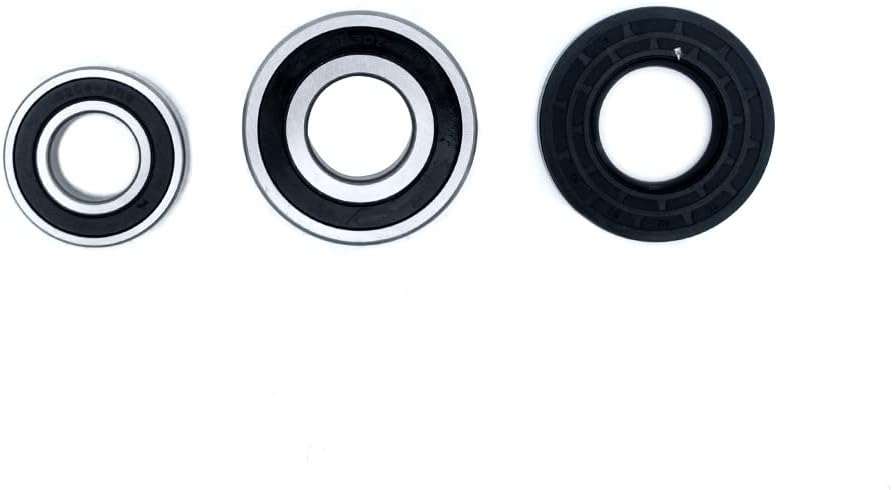
Figure 2.2: Individual components of the kit: two bearings and one tub seal, shown from a top-down perspective.

Figure 2.3: A close-up view of one of the sealed bearings, displaying its part number B607-2RS.

Figure 2.4: A detailed view of the tub seal, showing its design and numerical markings.
3. Compatibility
This FKG tub bearing and seal kit (Model GL-963) is compatible with various front-load washing machine models from Whirlpool, Maytag, Inglis, and Amana. Please verify your appliance's model number against the list below to ensure compatibility.
Replaces Part Numbers: W10285625, 1552638, AH2373033, EA2373033, PS2373033, B00ECV6BPG.
Known Compatible Models:
- Whirlpool Models: WFW9050XW00, WFW9050XW01, WFW9050XW02, WFW9050XW03, WFW9150WW00, WFW9150WW01, WFW9150WW02, WFW9151YW00, YWFW9050XW00, YWFW9050XW01, YWFW9151YW00.
- Maytag Models: MHWE200XW00, MHWE201YW00, MHWE250XL00, MHWE251YG00, MHWE251YL00, MHWZ400TQ03, YMHWE201YW00, YMHWE251YG00, YMHWE251YL00.
- Inglis Models: IFW7300WW00, IFW7300WW01, IFW7300WW02, YIFW7300WW00.
- Amana Models: NFW7300WW00, NFW7300WW01, NFW7300WW02, YNFW7300WW00.
4. Safety Information
WARNING: Always disconnect power to the washing machine before attempting any service or repair. Failure to do so can result in serious injury or death.
- Wear appropriate personal protective equipment (PPE), such as gloves and eye protection.
- Ensure the work area is well-lit and clear of obstructions.
- If you are unsure about any step of the repair process, consult a qualified appliance technician.
- Keep all parts and tools away from children and pets.
5. Setup and Installation
Replacing tub bearings and seals in a front-load washer is a complex procedure that typically requires significant disassembly of the appliance. It is recommended that this repair be performed by individuals with mechanical aptitude and experience in appliance repair.
Required Tools (Not Included):
- Socket wrench set
- Screwdriver set (Phillips and flathead)
- Pliers
- Hammer and punch set
- Bearing puller (may be required)
- Seal driver or appropriate sized pipe/socket for seal installation
- Degreaser and cleaning cloths
General Installation Steps (Consult specific washer service manual for detailed instructions):
- Disconnect Power: Unplug the washing machine from the electrical outlet. Turn off water supply valves.
- Disassemble Washer: Carefully disassemble the washing machine to access the outer tub. This typically involves removing the top panel, control panel, dispenser, front panel, door, door boot, and various hoses and wiring.
- Remove Inner Tub: Once the outer tub is accessible, remove the stator/rotor assembly (if direct drive), then the drive pulley and shaft nut. The inner tub can then be removed from the outer tub.
- Remove Old Bearings and Seal: With the inner tub removed, the old bearings and seal will be visible in the outer tub. Use a punch and hammer to carefully tap out the old bearings from the inside out. Pry out the old tub seal.
- Clean Tub Housing: Thoroughly clean the bearing and seal housing area in the outer tub, removing any old grease, rust, or debris.
- Install New Seal: Apply a thin layer of the provided bearing grease to the new tub seal. Carefully press the new seal into place in the outer tub, ensuring it is seated evenly and flush. A seal driver or a large socket/pipe can assist in this.
- Install New Bearings: Apply a thin layer of the provided bearing grease to the new bearings. Install the new bearings into the outer tub. The smaller bearing usually goes in first, followed by the larger one. Use a bearing driver or a large socket/pipe to gently tap them into place until fully seated. Ensure they are installed straight and not cocked.
- Reassemble Washer: Reassemble the washing machine in reverse order of disassembly. Pay close attention to all connections, hoses, and wiring. Ensure the inner tub spins freely before fully reassembling.
- Test Operation: Once fully reassembled, reconnect water and power. Run a short test cycle to check for leaks and proper operation.
6. Operating Instructions
This product is a replacement part and does not have specific operating instructions beyond its function within the washing machine. Once installed correctly, the washing machine should operate as intended by its manufacturer. Refer to your washing machine's original user manual for operating instructions.
7. Maintenance
The FKG tub bearings and seal are designed for long-term, maintenance-free operation once installed. Regular maintenance of the washing machine itself, such as cleaning the dispenser and drum, can contribute to the overall longevity of all components.
If unusual noises or leaks occur after installation, refer to the troubleshooting section or consult a qualified technician.
8. Troubleshooting
If you encounter issues after installing the FKG Tub Bearing and Seal Kit, consider the following common problems and solutions:
- Loud Noise During Spin Cycle:
Possible Cause: Bearings not fully seated, incorrect bearing installation, or other components (e.g., motor, suspension) are faulty.
Solution: Re-check bearing seating. Ensure no debris is interfering. If noise persists, further diagnosis of other washer components may be necessary.
- Water Leakage:
Possible Cause: Tub seal improperly installed, damaged during installation, or other seals/hoses are leaking.
Solution: Inspect the tub seal for proper seating and damage. Ensure all hoses and clamps reconnected during reassembly are secure and leak-free.
- Washer Not Spinning/Imbalanced:
Possible Cause: Inner tub not properly aligned with the shaft, or other washer components (e.g., motor, drive belt, suspension) are faulty.
Solution: Verify the inner tub is correctly mounted on the shaft and spins freely. Check other washer components as per your appliance's service manual.
For issues not listed here, refer to your washing machine's specific service manual or contact a qualified appliance repair technician.
9. Specifications
| Attribute | Detail |
|---|---|
| Model Number | GL-963 |
| Replaces Part Numbers | W10285625, 1552638, AH2373033, EA2373033, PS2373033, B00ECV6BPG |
| Material | Metal (Bearings), Rubber (Seal) |
| Item Weight | 1.81 pounds |
| Package Dimensions | 4.45 x 4.37 x 2.44 inches |
| Certification | ISO 16949 |
10. Warranty and Support
Warranty: This FKG product comes with a 1-year limited warranty. For warranty claims or issues, please contact FKG customer support.
Customer Support: If you encounter any problems or require technical assistance, please contact FKG customer service. They aim to resolve issues within 24 hours (refund/replace/offer technical support).
For more information, visit the FKG Store on Amazon.


