
EVTSCAN ZT100
EVTSCAN Digital Multimeter ZT100 User Manual
Model: ZT100
1. Product Overview
The EVTSCAN Digital Multimeter ZT100 is a compact, auto-ranging digital multimeter designed for measuring AC/DC voltage, AC/DC current, resistance, capacitance, and frequency. It also includes diode and continuity test functions, along with features like data hold and auto power off for convenience and efficiency.
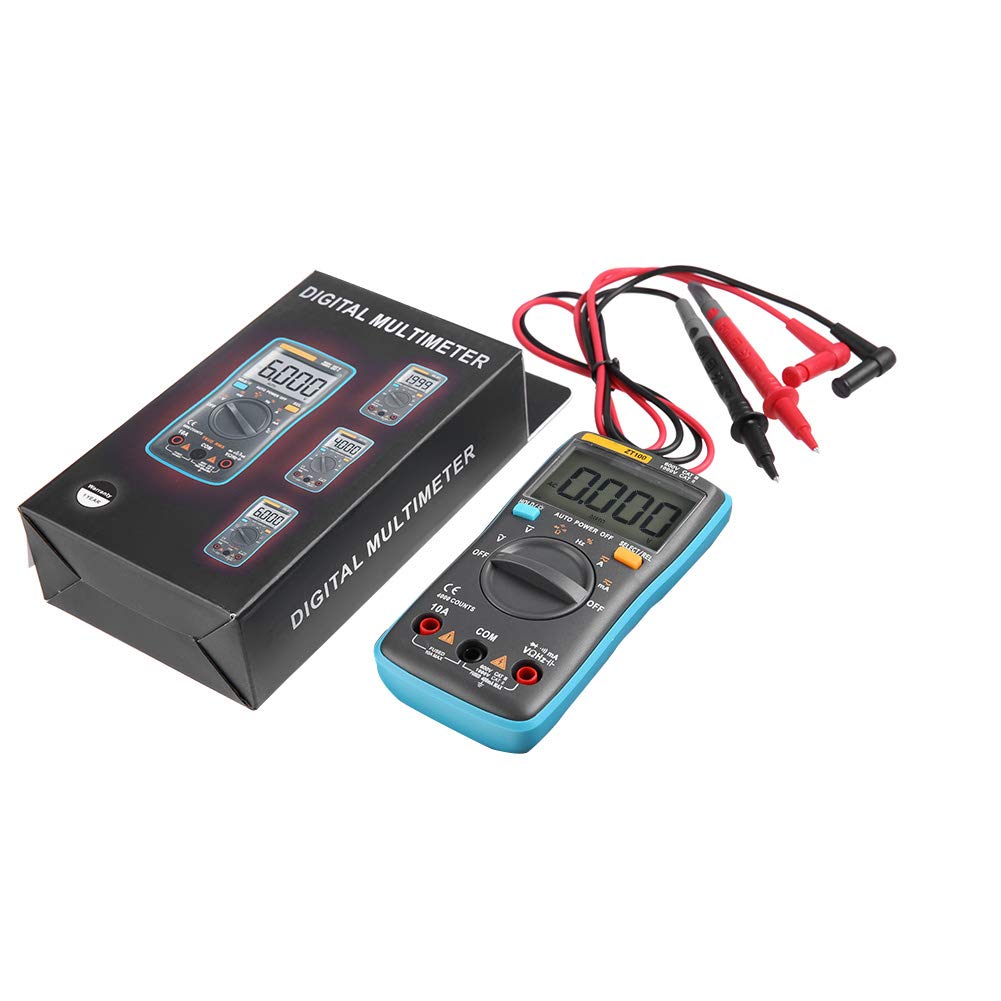
Figure 1: EVTSCAN Digital Multimeter ZT100 with packaging and test leads.
Key Features:
- Measures AC/DC voltage and current, resistance, diode, and continuity.
- LCD screen display with white backlight for clear readability in various lighting conditions.
- Compact size and back clip design for portability and ease of use.
- Live wire detection: Indicates live wires with a light flash and audible alert.
- Single-hand side slot design for flexible test lead positioning.
2. Setup
2.1 Battery Installation
- Ensure the multimeter is powered off.
- Locate the battery compartment on the back of the device.
- Use a screwdriver to open the battery compartment cover.
- Insert two AAA batteries (not included) according to the polarity markings inside the compartment.
- Replace the battery compartment cover and secure it with the screw.

Figure 2: Rear view of the ZT100 multimeter, indicating the battery compartment.
2.2 Connecting Test Leads
- Insert the black test lead into the "COM" (Common) input jack.
- For most measurements (voltage, resistance, capacitance, frequency, diode, continuity), insert the red test lead into the "VΩHz" input jack.
- For current measurements up to 400mA, insert the red test lead into the "mA" input jack.
- For current measurements up to 10A, insert the red test lead into the "10A" input jack.

Figure 3: ZT100 multimeter with red and black test leads connected to the input jacks.
3. Operating Instructions
3.1 Power On/Off
Rotate the central dial from "OFF" to any desired measurement function to power on the multimeter. To power off, rotate the dial back to the "OFF" position.
3.2 Auto Ranging
The ZT100 features auto-ranging, which automatically selects the appropriate measurement range. This simplifies operation as manual range selection is not required for most functions.
3.3 Measurement Functions
- DC Voltage (V–): Rotate the dial to the "V–" position. Connect the test leads in parallel to the DC voltage source.
- AC Voltage (V∼): Rotate the dial to the "V∼" position. Connect the test leads in parallel to the AC voltage source.
- DC Current (A– / mA–): Rotate the dial to the "A–" or "mA–" position. Connect the multimeter in series with the circuit. Ensure correct input jack selection (10A or mA).
- AC Current (A∼ / mA∼): Rotate the dial to the "A∼" or "mA∼" position. Connect the multimeter in series with the circuit. Ensure correct input jack selection (10A or mA).
- Resistance (Ω): Rotate the dial to the "Ω" position. Connect the test leads across the component to measure resistance. Ensure the circuit is de-energized.
- Capacitance (µF): Rotate the dial to the "µF" position. Connect the test leads across the capacitor. Ensure the capacitor is discharged before testing.
- Frequency (Hz): Rotate the dial to the "Hz" position. Connect the test leads to the signal source.
- Diode Test (→|): Rotate the dial to the "→|" position. Connect the red lead to the anode and the black lead to the cathode of the diode.
- Continuity Test (♫): Rotate the dial to the "♫" position. Connect the test leads across the circuit or component. An audible beep indicates continuity.
3.4 Special Functions
- Data Hold (HOLD): Press the "HOLD" button to freeze the current reading on the display. Press again to release.
- Backlight: Press the backlight button (often combined with HOLD or a separate button) to turn on/off the display backlight.
- Auto Power Off: The multimeter will automatically power off after a period of inactivity to conserve battery life.
- Live Wire Detection: For models with this feature, insert the red test lead into a power socket. A flashing light and beeper indicate a live wire.

Figure 4: Front panel of the ZT100 multimeter, showing the display, rotary dial, and function buttons.
4. Maintenance
4.1 Cleaning
Wipe the multimeter casing with a damp cloth and mild detergent. Do not use abrasive cleaners or solvents. Ensure the device is powered off and disconnected from any circuits before cleaning.
4.2 Battery Replacement
When the low battery indicator appears on the display, replace the batteries as described in Section 2.1. Remove batteries if the device will not be used for an extended period.
4.3 Fuse Replacement
The multimeter is protected by internal fuses. If the current measurement function fails, the fuse may need replacement. Refer to the caution label on the back of the device for fuse specifications (e.g., FUSED 10A MAX, FUSED 400mA MAX). Fuse replacement should only be performed by qualified personnel to prevent damage or injury.
5. Troubleshooting
| Problem | Possible Cause | Solution |
|---|---|---|
| No display or dim display | Dead or low batteries | Replace batteries (Section 2.1) |
| Incorrect readings | Incorrect function selected; poor test lead connection; damaged test leads | Verify function dial position; ensure leads are securely connected; inspect and replace damaged leads |
| Current measurement not working | Blown fuse; incorrect input jack | Check and replace fuse (Section 4.3); ensure red lead is in 10A or mA jack |
| Continuity test not beeping | Open circuit; high resistance | Verify circuit integrity; check for breaks or high resistance points |
6. Specifications
| Parameter | Range / Value |
|---|---|
| Model | ZT100 |
| Ranging | Auto |
| Update Rate | 3 times / second |
| Max Display (LCD) | 4000 Counts |
| DC Voltage | 400mV / 4V / 40V / 400V / 600V |
| AC Voltage | 400mV / 4V / 40V / 400V / 600V |
| DC Current | 40mA / 400mA / 10A |
| AC Current | 40mA / 400mA / 10A |
| Resistance | 400Ω / 4KΩ / 40KΩ / 400KΩ / 4MΩ / 40MΩ |
| Frequency | 99.5Hz / 999.5Hz / 9.999KHz / 99.99KHz / 999.9KHz / 9.999MHz |
| Capacitance | 4nF / 40nF / 400nF / 4uF / 40uF / 400uF / 1000uF / 4000uF |
| Low Battery Indicator | Yes |
| Data Hold | Yes |
| Auto Power Off | Yes |
| Powered By | 2 x AAA Battery (Not Included) |
| Dimensions (L x W x H) | 13.3 x 6.8 x 2.8 cm (5.2 x 2.7 x 1.1 inches) |
| Weight | Approx. 226g (8.0oz) / 0.23 Kilograms |
7. Warranty and Support
Warranty information and customer support details are typically provided with the product packaging or on the manufacturer's official website. Please refer to the documentation included with your purchase or visit the EVTSCAN brand store on Amazon for further assistance.
EVTSCAN Brand Store: Visit the EVTSCAN Store
Ask a question about this manual
Ask about setup, troubleshooting, compatibility, parts, safety, or missing instructions. Manuals+ will review the question and use this page’s manual context to help answer it.