Introduction
Thank you for choosing the Kalamera 2LB Bread Machine. This appliance is designed to simplify your bread-making process, offering a variety of programs to create delicious homemade bread, dough, jam, and more. Crafted with high-quality stainless steel and featuring intelligent controls, this bread maker provides convenience and consistent results. Please read this manual thoroughly before first use to ensure safe and optimal operation.

Image: The Kalamera 2LB Bread Machine, showcasing its sleek black stainless steel design, integrated touch control panel, and a clear viewing window on top.
Important Safety Information
Always follow basic safety precautions when using electrical appliances to reduce the risk of fire, electric shock, and/or injury to persons, including the following:
- Read all instructions before operating the bread machine.
- Do not touch hot surfaces. Use handles or knobs.
- To protect against electric shock, do not immerse cord, plugs, or housing in water or other liquid.
- Close supervision is necessary when any appliance is used by or near children.
- Unplug from outlet when not in use and before cleaning. Allow to cool before putting on or taking off parts.
- Do not operate any appliance with a damaged cord or plug, or after the appliance malfunctions or has been damaged in any manner.
- The use of accessory attachments not recommended by the appliance manufacturer may cause injuries.
- Do not use outdoors.
- Do not let cord hang over edge of table or counter, or touch hot surfaces.
- Do not place on or near a hot gas or electric burner, or in a heated oven.
- Extreme caution must be used when moving an appliance containing hot oil or other hot liquids.
- To disconnect, turn any control to "off", then remove plug from wall outlet.
- Do not use appliance for other than intended use.
- The bread pan is made from a ceramic food-grade material that is free from toxic substances.
What's Included
Before first use, please ensure all components are present and in good condition. Refer to the diagram below for identification.
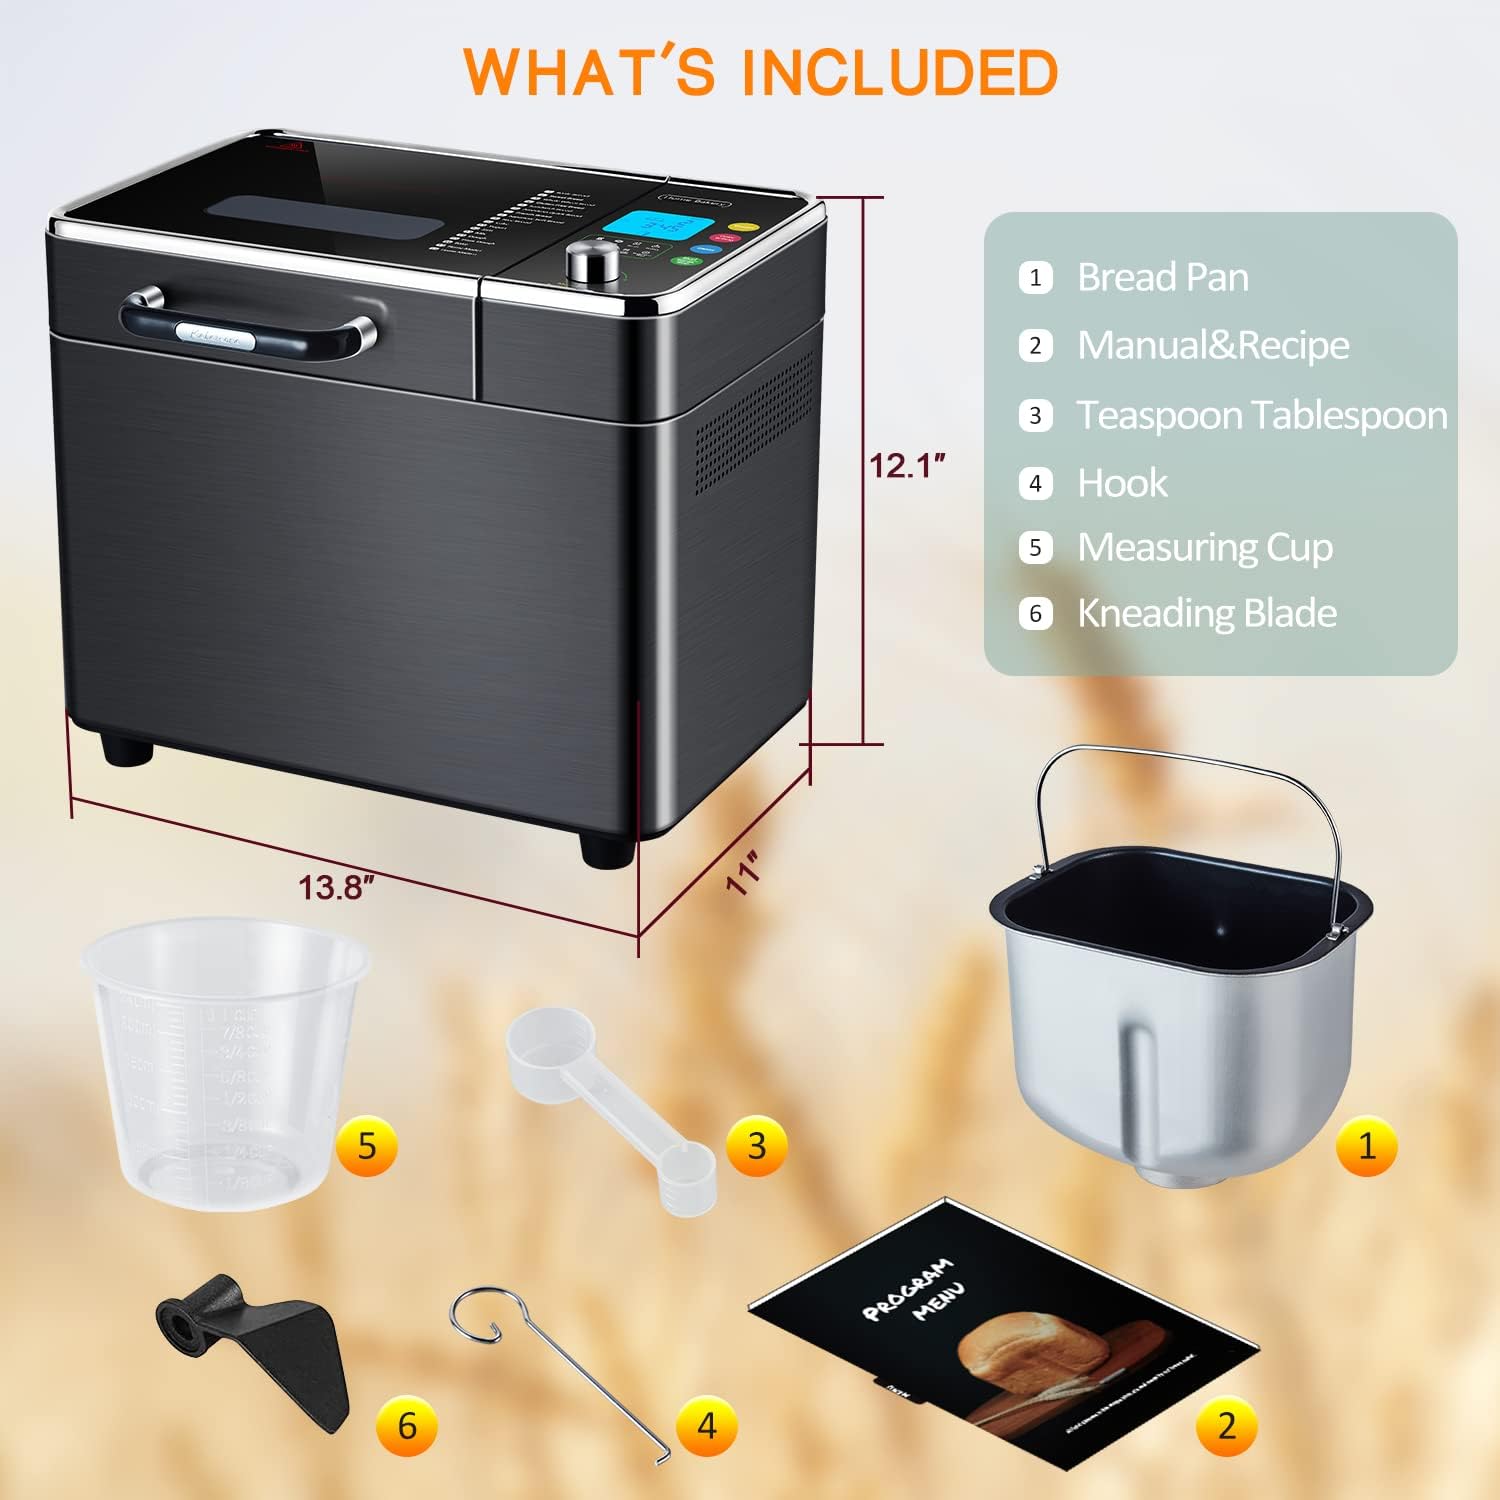
Image: A visual representation of the Kalamera Bread Machine and its accompanying accessories, including the bread pan, measuring tools, kneading blade, and instruction manual.
- Bread Pan
- User Manual & Recipe Book
- Teaspoon/Tablespoon Measuring Spoon
- Hook (for removing kneading blade)
- Measuring Cup
- Kneading Blade
Setup
- Unpacking: Carefully remove the bread machine and all accessories from the packaging. Retain packaging for future storage or transport.
- Initial Cleaning: Before first use, wipe the exterior of the bread machine with a damp cloth. Wash the bread pan, kneading blade, measuring cup, and measuring spoon with warm, soapy water. Rinse thoroughly and dry all parts completely.
- Install Kneading Blade: Place the kneading blade onto the shaft inside the bread pan. Ensure it is securely seated.
- Insert Bread Pan: Lower the bread pan into the baking chamber of the bread machine. Press down firmly and turn it clockwise until it locks into place.
- Placement: Place the bread machine on a stable, flat, heat-resistant surface, away from direct sunlight and heat sources. Ensure there is adequate ventilation around the appliance.
- Power Connection: Plug the power cord into a grounded electrical outlet. The display will light up, indicating the machine is ready for operation.
Operating Instructions
Control Panel Overview
The Kalamera Bread Machine features an intuitive digital touch panel for easy operation. Familiarize yourself with the display and controls.

Image: The intelligent touch control panel of the bread machine, showing the LCD display, program list, and control buttons for weight, color setting, delay, and start/pause/stop.
- LCD Display: Shows program number, time, loaf size, crust color, and current operation status.
- Menu/Time Knob: Rotate to select programs or adjust time. Press to confirm selection.
- Weight Button: Selects loaf size (e.g., 1LB, 1.5LB, 2LB).
- Color Setting Button: Selects crust color (Light, Medium, Dark).
- Delay Button: Sets the delay timer for deferred baking.
- Start/Pause/Stop Button: Initiates, pauses, or cancels a program.
Adding Ingredients
Always add ingredients in the order specified in your recipe. Typically, liquids are added first, followed by dry ingredients, with yeast added last on top of the dry ingredients, away from liquids and salt.

Image: Illustrates the process of adding ingredients, such as an egg, directly into the bread pan, which contains flour and other dry ingredients.
Program Selection (18-in-1 Functions)
The bread machine offers 18 preset programs for various types of bread and other recipes. Use the Menu/Time knob to cycle through the programs.
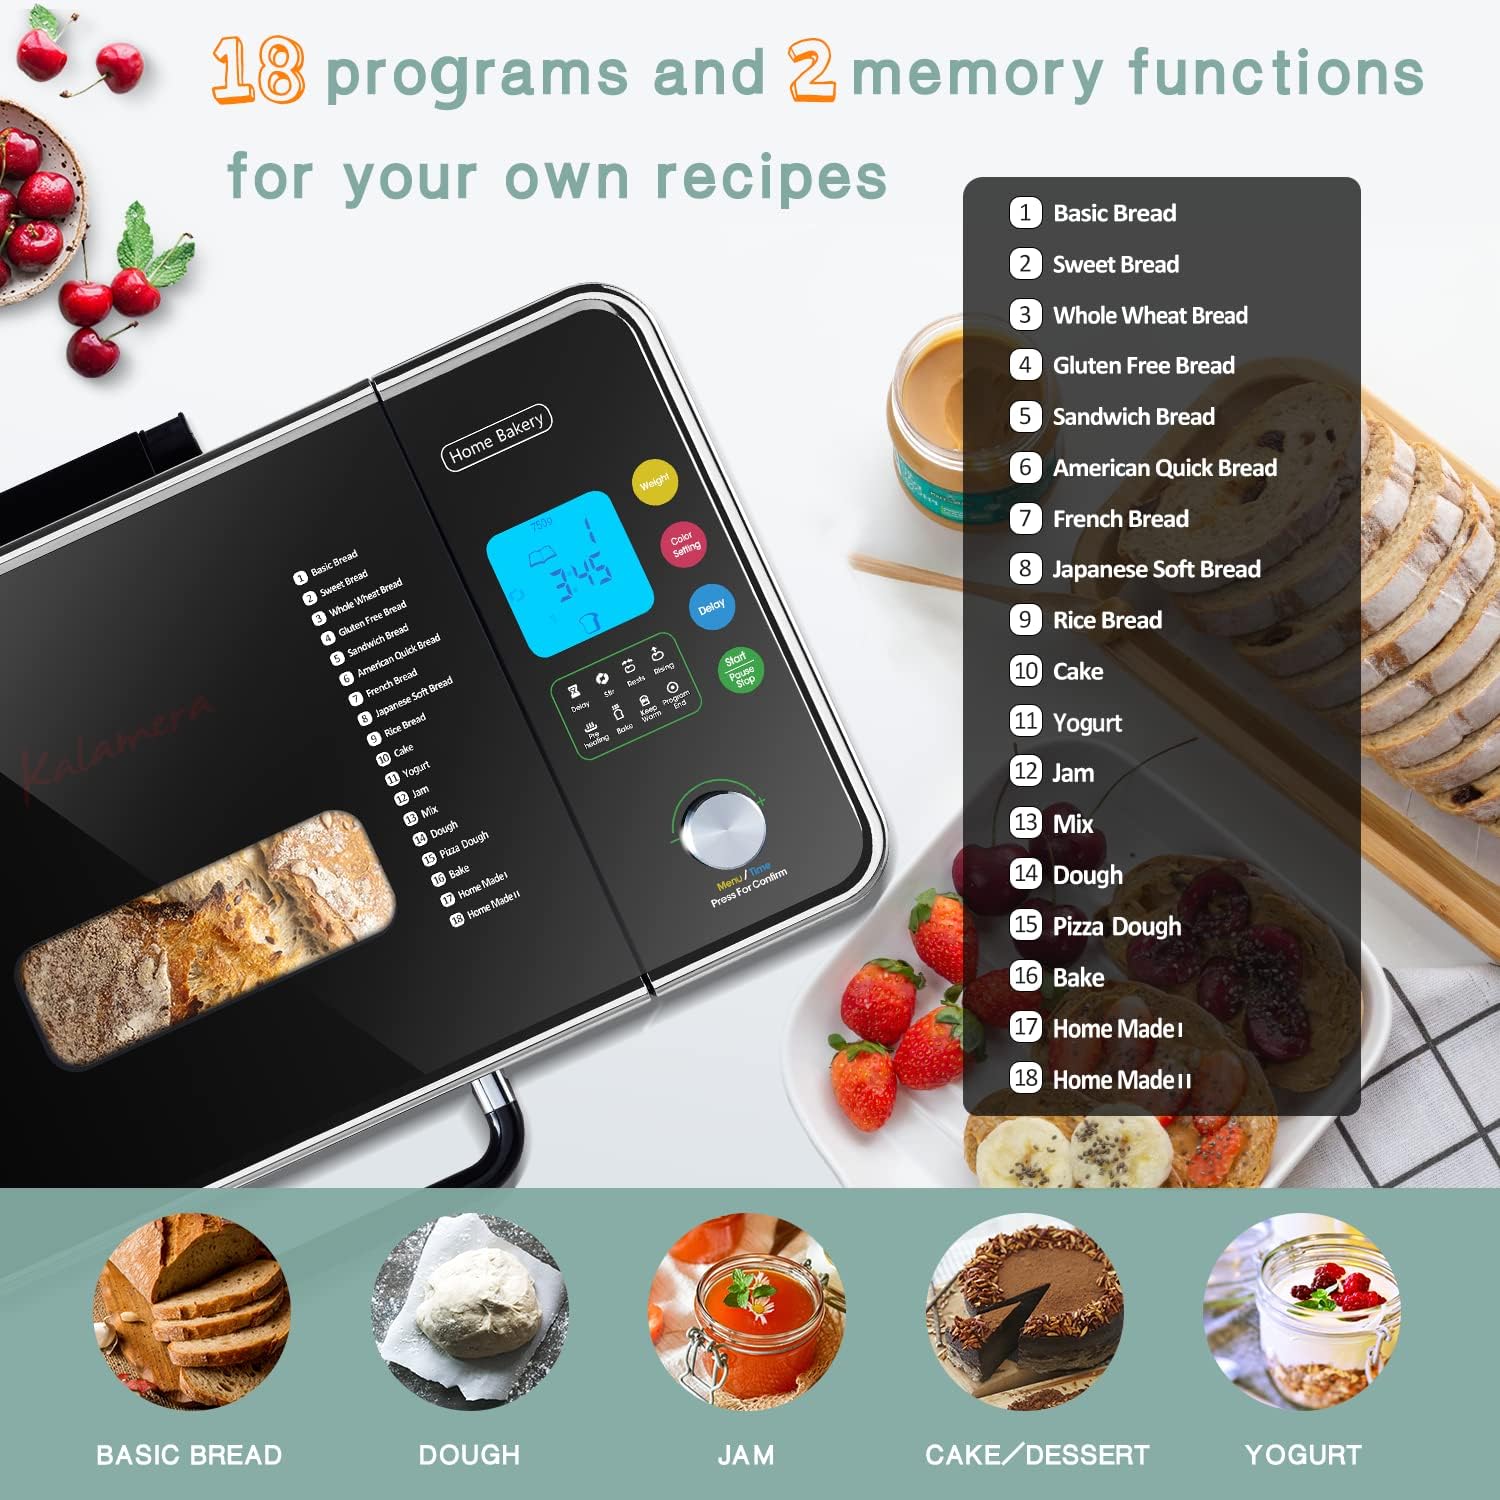
Image: A comprehensive list of the 18 pre-programmed functions of the bread machine, ranging from various bread types to dough, jam, cake, and yogurt settings.
Available programs include:
- Basic Bread
- Sweet Bread
- Whole Wheat Bread
- Gluten Free Bread
- Sandwich Bread
- American Quick Bread
- French Bread
- Japanese Soft Bread
- Rice Bread
- Cake
- Yogurt
- Jam
- Mix
- Dough
- Pizza Dough
- Bake
- Home Made I (Custom Program)
- Home Made II (Custom Program)
Adjusting Loaf Size and Crust Color
After selecting your program, you can customize the loaf size and crust color to your preference.

Image: Visual guide demonstrating the three available loaf sizes (1LB, 1.5LB, 2LB) and three crust color settings (Light, Medium, Dark) for customized baking results.
- Press the Weight button to cycle through 1LB, 1.5LB, or 2LB loaf sizes.
- Press the Color Setting button to choose between Light, Medium, or Dark crust.
Using the Delay Timer
The delay timer allows you to set the machine to finish baking at a later time, up to 15 hours in advance. This is ideal for waking up to freshly baked bread.
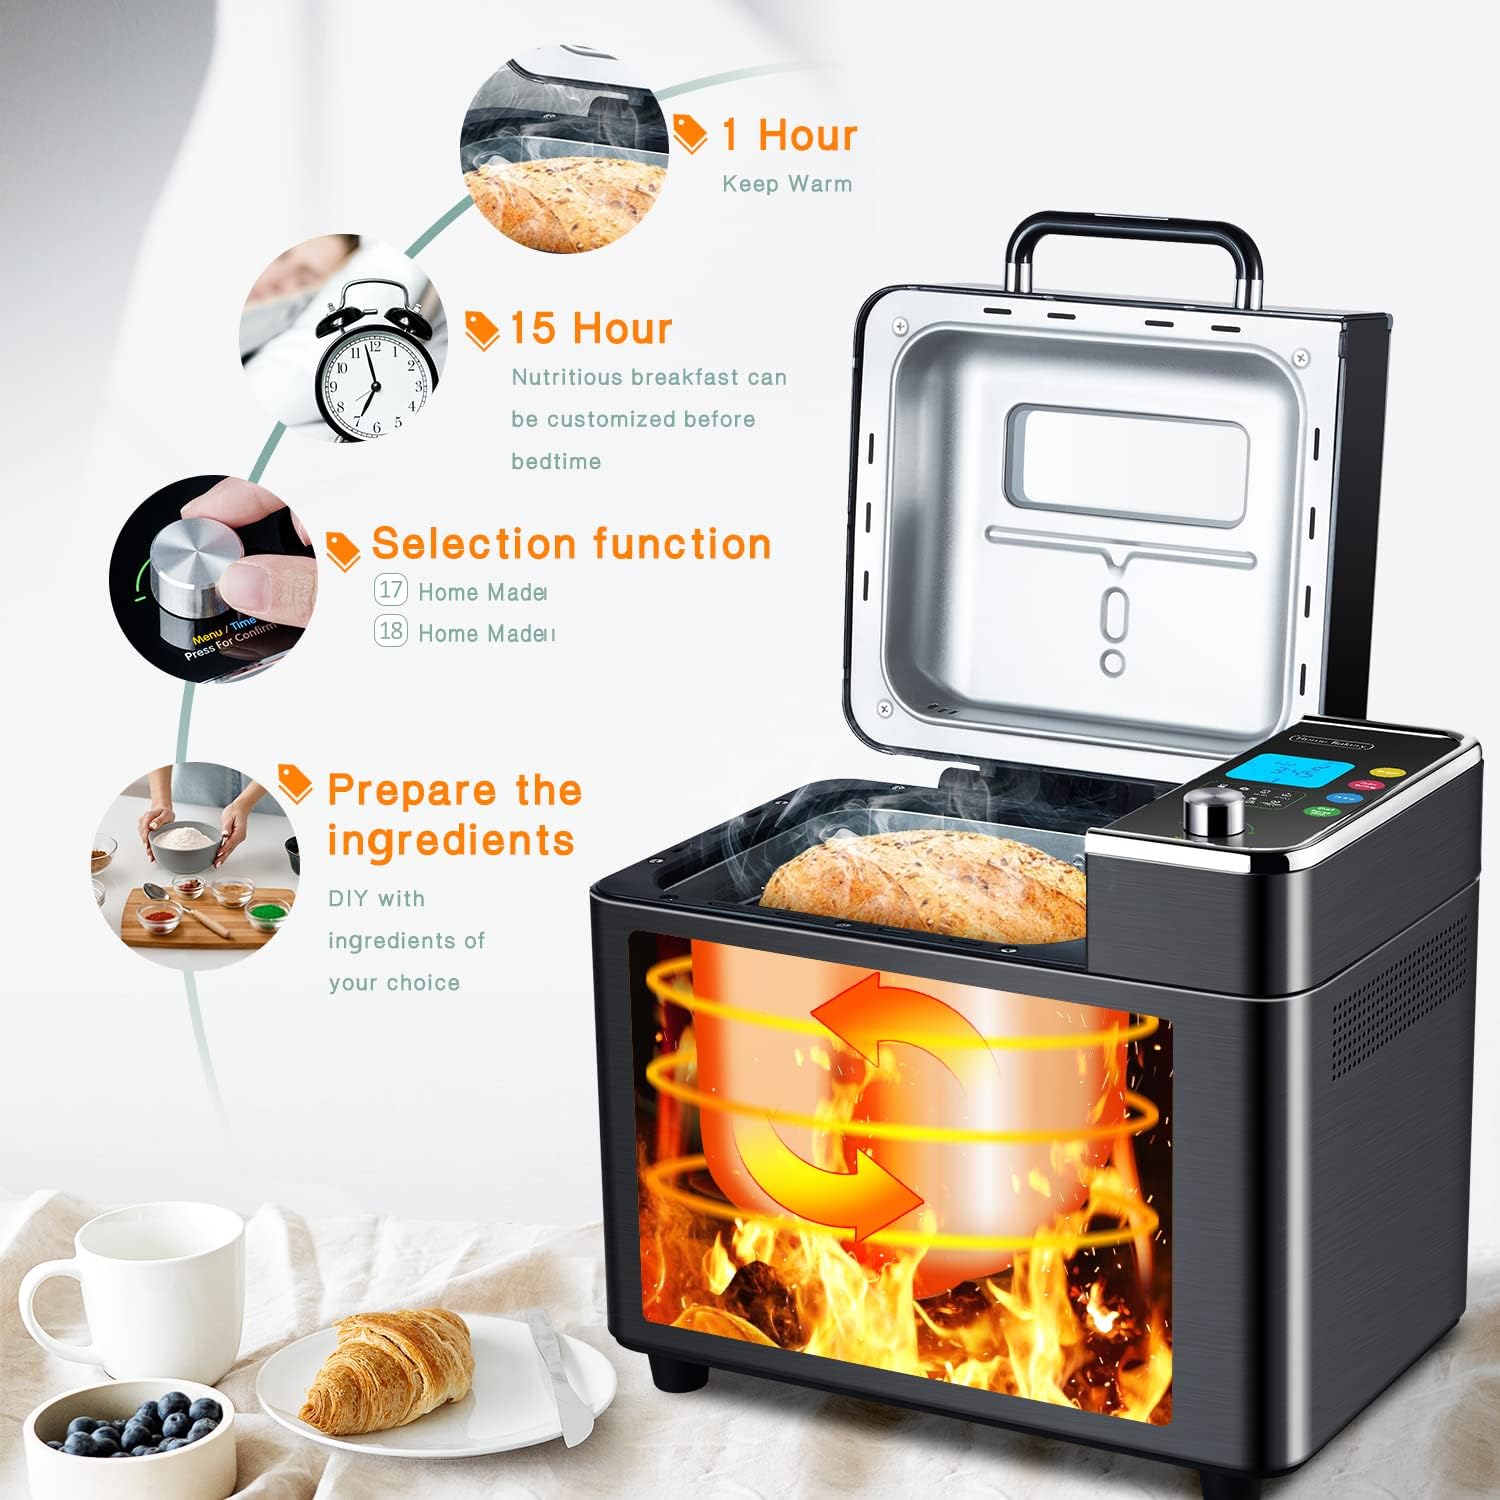
Image: Depicts the convenience of the 15-hour delay function for preparing ingredients overnight and the 1-hour keep warm function, ensuring fresh bread when desired.
- Add all ingredients to the bread pan.
- Select your desired program, loaf size, and crust color.
- Press the Delay button repeatedly to set the desired delay time. Each press increases the time.
- Press the Start/Pause/Stop button to activate the delay timer. The display will count down until the program begins.
Note: Do not use the delay timer for recipes containing highly perishable ingredients like milk, eggs, or fresh fruit, as they may spoil.
Starting, Pausing, and Stopping a Program

Image: A hand interacting with the bread machine's control panel, demonstrating the ease of use for selecting settings.
- Start: After selecting all settings, press the Start/Pause/Stop button once to begin the program. The indicator light will illuminate.
- Pause: During operation, press the Start/Pause/Stop button once to pause the program. The indicator light will flash. Press again to resume.
- Stop: To stop a program completely, press and hold the Start/Pause/Stop button for a few seconds until the machine resets. This will cancel the current operation.

Image: A circular diagram showing the operational flow of the bread machine, highlighting the "Start, Pause, Stop" button and its role in controlling the baking cycle.
Keep Warm Function
After the baking cycle is complete, the bread machine will automatically switch to a 1-hour "Keep Warm" function. This keeps the bread warm and fresh until you are ready to remove it. The display will show "0:00" and then count up for the keep warm duration.
Maintenance
Cleaning the Bread Pan and Kneading Blade
The nonstick ceramic bread pan and kneading blade are designed for easy cleaning.

Image: A freshly baked loaf of bread easily sliding out of the nonstick bread pan, demonstrating the pan's effective nonstick coating for effortless removal and cleaning.
- Always unplug the bread machine and allow it to cool completely before cleaning.
- Remove the bread pan from the machine. If the kneading blade is stuck in the bread, use the hook tool to carefully remove it.
- Wash the bread pan and kneading blade with warm, soapy water. Do not use abrasive cleaners or scouring pads, as this can damage the nonstick coating.
- Rinse thoroughly and dry completely before reassembling or storing.
- The bread pan is not dishwasher safe.
Cleaning the Exterior and Interior
- Wipe the exterior of the bread machine with a soft, damp cloth.
- Clean the interior of the baking chamber with a damp cloth. Remove any crumbs or residue.
- Do not immerse the bread machine housing in water or any other liquid.
- Ensure all parts are dry before plugging the machine back in or storing it.
Troubleshooting
| Problem | Possible Cause | Solution |
|---|---|---|
| Bread does not rise. | Yeast is old or inactive; too much salt; too little sugar; water too hot or cold. | Check yeast expiration date; reduce salt; increase sugar; use lukewarm water (105-115°F / 40-46°C). |
| Bread collapses during baking. | Too much liquid; too much yeast; high humidity. | Reduce liquid slightly; reduce yeast slightly; adjust recipe for humidity. |
| Bread is too dense or heavy. | Too much flour; too little liquid; not enough yeast. | Measure ingredients precisely; increase liquid slightly; check yeast activity. |
| Machine beeps or displays error code. | Overheating; pan not installed correctly; power interruption. | Unplug and let cool; ensure pan is locked in place; unplug and replug. Consult manual for specific error codes if available. |
| Kneading blade stuck in bread. | Normal occurrence. | Use the provided hook tool to carefully remove the blade after the bread has cooled slightly. |
Specifications
- Brand: Kalamera
- Model: 2LB Bread Machine
- Color: Black
- Product Dimensions: 11"D x 13.8"W x 12.1"H
- Item Weight: 15.62 pounds
- Number of Programs: 18
- Loaf Sizes: 1LB, 1.5LB, 2LB
- Crust Colors: Light, Medium, Dark
- Delay Timer: Up to 15 hours
- Keep Warm Function: 1 hour
- Pan Material: Ceramic food-grade nonstick
Warranty and Support
Kalamera is committed to providing quality products and services. For warranty information, product support, or to inquire about replacement parts, please visit the official Kalamera website or contact their customer service directly.
For further assistance, you may refer to the contact information provided in the original product packaging or on the manufacturer's official website.
Kalamera Official Store: Visit Kalamera Store on Amazon


