
1. Introduction
The Retevis RA685 is a versatile dual-band walkie talkie, offering robust communication capabilities with a 5W high-power output and an 1800mAh rechargeable battery. Its design focuses on durability and ease of use, making it suitable for various scenarios from outdoor activities to professional use. This manual provides detailed instructions to help you get the most out of your RA685 radio.
- Long Range Communication: Equipped with a 5W high-power and high-gain antenna for extended communication distance.
- Dual Band Operation: Supports both VHF (144-146 MHz) and UHF (430-440 MHz) frequency bands, adaptable to different communication needs.
- Extended Battery Life: Features an 1800mAh lithium battery providing up to 14 hours of continuous use.
- Durable Construction: Built with high-quality materials to withstand drops and harsh environments.
- Safety Features: Includes an emergency alarm function for quick assistance in hazardous situations.
- Secure Communication: Utilizes 50 CTCSS and 104 DCS codes to minimize interference and ensure private calls.
- User-Friendly: Simple operation with a 1.6-inch display for clear visibility and easy navigation.

This image highlights the Retevis RA685's capability for long-range communication and clear audio, suitable for outdoor environments like mountains, emphasizing its high power and high-gain antenna.
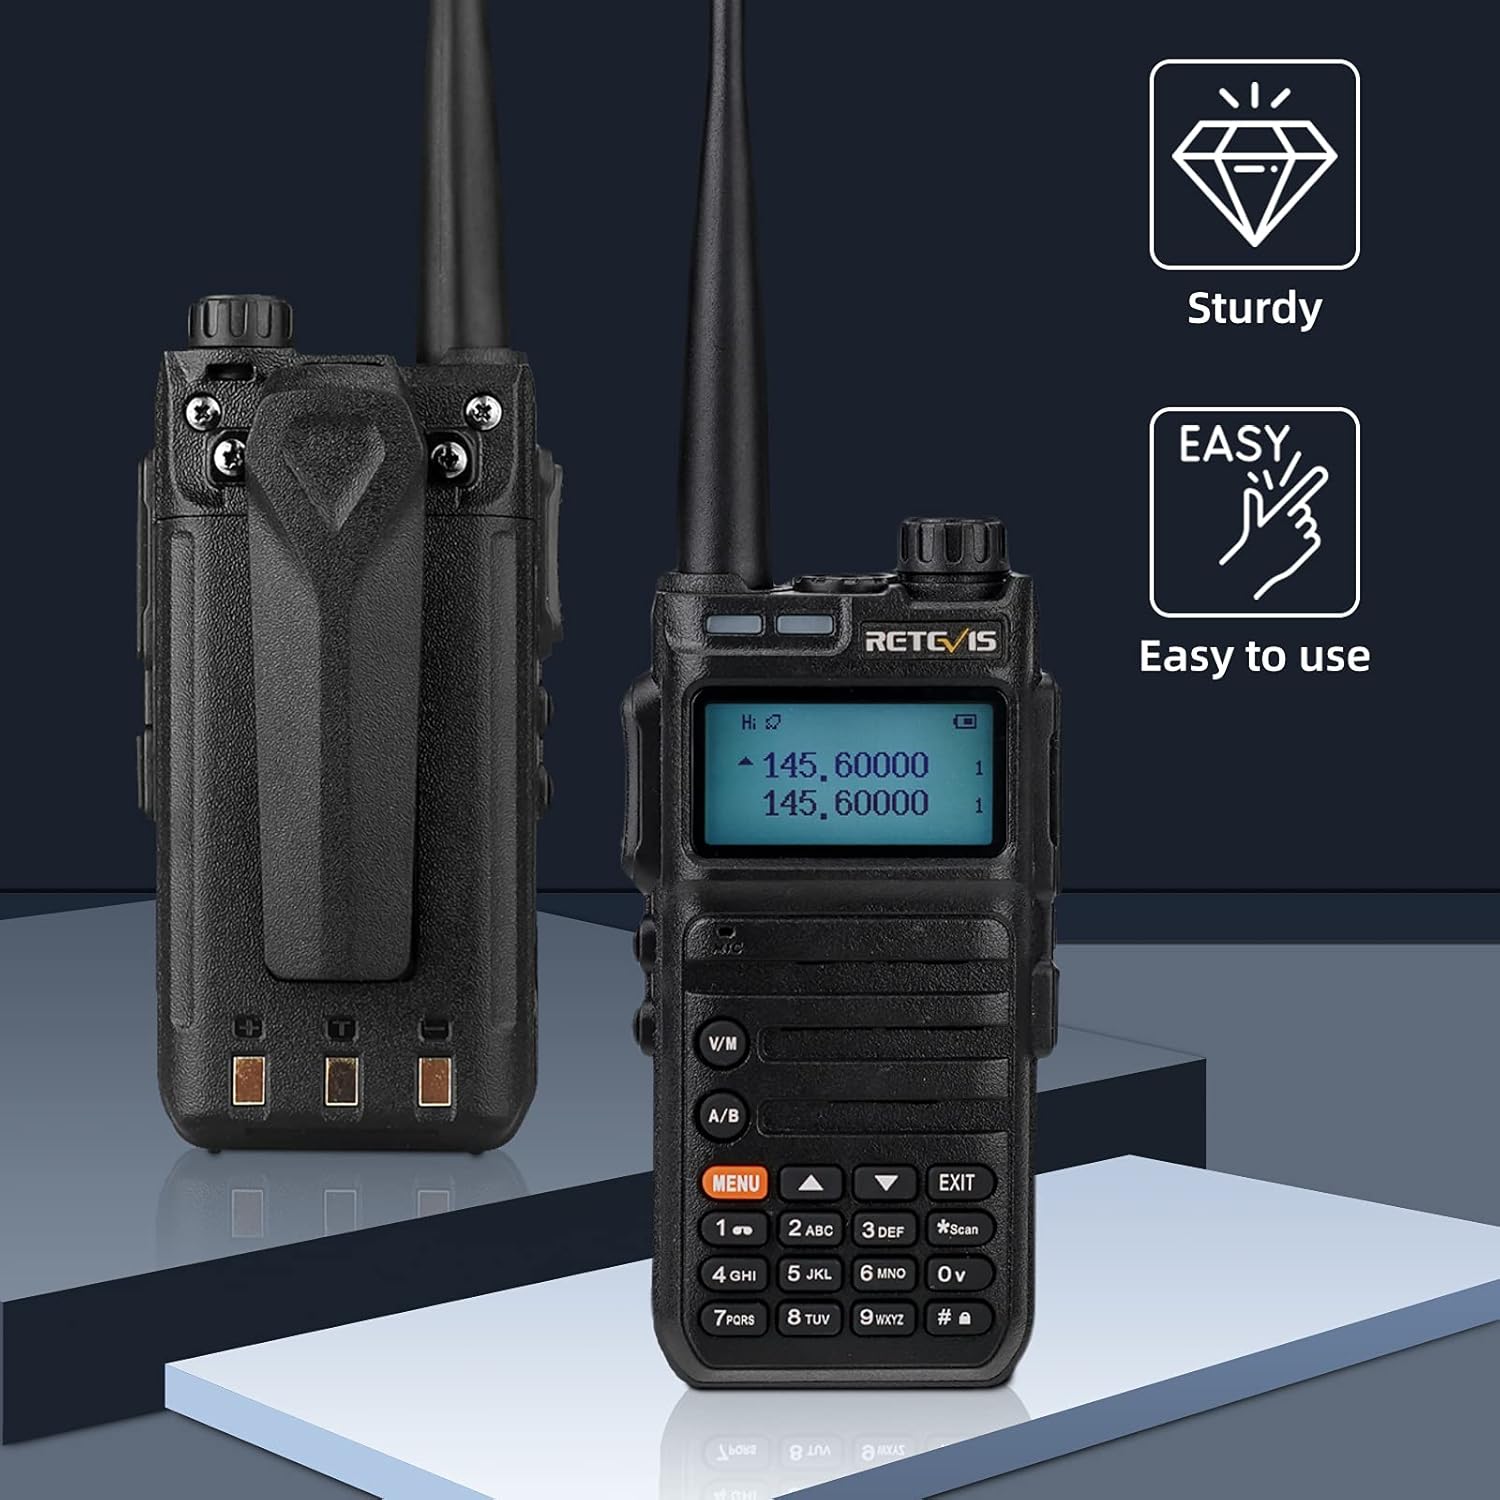
This image showcases the Retevis RA685's robust construction and its intuitive, easy-to-use interface, making it accessible for various users.
2. Package Contents
Upon unboxing your Retevis RA685, please verify that all the following items are included:
- Retevis RA685 Radio Body
- Antenna
- 1800mAh Li-ion Battery Pack
- Desktop Charger Base
- USB Type-C Charging Cable
- Belt Clip
- Hand Strap
- User Manual (this document)

This image displays the Retevis RA685 radio unit along with all standard accessories: the radio body, antenna, rechargeable battery, charging base, USB-C cable, belt clip, and hand strap. These components are essential for the radio's operation and charging.
3. Product Overview (Components)
Familiarize yourself with the various parts of your Retevis RA685 radio:
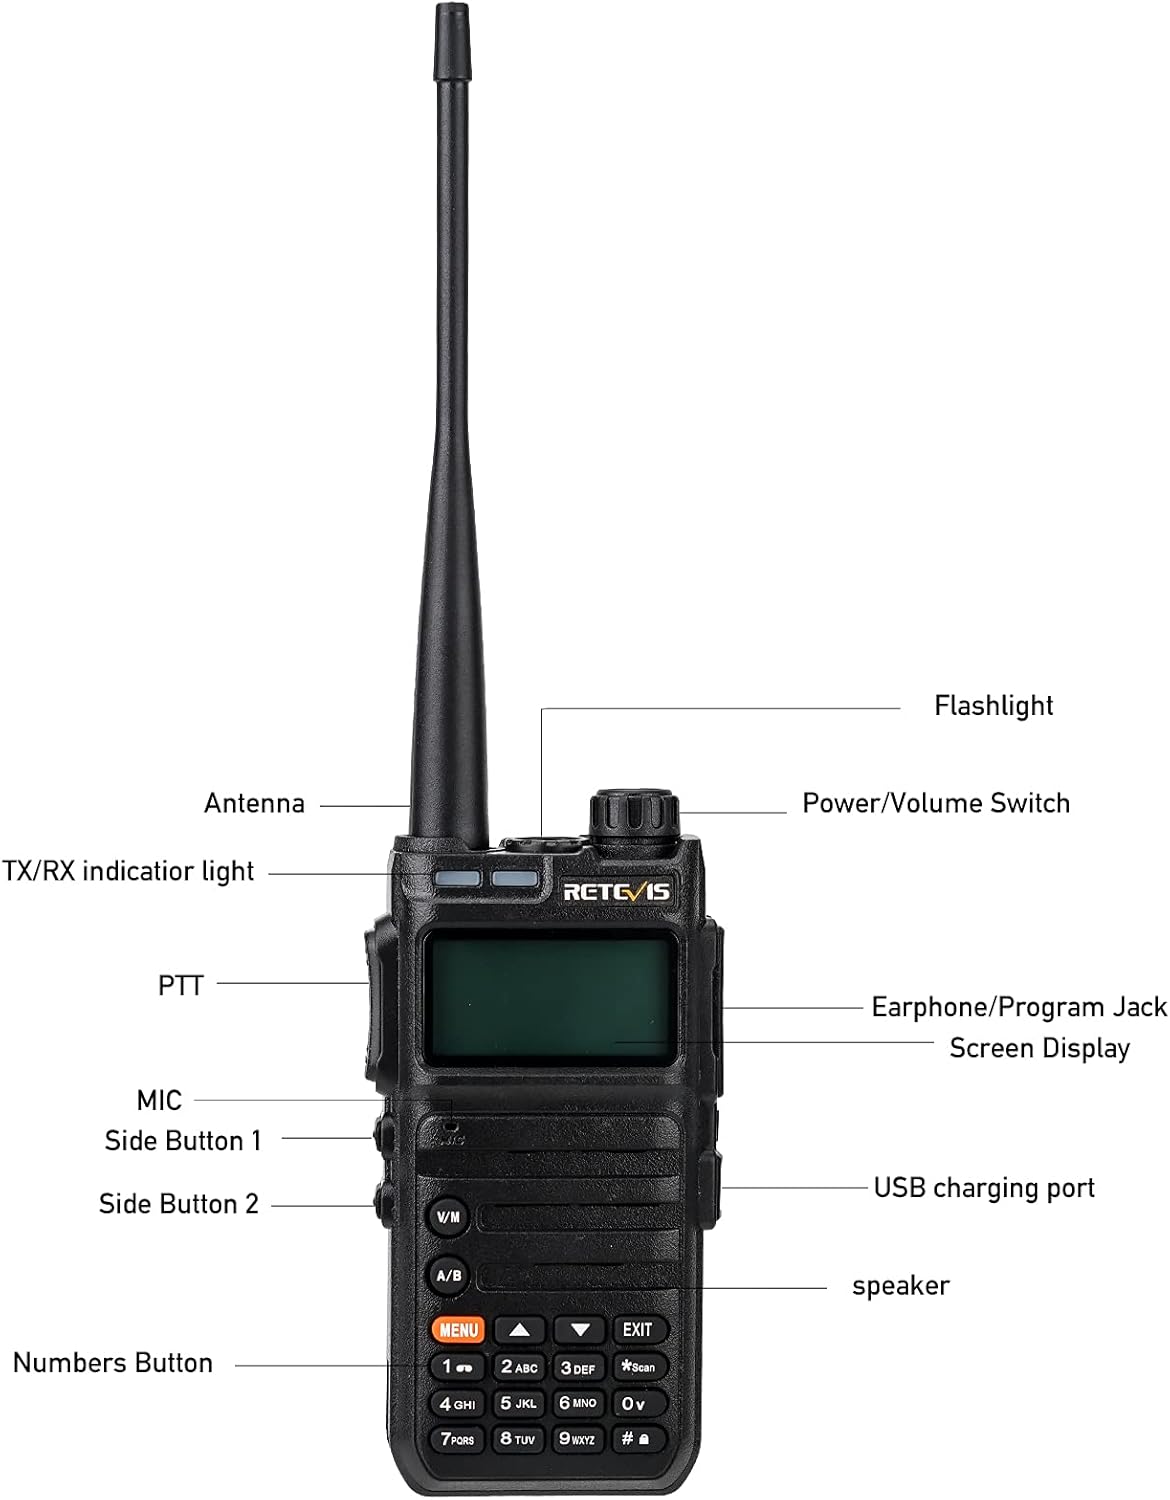
This diagram provides a clear view of the Retevis RA685's external components. Key parts include the antenna for signal transmission/reception, the power/volume switch for controlling the device and audio level, the built-in flashlight, and the TX/RX indicator light. The Push-to-Talk (PTT) button is prominently located for easy communication. Other features include the earphone/program jack, the screen display, microphone (MIC), programmable side buttons, a USB charging port, the speaker, and the numeric keypad for channel selection and menu navigation.
- Antenna: For transmitting and receiving radio signals.
- Power/Volume Switch: Rotates to turn the radio on/off and adjust volume.
- Flashlight: Built-in LED light for illumination.
- TX/RX Indicator Light: Illuminates red during transmission (TX) and green during reception (RX).
- PTT (Push-to-Talk) Button: Press and hold to transmit, release to receive.
- Earphone/Program Jack: Connects external audio accessories or programming cable.
- Screen Display: Shows channel, frequency, battery status, and menu options.
- MIC (Microphone): For voice input during transmission.
- Side Button 1 & 2: Programmable function buttons.
- USB Charging Port: Type-C port for direct charging.
- Speaker: For audio output.
- Numbers Button (Keypad): For manual frequency input, channel selection, and menu navigation.
4. Setup
4.1 Battery Installation
- Align the battery pack with the grooves on the back of the radio.
- Slide the battery upwards until it clicks into place.
- To remove, push the battery release latch (usually at the bottom of the battery compartment) and slide the battery downwards.
4.2 Antenna Attachment
- Screw the antenna clockwise into the connector on the top of the radio until it is firmly seated.
- Do not overtighten.
4.3 Charging the Battery
Before initial use, fully charge the battery. The RA685 offers multiple convenient charging methods:
- Using the Desktop Charger: Place the radio (with battery installed) into the desktop charger base. Ensure the charging contacts align. The indicator light on the charger will show charging status (usually red for charging, green for fully charged).
- Direct USB Type-C Charging: Connect the provided USB Type-C cable directly to the radio's USB port and to a power source (e.g., USB wall adapter, power bank, computer USB port, or car charger).

This image illustrates the versatility of charging the Retevis RA685. It can be charged using the included USB Type-C cable directly from various power sources such as a standard USB wall adapter, a portable power bank, a computer's USB port, or a car charger, providing flexibility for charging on the go or at home.

This image highlights the 1800mAh battery capacity and shows the battery charge level visually represented on the radio's display, indicating the remaining power for operation.
5. Operating Instructions
5.1 Power On/Off and Volume Adjustment
- To power on the radio, rotate the Power/Volume switch (top knob) clockwise until you hear a click.
- Continue rotating clockwise to increase the volume; rotate counter-clockwise to decrease it.
- To power off, rotate the switch counter-clockwise until it clicks.
5.2 Channel Selection and Frequency Input
- The RA685 supports both channel mode and frequency mode.
- Use the V/M button to switch between Channel Mode and Frequency (VFO) Mode.
- In Channel Mode, use the Up/Down arrow buttons or the numeric keypad to select a pre-programmed channel.
- In Frequency Mode, use the numeric keypad to directly input the desired frequency.
- The A/B button allows you to switch between the upper (A) and lower (B) frequency displays for dual-watch operation.
5.3 Transmitting and Receiving (PTT)
- To transmit, press and hold the PTT button on the left side of the radio. Speak clearly into the microphone. The TX/RX indicator light will turn red.
- To receive, release the PTT button. The TX/RX indicator light will turn green when receiving a signal.
- Ensure you are on the same frequency/channel as the person you wish to communicate with.
5.4 CTCSS/DCS Codes for Secure Communication
- CTCSS (Continuous Tone Coded Squelch System) and DCS (Digital Coded Squelch) codes help filter out unwanted signals from other users on the same frequency.
- To set these codes, access the radio's menu (press MENU button) and navigate to the CTCSS/DCS settings.
- Both transmitting and receiving radios must have the same CTCSS/DCS code set to communicate.
5.5 Emergency Alarm Function
- The RA685 features an emergency alarm. This function can be activated via a programmable side button or through the menu.
- When activated, the radio will emit a loud alarm sound and/or transmit an alarm tone, alerting others to your situation.
5.6 Built-in LED Flashlight
- The radio includes a convenient LED flashlight located at the top.
- Typically, this can be activated by a short press of a programmable side button (refer to your radio's specific button assignments).

This image demonstrates the built-in LED flashlight feature of the Retevis RA685, highlighting its utility for visibility in low-light conditions. The 1.6-inch display is also visible, making operations more convenient.
5.7 VOX Function (Voice Operated Transmit)
- VOX allows you to transmit by speaking into the microphone without pressing the PTT button.
- To enable VOX, navigate through the radio's menu. You can also adjust the VOX sensitivity level.
5.8 FM Radio Function
- The RA685 includes an FM radio receiver for entertainment.
- Access the FM radio mode via the menu or a dedicated function key (if programmed).
6. Maintenance
Proper maintenance ensures the longevity and optimal performance of your Retevis RA685 radio.
- Cleaning: Use a soft, damp cloth to clean the radio's surface. Do not use harsh chemicals or abrasive cleaners. Ensure the USB port cover is closed to prevent dust and moisture ingress.
- Battery Care:
- Avoid overcharging or completely draining the battery.
- Store the battery in a cool, dry place when not in use for extended periods.
- If the battery will not be used for a long time, charge it to about 50% capacity before storage.
- Storage: Store the radio in a dry, dust-free environment away from direct sunlight and extreme temperatures. Remove the battery if storing for more than a month.
- Antenna: Do not bend or twist the antenna excessively, as this can damage it and affect performance.

This image emphasizes the sturdy and durable build quality of the Retevis RA685, designed to withstand challenging environments and accidental impacts.
7. Troubleshooting
If you encounter issues with your Retevis RA685, refer to the following common problems and solutions:
| Problem | Possible Cause | Solution |
|---|---|---|
| Radio does not power on. | Battery is not installed correctly or is depleted. | Ensure battery is properly installed. Charge the battery fully. |
| Cannot transmit or receive. | Incorrect frequency/channel, low battery, or antenna not attached. | Verify frequency/channel settings. Charge battery. Ensure antenna is securely attached. Check if CTCSS/DCS codes match. |
| Poor audio quality or static. | Weak signal, interference, or volume too low/high. | Move to an area with better signal. Adjust squelch level. Adjust volume. Check for external interference sources. |
| Battery drains quickly. | Frequent transmission, high power setting, or aging battery. | Reduce transmission time. Use low power setting when possible. Consider replacing the battery if it's old. |
| Keypad/buttons unresponsive. | Keypad lock enabled or software glitch. | Check if keypad lock is active (often indicated by a key icon on screen). Try turning the radio off and on again. |
8. Specifications
Key technical specifications for the Retevis RA685 Dual Band Walkie Talkie:
| Feature | Specification |
|---|---|
| Brand | Retevis |
| Model Number | RA685 |
| Color | Black |
| Frequency Range | 144-146 MHz (VHF); 430-440 MHz (UHF) |
| Output Power | 5W |
| Battery Capacity | 1800mAh Lithium-ion |
| Number of Channels | 128 |
| Max Range | Up to 3 Kilometers (environment dependent) |
| Special Features | Emergency Alarm, Rechargeable, Long Range, 1800mAh battery, Dual Band, Built-in Flashlight, VOX, FM Radio |
| Water Resistance Level | Not waterproof |
| Dimensions (D x W x H) | 67.3 x 43.2 x 13.5 cm (approximate, radio body only) |
9. Warranty and Support
Retevis provides comprehensive warranty coverage and customer support for your RA685 radio.
- Warranty Period:
- 2-year warranty for the radio body.
- 1-year warranty for accessories (e.g., battery, charger, antenna).
- Return Policy: 30-day no-reason return policy.
- Post-Warranty Service: Maintenance services are available beyond the warranty period; associated costs will be borne by the customer.
- Contact Support: For any inquiries, technical assistance, or warranty claims, please contact Retevis customer support via Amazon. Responses are typically provided within 12 hours.
For the most up-to-date support information and resources, please visit the official Retevis store on Amazon or their official website.


