Introduction
Thank you for purchasing the AMIR Digital LED Alarm Clock. This clock features a large LED display, adjustable brightness, temperature display, voice control, and multiple alarm modes. This manual provides detailed instructions on how to set up, operate, and maintain your new alarm clock.

Figure 1: Front view of the AMIR Digital LED Alarm Clock. The clock features a large, clear red LED display.
Package Contents
- 1 x AMIR Digital LED Alarm Clock
- 1 x USB Power Cable (1 meter)
- 1 x User Manual
Note: AAA batteries and AC adapter are not included.

Figure 2: The AMIR Digital LED Alarm Clock, its USB power cable, and the user manual as found in the package.
Setup
1. Powering the Device
The clock can be powered in two ways:
- USB Cable Power: Connect the provided USB cable to the clock's power input and plug the other end into a USB power adapter (not included) or a USB port on a computer. The display will remain continuously on when powered by USB.
- Battery Power: Insert 3 x AAA batteries (not included) into the battery compartment on the back of the clock. When powered by batteries, the display will automatically turn off after 16 seconds to conserve energy. You can activate the display by making a sound (voice control) or touching the clock.
Note: Using both USB power and batteries provides a memory function, retaining time settings during power outages.
2. Button Functions
Familiarize yourself with the buttons located on the back of the clock:
- DOWN: Decreases values, adjusts brightness.
- UP: Increases values, adjusts brightness.
- LIGHT/SNOOZE: Adjusts brightness, activates snooze function.
- MODE: Switches between clock, date, and temperature modes.
- ALARM: Enters alarm setting mode.
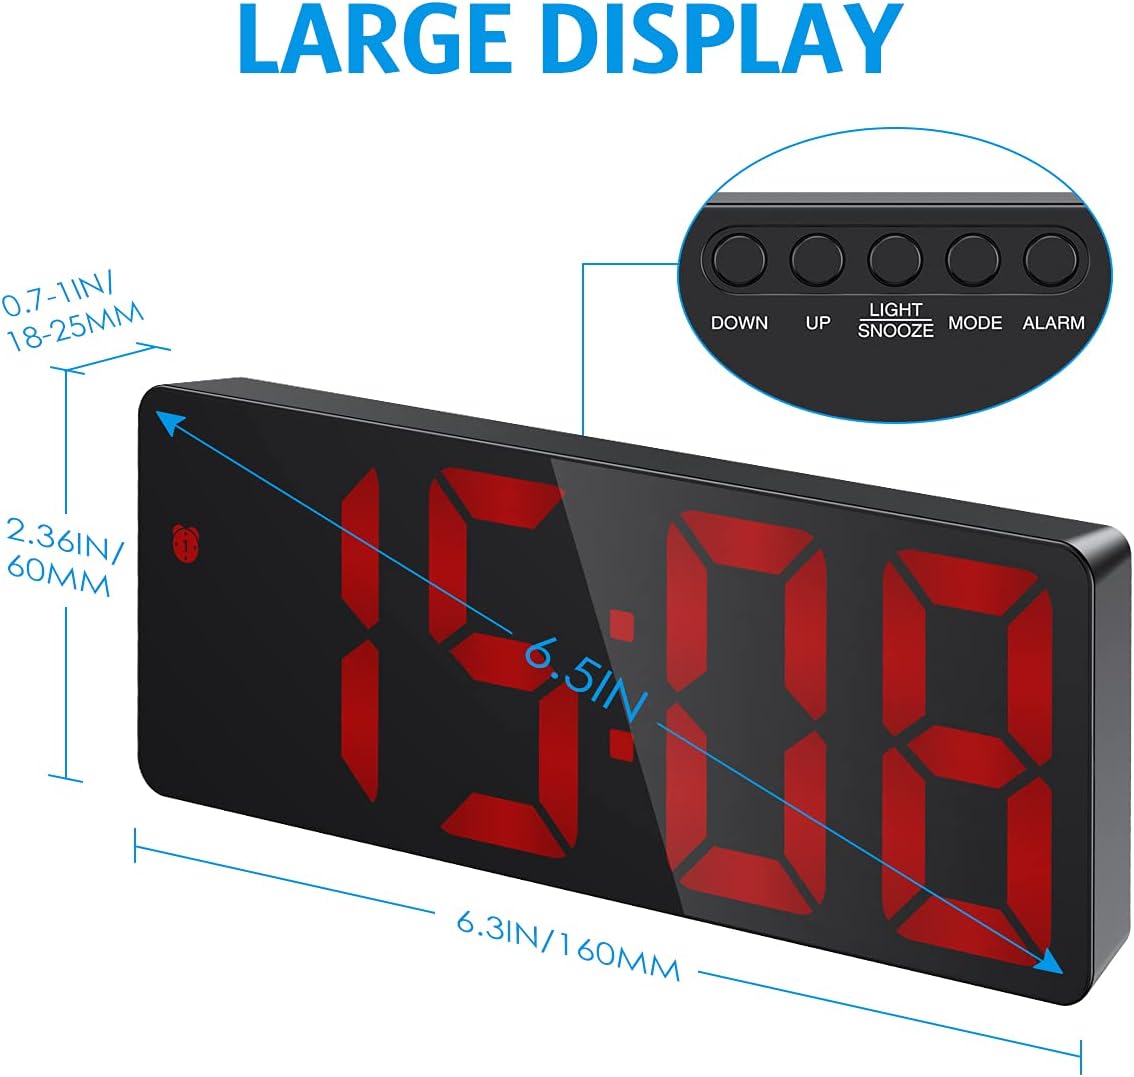
Figure 3: Overview of the clock's dimensions and button layout.
3. Initial Time Setting
- Press and hold the MODE button for 3 seconds to enter time setting mode. The hour digits will flash.
- Use the UP or DOWN buttons to adjust the hour.
- Press MODE again to switch to minute setting. The minute digits will flash.
- Use the UP or DOWN buttons to adjust the minute.
- Press MODE to confirm and exit time setting.
4. 12/24H Format Selection
While in time setting mode (after step 1 above), press the UP button to toggle between 12-hour and 24-hour formats.
5. Temperature Display
The clock automatically displays the temperature. To switch between Celsius (°C) and Fahrenheit (°F), press the DOWN button while in temperature display mode (press MODE until temperature is shown).
Operating Instructions
1. Adjusting Brightness
The clock offers three levels of brightness (Bright, Medium, Low) and a Night Mode.
- Manual Adjustment: Press the UP or DOWN buttons (not in setting mode) to cycle through Bright, Medium, and Low brightness levels.
- Night Mode: In Night Mode, the display automatically dims between 18:00 (6 PM) and 6:00 (6 AM). To activate/deactivate Night Mode, press and hold the MODE button until "OFF" or "ON" appears. You can also customize the night mode time period by pressing MODE again after activating Night Mode.
- Display Off: To completely turn off the display while sleeping, press and hold the LIGHT/SNOOZE button for more than 3 seconds. Press any button to turn it back on.

Figure 4: Visual representation of the three adjustable brightness levels.
2. Setting the Alarm
The clock supports three alarm modes: Monday-Friday, Monday-Saturday, and Everyday.
- Press and hold the ALARM button for 3 seconds to enter alarm setting mode. The hour digits will flash.
- Use the UP or DOWN buttons to adjust the alarm hour.
- Press ALARM again to switch to minute setting. The minute digits will flash.
- Use the UP or DOWN buttons to adjust the alarm minute.
- Press ALARM again to select the snooze duration (1-60 minutes). Use UP or DOWN to adjust.
- Press ALARM again to select the alarm mode:
- 1-5: Monday to Friday
- 1-6: Monday to Saturday
- 1-7: Everyday
- Press ALARM to confirm and exit alarm setting.

Figure 5: The three available alarm modes for customized wake-up schedules.
3. Snooze Function
When the alarm sounds, press the LIGHT/SNOOZE button to activate the snooze function. The alarm will sound again after the set snooze duration (1-60 minutes). To cancel the alarm completely, press any other button.

Figure 6: The snooze function allows for additional sleep time after the alarm sounds.
4. Voice Control & Power Saving Mode (Battery Powered Only)
When the clock is powered solely by AAA batteries, it enters a power-saving mode where the display turns off after 16 seconds of inactivity. You can activate the display by:
- Making a sound (e.g., clapping hands, knocking on the table).
- Touching the clock.
The clock's internal time and temperature tracking continue even when the display is off in power-saving mode.

Figure 7: The clock's display can be activated by sound or touch when running on battery power.
Maintenance
- Cleaning: Wipe the clock surface with a soft, dry cloth. Do not use abrasive cleaners or solvents.
- Battery Replacement: If using batteries, replace them when the display becomes dim or the clock functions become erratic. Ensure correct polarity when inserting new batteries.
- Storage: If storing the clock for an extended period, remove the batteries to prevent leakage.
Troubleshooting
| Problem | Possible Cause | Solution |
|---|---|---|
| Display is off or dim. |
|
|
| Alarm does not sound. |
|
|
| Voice control not working. |
|
|
Specifications
| Brand | AMIR |
| Model | B09F5SL8K6 |
| Display Type | Digital LED |
| Color | Red (LED display) |
| Power Source | Wired Electric (USB) and Battery Powered (3x AAA, not included) |
| Special Features | Alarm, Adjustable Brightness, Temperature Display, Night Mode, Snooze, Voice Control |
| Product Dimensions | 16L x 6H cm (approx. 6.3 x 2.36 inches) |
| Weight | 160 g (approx. 0.35 lbs) |
Warranty and Support
This product comes with a standard manufacturer's warranty. For warranty claims or technical support, please contact the retailer or manufacturer directly. Keep your purchase receipt as proof of purchase.
For further assistance, please visit the AMIR official website or contact their customer service.