1. Introduction
This manual provides detailed instructions for the setup, operation, and maintenance of your Pyle PKBRD6112 Portable Digital Karaoke Piano Keyboard. Please read this manual thoroughly before using the product to ensure proper function and to maximize your experience.
The Pyle PKBRD6112 is a portable digital musical keyboard featuring 61 keys, designed for both beginners and experienced users. It includes a variety of tones, rhythms, and a wired microphone for vocal accompaniment. The keyboard is equipped with built-in stereo speakers, an auxiliary input for connecting external audio sources, and a rechargeable battery for portable use.

Image 1.1: Pyle PKBRD6112 Electric Keyboard with 61 keys and included wired microphone.
2. Package Contents
Verify that all items listed below are included in your package:
- Portable Piano Keyboard (PKBRD6112)
- Wired Microphone
- USB Charger Power Cable
- Audio Cable (3.5mm to 3.5mm)
- UL Adapter (Power Adapter)
- Music Sheet Stand Holder
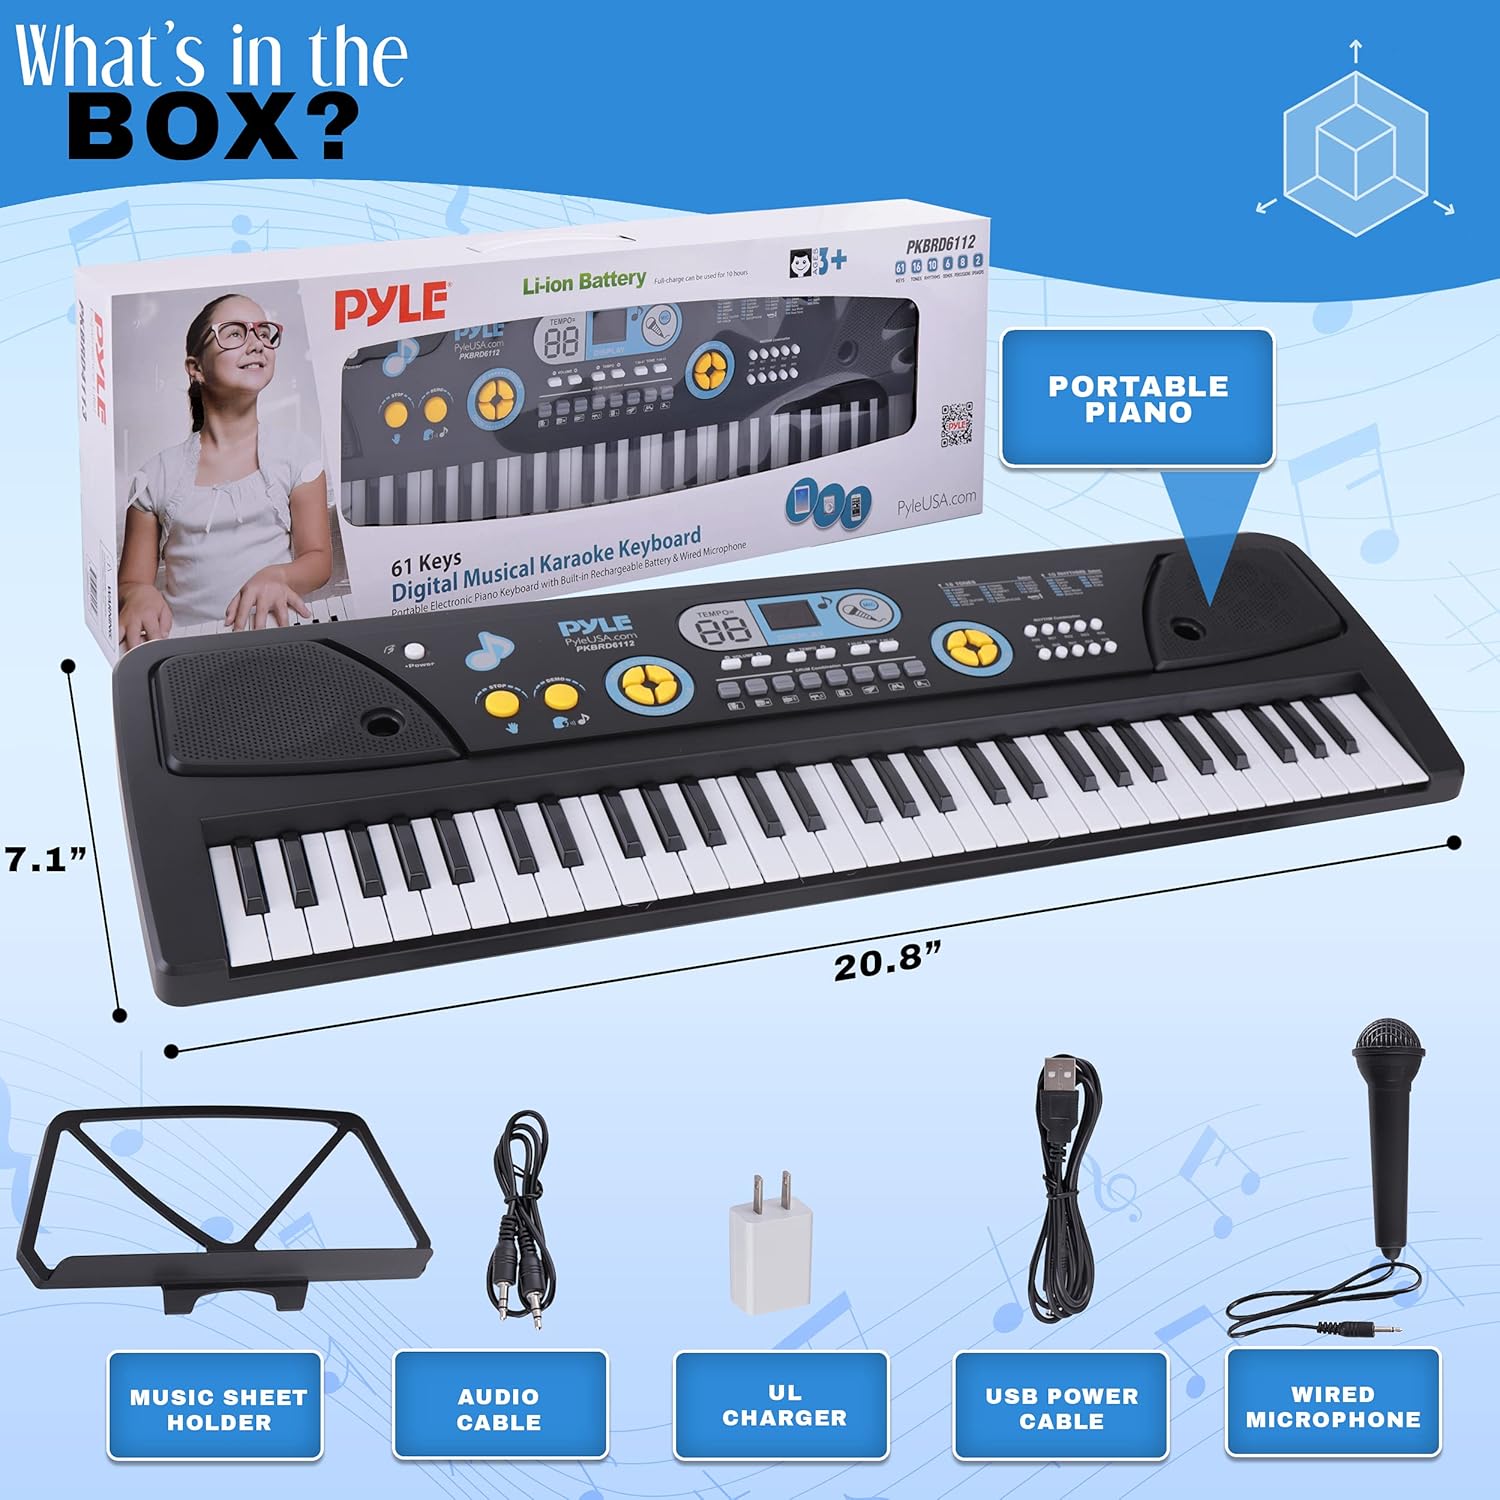
Image 2.1: All components included in the Pyle PKBRD6112 package.
3. Product Overview
Familiarize yourself with the various parts and controls of your Pyle PKBRD6112 keyboard.

Image 3.1: Top and rear view of the keyboard with labeled controls and ports.
- Power Button: Turns the keyboard on or off.
- Volume Control: Adjusts the overall sound output level.
- Tempo Control: Adjusts the speed of rhythms and demo songs.
- Tone Selection: Cycles through 16 different instrument sounds.
- Rhythm Selection: Cycles through 10 different rhythm patterns.
- Demo Button: Plays pre-recorded demonstration songs.
- Stop Button: Stops current rhythm or demo playback.
- Single/Finger/Okon/Follow: Controls for accompaniment modes.
- Drum Combination Pads: Buttons for playing individual drum sounds.
- Rec/Play/Prog/Fill-in: Controls for recording, playback, programming rhythms, and rhythm fills.
- Display: Shows current tone, rhythm, and other settings.
- AUX IN (3.5mm Jack): Connect external audio devices.
- MIC IN (3.5mm Jack): Connect the wired microphone.
- PHONES IN (3.5mm Jack): Connect headphones for private practice.
- USB Power Input: Connect the USB charger power cable for power and charging.
4. Setup
4.1 Powering the Keyboard
- Locate the USB Power Input port on the rear of the keyboard.
- Connect the provided USB Charger Power Cable to the keyboard.
- Connect the other end of the USB cable to the UL Adapter.
- Plug the UL Adapter into a standard wall outlet.
- The keyboard has a built-in rechargeable battery. Allow sufficient time for the battery to charge before initial portable use.
4.2 Connecting the Microphone
- Locate the MIC IN (3.5mm Jack) port on the rear of the keyboard.
- Insert the plug of the wired microphone into the MIC IN port.
- Adjust the microphone volume using the keyboard's main volume control or dedicated microphone volume if available (refer to Image 3.1).
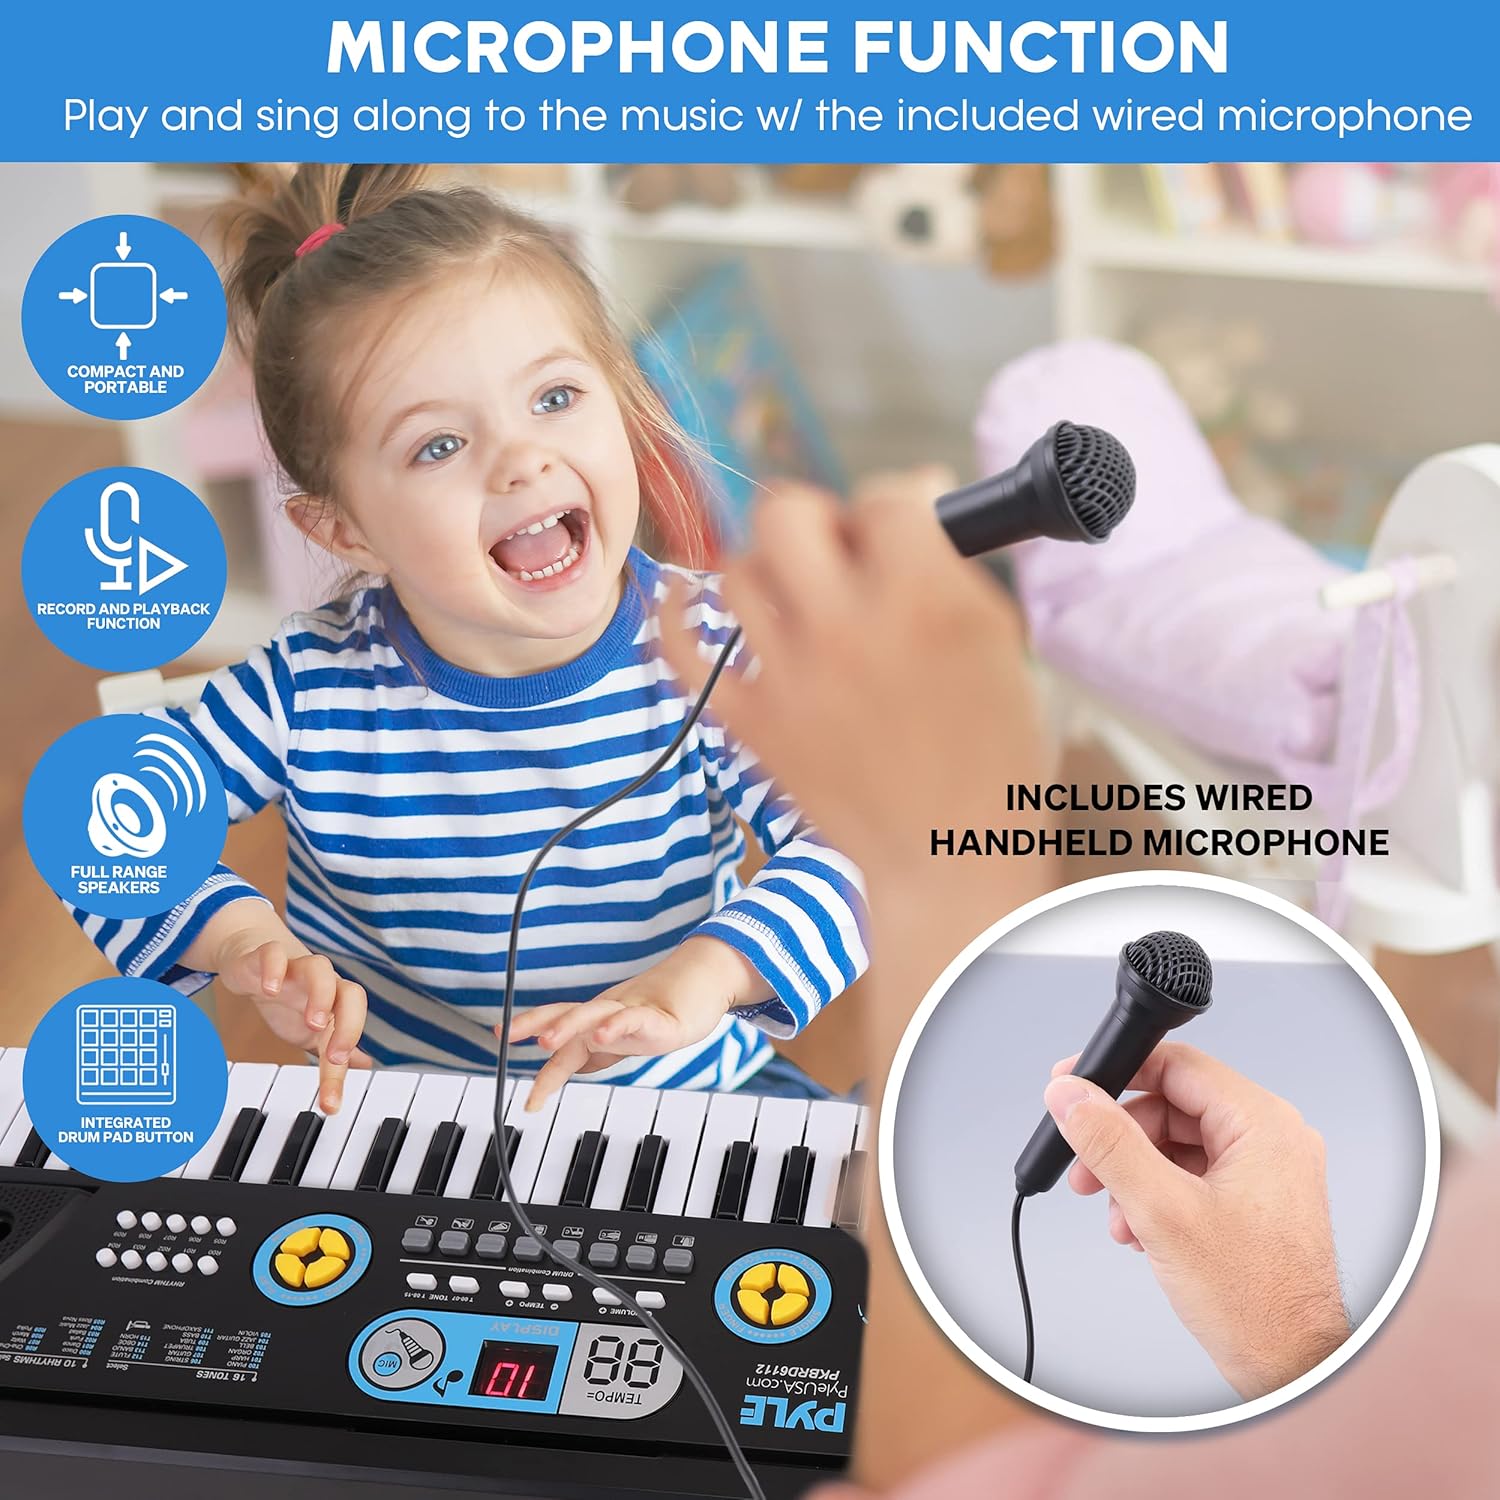
Image 4.1: Using the wired microphone with the keyboard.
4.3 Connecting Headphones
- Locate the PHONES IN (3.5mm Jack) port on the rear of the keyboard.
- Plug your headphones into this port for private listening. The internal speakers will be muted when headphones are connected.

Image 4.2: Connecting headphones for private practice.
4.4 Connecting External Audio Devices (AUX IN)
- Locate the AUX IN (3.5mm Jack) port on the rear of the keyboard.
- Use the provided Audio Cable to connect your smartphone, tablet, laptop, or other audio device to the AUX IN port.
- Audio from the connected device will play through the keyboard's speakers, allowing you to play along with music.

Image 4.3: Connecting an external device for audio streaming.
4.5 Attaching the Music Sheet Stand Holder
- Locate the slots on the top panel of the keyboard, behind the control panel.
- Insert the base of the music sheet stand holder into these slots until it is securely in place.

Image 4.4: Music sheet stand holder attached to the keyboard.
4.6 Microphone Storage
When not in use, the wired microphone can be stored in the dedicated holder located on the underside of the keyboard.

Image 4.5: Microphone holder on the bottom of the keyboard.
5. Operating Instructions
5.1 Power On/Off and Volume Adjustment
- Press the Power Button to turn the keyboard on. The display will illuminate.
- Rotate the Volume Control knob to adjust the desired sound level.
- Press the Power Button again to turn the keyboard off.
5.2 Selecting Tones
- The keyboard features 16 different instrument tones.
- Press the Tone Selection buttons (usually labeled with numbers or up/down arrows) to cycle through the available tones. The current tone number will be shown on the display.
5.3 Selecting Rhythms and Adjusting Tempo
- The keyboard includes 10 rhythm patterns.
- Press the Rhythm Selection buttons to choose a rhythm. The current rhythm number will be shown on the display.
- Use the Tempo Control buttons to increase or decrease the speed of the selected rhythm.
- Press the Stop Button to halt the rhythm playback.

Image 5.1: Overview of available rhythms, drum combinations, and tones.
5.4 Using Drum Combinations
- The keyboard features integrated Drum Combination Pads.
- Press these pads to play individual drum sounds, allowing you to create your own drum patterns or add percussion to your music.
5.5 Demo Songs
- Press the Demo Button to play through the pre-recorded demonstration songs.
- Press the Stop Button to end the demo song playback.
5.6 Record and Playback Function
- Recording: Press the REC button to enter recording mode. Play your desired melody on the keys. The keyboard will record your key presses.
- Playback: After recording, press the PLAY button to listen to your recorded melody.
- Note: This function typically records only the notes played on the keyboard, not external audio or microphone input.
5.7 Karaoke Function
- Connect an external audio device (e.g., smartphone) to the AUX IN port (refer to Section 4.4).
- Connect the wired microphone to the MIC IN port (refer to Section 4.2).
- Play music from your external device and sing along through the microphone.

Image 5.2: Engaging in karaoke with the keyboard and microphone.
5.8 Power Saving Function
The keyboard is equipped with a power-saving feature. If left inactive for a certain period, it may automatically enter a sleep mode or power off to conserve battery life. Press any key or the power button to reactivate it.
6. Maintenance
- Cleaning: Use a soft, dry cloth to wipe the surface of the keyboard. Do not use abrasive cleaners, waxes, or solvents.
- Storage: Store the keyboard in a cool, dry place away from direct sunlight and extreme temperatures. Avoid placing heavy objects on top of the keyboard.
- Battery Care: For optimal battery life, avoid fully discharging the battery frequently. Charge the keyboard regularly, even if not in constant use.
- Transportation: When transporting, ensure the keyboard is securely packed to prevent damage. Utilize the microphone holder on the underside for safe microphone storage.
7. Troubleshooting
| Problem | Possible Cause | Solution |
|---|---|---|
| No sound from speakers. | Volume too low; headphones connected; keyboard off. | Increase volume; disconnect headphones; ensure keyboard is powered on. |
| Microphone not working. | Microphone not fully plugged in; microphone volume too low. | Ensure microphone is securely connected to MIC IN port; adjust keyboard volume. |
| Keyboard does not power on. | Battery discharged; power adapter not connected or faulty. | Connect the keyboard to power using the USB cable and UL adapter; allow time to charge. |
| External audio not playing through speakers. | Audio cable not connected correctly; external device volume too low. | Ensure audio cable is securely connected to AUX IN and external device; increase volume on both keyboard and external device. |
8. Specifications
| Feature | Detail |
|---|---|
| Model Number | PKBRD6112 |
| Number of Keys | 61 |
| Tones | 16 |
| Rhythms | 10 |
| Speakers | Built-in Stereo Speakers |
| Connectivity | AUX IN (3.5mm), MIC IN (3.5mm), PHONES IN (3.5mm), USB Power |
| Power Source | Rechargeable Battery, Corded Electric (via USB/UL Adapter) |
| Body Material | Acrylonitrile Butadiene Styrene |
| Product Dimensions (L x W x H) | 29.8 x 10.39 x 3.82 inches |
| Item Weight | 3.96 pounds |
9. Warranty and Support
Pyle products are designed and manufactured to high-quality standards. For information regarding warranty coverage, technical support, or service inquiries, please refer to the warranty card included with your product or visit the official Pyle website.
Please retain your proof of purchase for any warranty claims.


