1. Introduction
This manual provides comprehensive instructions for the installation, operation, and maintenance of your MOES RF433 and WiFi Wireless Light Switch Remote Control Kit. This DIY smart switch system includes an RF433 and WiFi receiver module and a self-generating wall panel transmitter. It is designed to enhance your smart home experience by offering convenient control over your lighting, compatible with popular smart home platforms like Alexa, Google Home, and the Tuya Smart Life App. Please read this manual thoroughly before installation and use to ensure proper function and safety.
2. Safety Information
- Electrical Safety: Installation should only be performed by a qualified electrician or in accordance with local electrical codes. Always turn off power at the circuit breaker before installing or servicing the device.
- Indoor Use Only: This device is intended for indoor use in dry locations. Do not expose to water or excessive humidity, unless specified for waterproof components.
- Voltage Compatibility: Ensure the device's voltage rating matches your electrical supply. The receiver operates at AC 90-250V, 50/60Hz.
- Load Capacity: Do not exceed the maximum load capacity of 10A for the receiver. Overloading can cause damage or fire.
- Component Matching: The RF433 relay receiver and the wall panel transmitter must be of the same type for proper functionality. Do not mix components from different kits or manufacturers.
- Children and Pets: Keep the device and its components out of reach of children and pets to prevent accidents.
3. Package Contents
The MOES RF433 and WiFi Wireless Light Switch Remote Control Kit (1 Switch, 1 Receiver) includes:
- 1 x MOES RF433 and WiFi Receiver Module
- 1 x MOES Self-Generating Wall Panel Transmitter (Wireless Switch)
- 1 x Double-sided adhesive tape (for switch mounting)
- 1 x User Manual
4. Product Overview
The MOES Wireless Light Switch system consists of two main components: a compact receiver module and a battery-free wall panel switch.
4.1. Receiver Module
The receiver module is a mini-sized device designed to be installed behind an existing light switch or directly wired to a light fixture. It acts as the control unit, receiving signals from the wireless switch and/or your smart home app to control the connected electrical load.

Figure 4.1: MOES RF433 and WiFi Receiver Module. This image shows the compact receiver module held in a hand, illustrating its small size and key features such as app remote control, voice control, timing/countdown, two-way control, excellent heat dissipation, group control, and relay status setting.
- Mini Body: Compact design for easy installation in junction boxes or behind switches.
- App Remote Control: Control connected devices via the Tuya Smart Life App.
- Voice Control: Compatible with Alexa and Google Home for hands-free operation.
- Timing/Countdown: Schedule lights to turn on/off automatically.
- Two-way Control: Supports multi-location control.
- Excellent Heat Dissipation: Designed for safe and reliable operation.
- Group Control: Manage multiple devices simultaneously.
- Relay Status Setting: Configure the power-on state of the connected device.
4.2. Wireless Wall Panel Transmitter (Switch)
The wall panel transmitter is a self-generating, battery-free switch that communicates with the receiver module using RF433 technology. It requires no wiring or batteries, offering flexible placement options.

Figure 4.2: MOES Wireless Wall Panel Transmitter. This image illustrates the waterproof design of the wireless wall panel switch, indicating its durability.
5. Installation
Before proceeding with installation, ensure the main power supply is turned off at the circuit breaker to prevent electrical shock.
5.1. Receiver Module Installation
- Power Off: Turn off the main power supply to the circuit where you intend to install the receiver.
- Wiring: Connect the receiver module according to the wiring diagram provided below. Ensure all connections are secure. The receiver is designed to fit into standard UK/EU/US cable decoder boxes or behind traditional switches.
- Placement: Carefully place the receiver module into the junction box or behind the existing switch.
- Power On: Restore power to the circuit.

Figure 5.1: Receiver Module Placement. This diagram illustrates how the compact receiver module can be easily placed inside a standard junction box, behind an existing wall switch.
5.2. Wiring Diagram for 2-Way Control
The receiver supports 2-way control, allowing you to control a single light from multiple locations using both the wireless switch and a traditional switch, or multiple wireless switches.

Figure 5.2: 2-Way Control Wiring Diagram. This diagram shows the electrical connections for implementing 2-way control, connecting the receiver module to a lamp and a traditional 2-way switch. Ensure correct L (Live) and N (Neutral) connections.
5.3. Wireless Switch Placement
The self-generating wireless switch can be placed anywhere convenient. Use the provided double-sided adhesive tape to secure it to a wall or any flat surface. No wiring or battery replacement is needed.
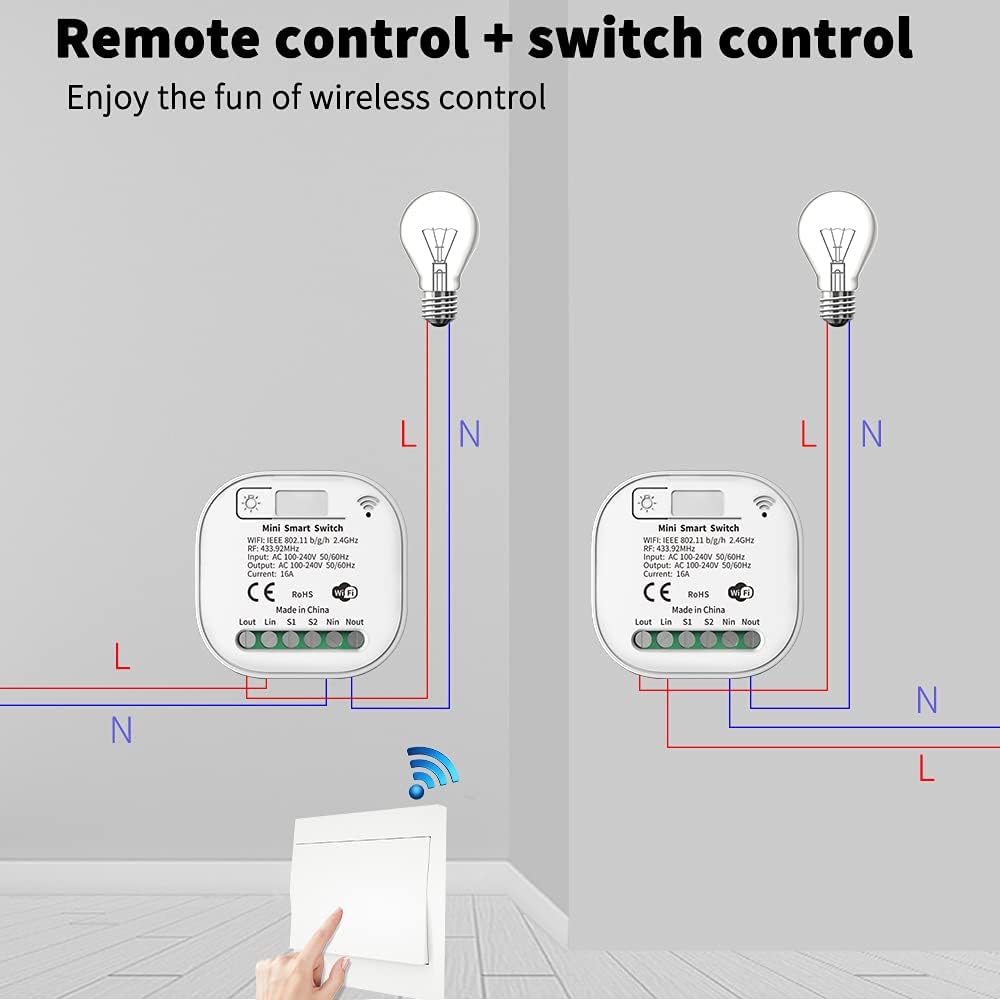
Figure 5.3: Wireless Switch Control. This image demonstrates the flexibility of the wireless switch, showing how it can control one or more lights remotely without physical wiring to the light fixture.
6. Operating Instructions
6.1. Pairing the Wireless Switch with the Receiver
To enable control, the wireless switch must be paired with the receiver module. The exact pairing procedure may vary slightly, but generally involves:
- Ensure the receiver module is powered on.
- Press and hold the pairing button on the receiver module (refer to the receiver's specific instructions for button location) until an indicator light flashes.
- Within a few seconds, press the wireless wall panel switch. The indicator light on the receiver should stop flashing or change color, indicating successful pairing.
Once paired, pressing the wireless switch will toggle the connected light on or off.
6.2. App Remote Control (Tuya Smart Life)
The receiver module supports WiFi connectivity, allowing control via the Tuya Smart Life App.
- Download App: Download the "Tuya Smart" or "Smart Life" app from your smartphone's app store (iOS or Android).
- Register/Login: Create an account or log in to your existing account.
- Add Device: In the app, tap "+" to add a new device. Select "Electrical" -> "Switch (Wi-Fi)" or follow the app's on-screen instructions for adding a smart switch.
- Connect to Wi-Fi: Follow the app's prompts to connect the receiver module to your home Wi-Fi network. This usually involves putting the device into pairing mode (e.g., by rapidly toggling power or pressing a button on the receiver).
- Control: Once successfully added, you can control the light, set schedules, and configure other smart features directly from the app.

Figure 6.1: WiFi Remote Control. This image illustrates the extensive remote control options available, including control via the Tuya Smart Life App and voice commands through smart assistants like Alexa and Google Assistant.
6.3. Voice Control (Alexa & Google Home)
After setting up the device in the Tuya Smart Life App, you can link it to Amazon Alexa or Google Home for voice control.
- Link Account: Open the Alexa or Google Home app. Go to "Skills & Games" (Alexa) or "Works with Google" (Google Home) and search for "Tuya Smart" or "Smart Life".
- Enable Skill: Enable the skill and link your Tuya Smart/Smart Life account.
- Discover Devices: Ask Alexa or Google to discover new devices.
- Voice Commands: You can now use voice commands such as:
- "Alexa, turn on the living room light."
- "Hey Google, turn off the bedroom light."
7. Maintenance
- Cleaning: Use a soft, dry cloth to clean the wireless switch and receiver module. Do not use abrasive cleaners or solvents.
- Firmware Updates: Periodically check the Tuya Smart Life App for any available firmware updates for the receiver module to ensure optimal performance and security.
- Environmental Conditions: Ensure the operating environment remains within the specified temperature and humidity ranges to prolong the device's lifespan.
8. Troubleshooting
| Problem | Possible Cause | Solution |
|---|---|---|
| Light does not respond to wireless switch. |
|
|
| Device cannot connect to Wi-Fi or App. |
|
|
| Voice control not working. |
|
|
9. Specifications
| Feature | Detail |
|---|---|
| Brand | MOES |
| Model | WRT-S-ZEU1-RC-EN |
| Connectivity Protocol | Wi-Fi, RF433 |
| Operating Mode | ON-ON-OFF |
| Current Rating | 10 A |
| Contact Type | Normally Open |
| Connector Type | Screw |
| Switch Type | Push Button |
| Terminal | Quick Connection |
| Material | Material(s) (Contact Material: Copper) |
| Item Dimensions (L x W x H) | 10.5 x 9.1 x 5 centimeters |
| Circuit Type | Parallel |
| Mounting Type | Double-sided adhesive |
| Actuator Type | Toggle |
| Number of Positions | 1 |
| Control Device Type | Voice Assistant |
| Control Method | Remote Control |
| Compatible Devices | Alexa, Google Home, Tuya Smart Life App, RF433/WiFi Relay Receiver |
| International Protection Rating | IP65 (for the switch) |
| Compliant Specifications | CE, CCC, RoHS, IP65 |
10. Warranty and Support
MOES offers a 60-day money-back guarantee and a 30-day return policy for any reason. For technical support, troubleshooting assistance, or warranty claims, please contact MOES customer service through the retailer where the product was purchased or visit the official MOES website for contact information.
Please retain your proof of purchase for warranty purposes.


