Introduction
Thank you for choosing the iHome AutoVac Halo Robot Vacuum and Mop Combo. This manual provides essential information for the safe operation, maintenance, and troubleshooting of your device. Please read it thoroughly before first use and keep it for future reference.
What's Included
Verify that all components are present in the package:
- iHome AutoVac Halo Robot Vacuum
- Auto-Empty Base
- Mop Pads
- Replacement Side Brush
- PowerMop Attachment
- Brush Cleaning Tool
- Replacement HEPA Filter
- Remote Control
- Dust Bag
- Power Cable

Image: All components of the iHome AutoVac Halo, including the robot vacuum, auto-empty base, mop pads, side brush, PowerMop attachment, cleaning tool, HEPA filter, remote control, dust bag, and power cable.
Setup Guide
1. Prepare the Robot Vacuum
- Remove any protective film from the robot's surface.
- Remove and discard any bumper guards or packing materials.

Image: Top view of the iHome AutoVac Halo Robot Vacuum, showing its clean, minimalist design.
2. Place the Auto-Empty Base
Choose an ideal location for the auto-empty base:
- Near an electrical outlet.
- Away from obstructions (ensure at least 2 feet on either side and 5 feet in front).
- In an area with a strong Wi-Fi signal.

Image: The iHome AutoVac Halo Robot Vacuum docked with its auto-empty base, illustrating proper placement.
3. Initial Charging
Connect the power cable to the auto-empty base and plug it into an outlet. Place the AutoVac Halo onto the base. The robot's LED indicators will light up. Allow the robot to fully charge before its first cleaning cycle (up to 5 hours). The LED will turn solid green when charging is complete.
Video: Demonstrates the initial setup and charging process for the iHome AutoVac Halo, including connecting the base and docking the robot.
4. Connect to Wi-Fi and App Setup
Download the "iHome Clean" app from your device's app store. Follow the in-app instructions to connect your AutoVac Halo to your home Wi-Fi network and add it as a device. This enables smart mapping, scheduling, and remote control features.

Image: Screenshot of the iHome Clean app displaying a mapped floor plan, illustrating the smart mapping capabilities.
Operating Instructions
1. Preparing Your Home for Cleaning
Before starting a cleaning cycle, ensure the area is free of small objects, loose cables, and anything that could obstruct the robot or get tangled in its brushes. This helps prevent the robot from getting stuck and ensures efficient cleaning.
2. Starting a Cleaning Cycle
You can start a cleaning cycle in several ways:
- On-Device: Press the Power button on the robot.
- Remote Control: Use the provided remote control to start/stop cleaning.
- iHome Clean App: Use the app for advanced control, including auto-clean, region cleaning, area cleaning, and spot cleaning.
- Voice Control: Connect to Amazon Echo or Google Home for voice commands.
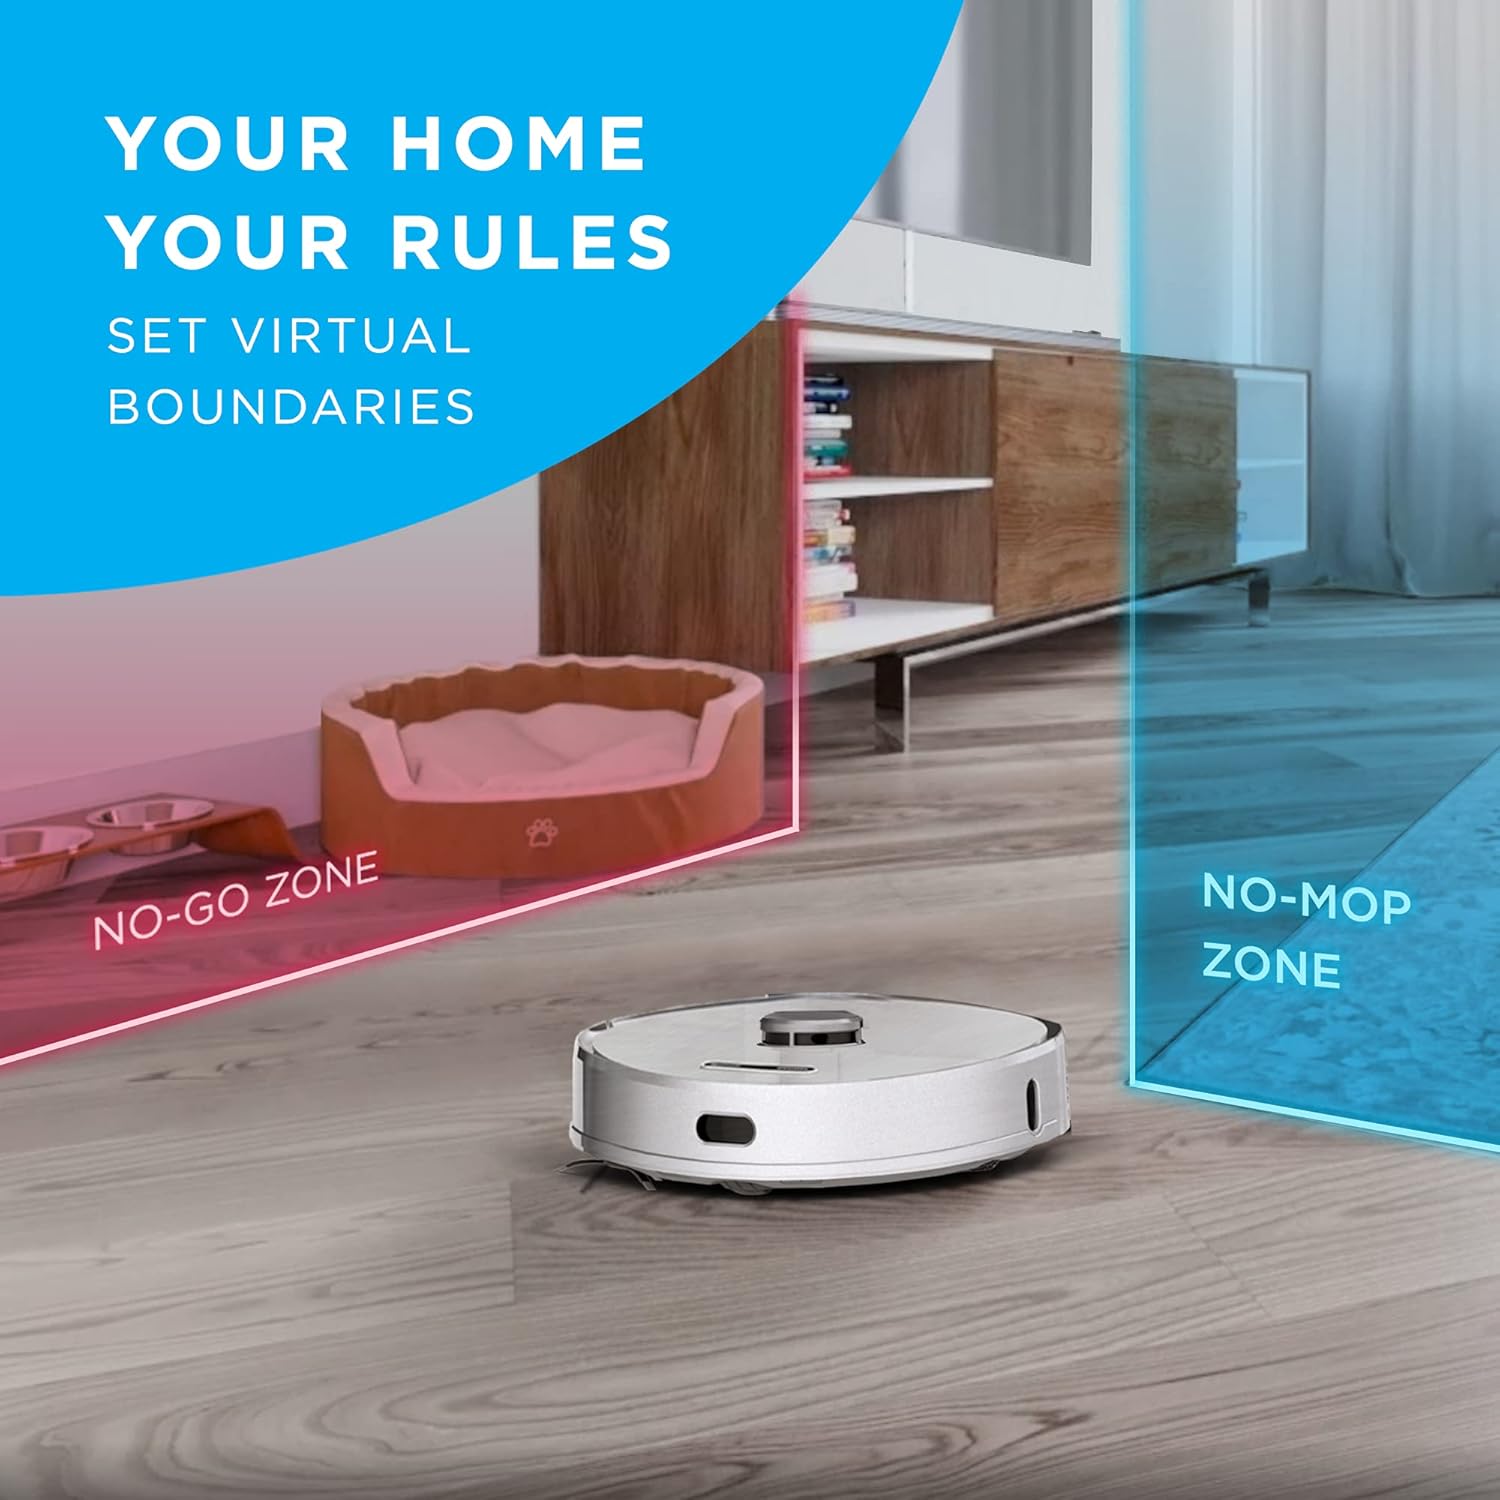
Image: The iHome AutoVac Halo actively cleaning a hard floor, demonstrating its operation.
3. Smart Mapping and Navigation
The AutoVac Halo uses LiDAR Visual Navigation Technology to map your home. During its first few runs, it will create a detailed floor plan. This map allows for efficient, systematic cleaning and enables features like:
- Virtual Boundaries: Set "No-Go Zones" or "No-Mop Zones" via the app to restrict cleaning in specific areas.
- Scheduled Cleaning: Schedule cleaning for specific rooms or times.
- Real-time Tracking: Monitor the robot's progress and location on the map in the app.
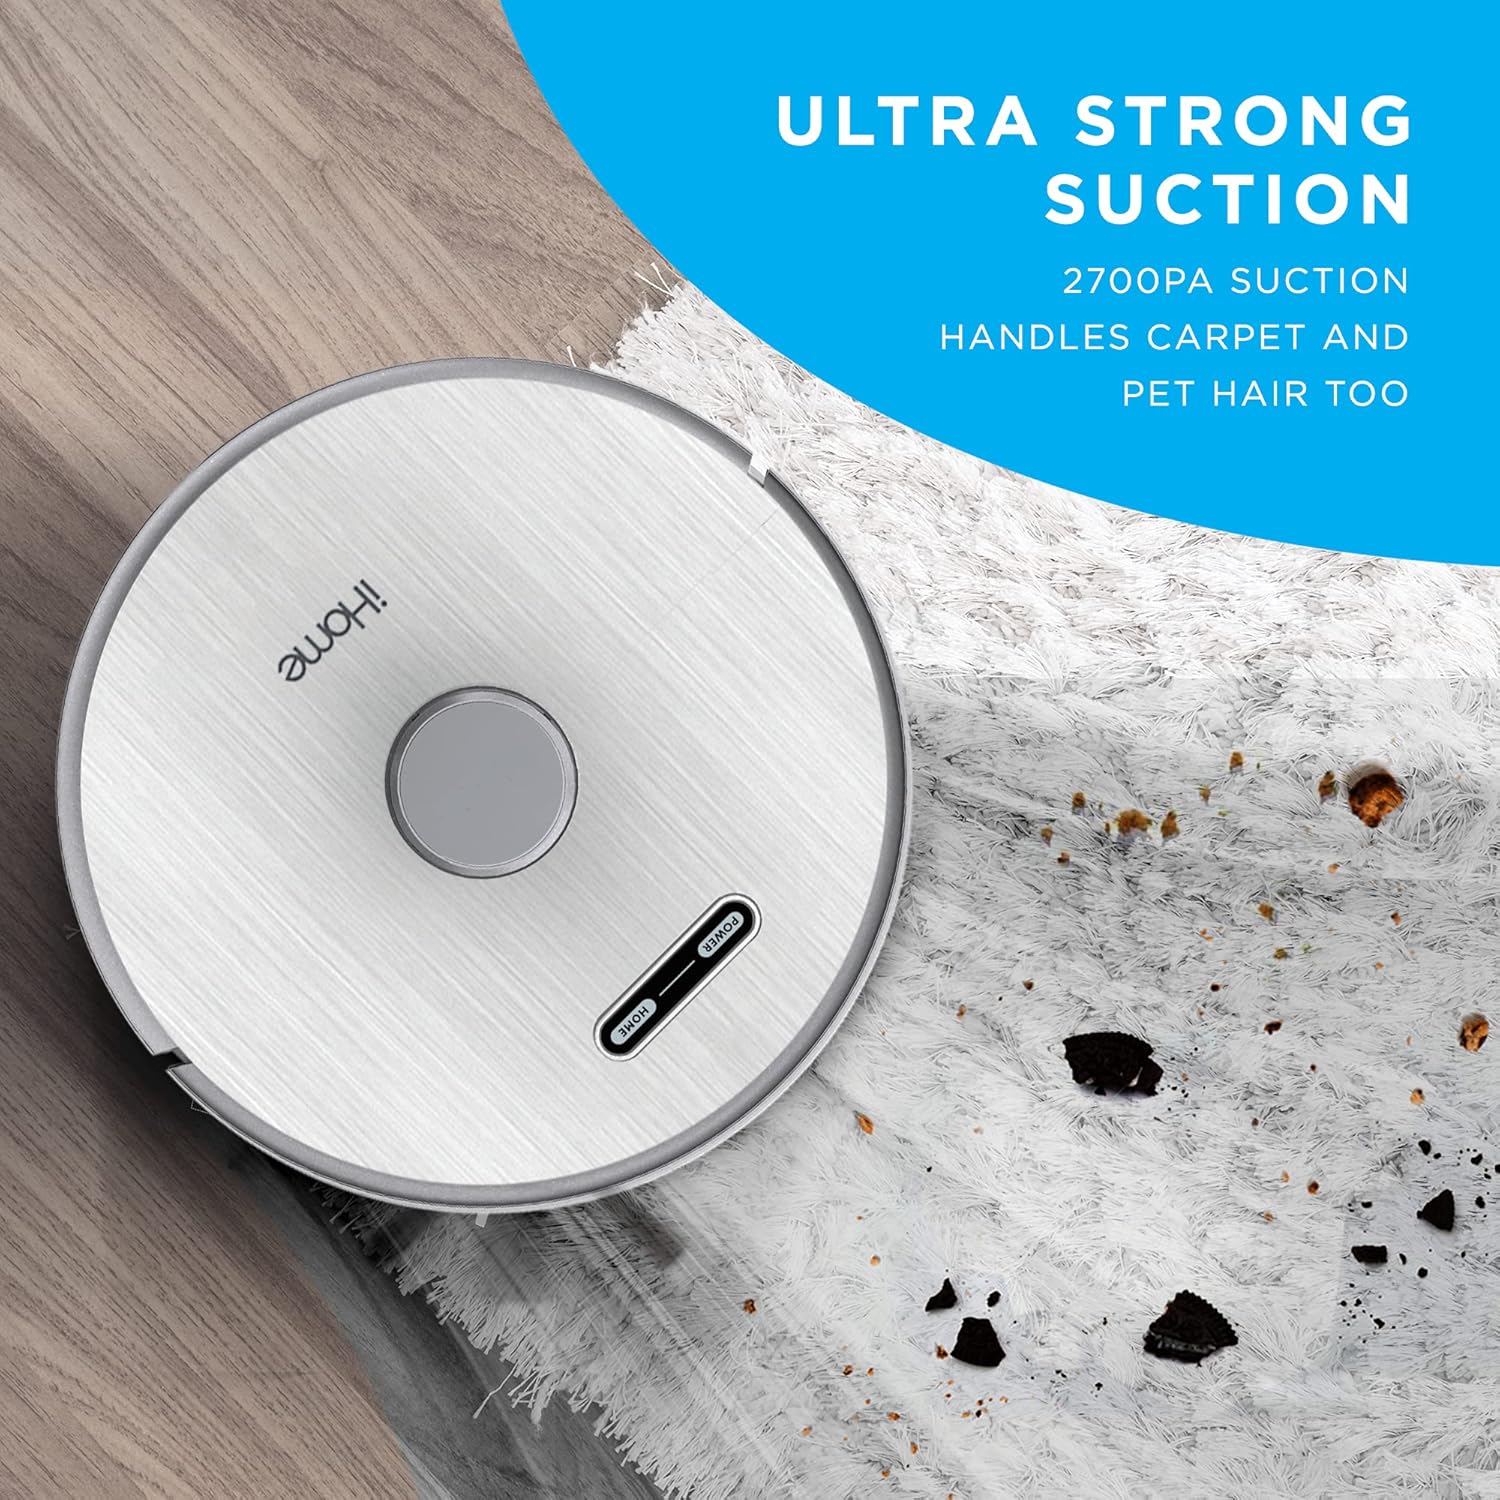
Image: The iHome AutoVac Halo navigating a room, with virtual boundaries (No-Go Zone, No-Mop Zone) overlaid on a floor plan.
4. Vacuum and Mop Functions
The AutoVac Halo offers both vacuuming and mopping capabilities. It is suitable for hardwood floors, tile, and low-pile carpets. For mopping, attach the PowerMop attachment and fill the water tank (if applicable, specific instructions for mop attachment are in the full manual). Adjust suction and mop settings via the app.

Image: The iHome AutoVac Halo demonstrating its mopping function on a hard floor, leaving a clean path.
Maintenance
Regular maintenance ensures optimal performance and extends the lifespan of your AutoVac Halo.
1. Auto-Empty Base Dust Bag
The auto-empty base automatically transfers dirt from the robot's dustbin into a disposable dust bag. Replace the dust bag when the indicator light on the base signals it is full, or approximately every 30-60 days depending on usage.

Image: A hand removing a full dust bag from the iHome Auto-Empty Base, ready for disposal.
2. Robot Dustbin and Filter
Although the base self-empties, periodically check and clean the robot's internal dustbin and HEPA filter. Tap out loose debris and rinse the filter under running water (ensure it's completely dry before re-inserting). Replace the HEPA filter every 3-6 months.
3. Brushes and Wheels
Regularly inspect and clean the main brush, side brushes, and wheels. Use the provided cleaning tool to remove tangled hair or debris. Replace worn-out side brushes as needed.
4. Mop Pads
After each mopping cycle, remove and clean the mop pads. They can be hand-washed or machine-washed. Ensure they are dry before reattaching.
Troubleshooting
If you encounter issues with your iHome AutoVac Halo, refer to the following common solutions:
| Problem | Possible Cause | Solution |
|---|---|---|
| Robot not charging | Not properly docked; power cable loose; charging contacts dirty. | Ensure robot is correctly aligned on the base. Check power cable connection. Clean charging contacts on both robot and base. |
| Robot gets stuck frequently | Loose cables, small objects, or thick carpets. | Clear the cleaning area of obstructions. Use virtual boundaries in the app for problem areas. |
| Poor cleaning performance | Full dustbin/dust bag; clogged filter; worn brushes. | Empty dustbin/replace dust bag. Clean or replace filter. Clean or replace brushes. |
| Wi-Fi connection issues | Weak Wi-Fi signal; incorrect network password; router issues. | Ensure strong Wi-Fi signal near the base. Re-enter Wi-Fi credentials in the app. Restart your router. |
| Main Wheel Error | Debris caught in wheels; wheel malfunction. | Check wheels for obstructions and clean them. If the error persists, contact customer support. |
Specifications
- Brand: iHome
- Model Name: iHRV7
- Special Features: LiDAR Navigation, Self-Emptying, Smart Mapping
- Color: White
- Filter Type: Cartridge
- Battery Life: Up to 3 Hours
- Power Source: Battery Powered
- Batteries: 1 Lithium Ion battery required (included)
- Control Method: Voice, App, Remote
- Compatible Devices: Amazon Echo, Google Home
- Form Factor: Robotic
- UPC: 860004017271
- Product Dimensions: 13 x 13 x 4 inches
- Item Weight: 5 pounds
- Surface Recommendation: Hardwood floors, tile, low-pile carpets
Warranty and Support
For warranty information, technical support, or service inquiries, please refer to the warranty card included in your product packaging or visit the official iHome website. Keep your purchase receipt as proof of purchase for warranty claims.
Online Support: www.ihome.com/support
Related Documents - iHRV7
 |
iHome AUTOVAC Eclipse Series Robot Vacuum and Mop User Manual This user manual provides comprehensive instructions for the iHome AUTOVAC Eclipse Series 2-in-1 Robot Vacuum and Mop, covering setup, operation, safety, app connectivity, and maintenance for efficient home cleaning. |
 |
iHome Autovac Halo IHRV7 Owner's Guide Owner's guide for the iHome Autovac Halo robot vacuum cleaner, model IHRV7. Includes safety instructions, product overview, setup, usage, maintenance, troubleshooting, and FCC information. |
 |
iHome AUTOVAC NOVA S1 PRO Owner's Guide: Setup, Maintenance, and Troubleshooting Comprehensive owner's guide for the iHome AUTOVAC NOVA S1 PRO robot vacuum. Learn about setup, app usage, maintenance, troubleshooting, and warranty information for your iHome cleaning device. |
 |
iHome Autovac Eclipse iHRV2 Owner's Guide: Setup, Operation, and Maintenance Comprehensive owner's guide for the iHome Autovac Eclipse robot vacuum cleaner (Model iHRV2). Learn how to set up, use, maintain, and troubleshoot your device. Includes product overview, cleaning modes, app connection, safety instructions, and FCC statement. |
 |
iHome AutoVac Juno Robot Vacuum Cleaner (Model iHRV9) Owner's Guide Owner's guide for the iHome AutoVac Juno robot vacuum cleaner (Model iHRV9), providing detailed instructions on setup, operation, maintenance, troubleshooting, and warranty information. |
 |
iHome Autovac Nova (Model iHRV6) Owner's Guide Comprehensive owner's guide for the iHome Autovac Nova (Model iHRV6) robotic vacuum cleaner, covering setup, operation, maintenance, and troubleshooting. |