1. Introduction
The YESWELDER ARC 145A 230V MMA Welder (Model ARC-145D) is a compact and efficient single-phase inverter arc welding machine. It is designed to provide a stable and smooth arc for various welding applications, including carbon steels, low-alloy steels, stainless steels, and cast iron. This manual provides essential information for the safe and effective operation, maintenance, and troubleshooting of your welding machine.
Please read this manual thoroughly before operating the welder and retain it for future reference.
2. Safety Instructions
WARNING: Welding can be dangerous. Always follow safety precautions to prevent injury or death. Ensure you have proper training before operating this equipment.
- Electric Shock: Can kill. Do not touch live electrical parts. Wear dry welding gloves and protective clothing. Ensure the workpiece is properly grounded.
- Fumes and Gases: Can be hazardous to your health. Keep your head out of the fumes. Use adequate ventilation or exhaust at the arc to keep fumes and gases away from the breathing zone.
- Arc Rays: Can burn eyes and skin. Wear a welding helmet with a proper shade filter. Wear safety glasses with side shields under your helmet. Wear protective clothing to protect your skin.
- Fire and Explosion: Welding sparks can cause fire or explosion. Keep flammable materials away from the welding area. Have a fire extinguisher readily available.
- Hot Parts: Can cause severe burns. Allow the welding gun and workpiece to cool before handling.
- Noise: Can damage hearing. Wear ear protection.
3. Package Contents
Verify that all items are present and undamaged upon unpacking:
- YESWELDER ARC 145A 230V MMA Welder (Model ARC-145D)
- 3m Earth Clamp
- 3m Electrode Holder
- Shoulder Strap
- Wire Brush (typically included for maintenance)

Image: YESWELDER ARC 145A Welder with included accessories and dimensions.
4. Product Features
The YESWELDER ARC 145A welder incorporates advanced technology for reliable performance:
- Output Power: Provides 20 to 145 Amperes on a 230V power supply.
- Arc Performance: Features easy arc starting, stable arc, deep weld pool, and excellent weld bead formation.
- Electrode Compatibility: Compatible with welding rods such as 7018, 6011, 422, and 6013. Supports electrodes up to a maximum size of 3.2 mm.
- Adaptive Arc Force: Automatic adaptive arc force during MMA welding helps stabilize the arc, minimizes spatter, and prevents the arc from breaking or the electrode from sticking.
- Hot-Start Function: Increases the ease of electrode starting, ensuring quick and reliable arc ignition.
- Anti-Stick Function: Reduces welding current when the electrode sticks to the workpiece, allowing for easy removal of the electrode.
- Portability: Compact, lightweight design (net weight 2.1 kg) with a soft, easy-to-carry handle for both indoor and outdoor use.
- Protection: Equipped with an overheat/overload shutdown indicator to ensure durable and safe operation.
- Technology: Utilizes Advanced IGBT Inverter Technology and a pure copper transformer for efficient power conversion.
- Cooling: Intelligent high-speed cooling fan design with a large radiator for durability and quiet operation.

Image: Welder in use, illustrating key features and benefits.

Image: Detailed view of the welder's internal technologies and cooling system.
5. Setup
Before starting any welding operation, ensure the machine is placed on a stable, level surface in a well-ventilated area, free from flammable materials.
- Connect Earth Clamp: Connect the earth clamp cable to the negative (-) terminal on the front panel of the welder. Secure the earth clamp firmly to the workpiece or welding table, ensuring good electrical contact.
- Connect Electrode Holder: Connect the electrode holder cable to the positive (+) terminal on the front panel of the welder.
- Insert Electrode: Securely insert the desired welding electrode into the electrode holder. Ensure the electrode type and size are appropriate for the material and thickness you intend to weld (e.g., 7018, 6011, 422, 6013 electrodes up to 3.2mm).
- Power Connection: Connect the welder's power cord to a suitable 230V AC power outlet. Ensure the power supply meets the welder's requirements.
6. Operating Instructions
Always wear appropriate Personal Protective Equipment (PPE) including a welding helmet, gloves, and protective clothing before operating the welder.
- Power On: Turn on the main power switch located on the welder. The digital display will illuminate.
- Adjust Welding Current: Use the control knob on the front panel to set the desired welding current (amperage). The digital display will show the selected amperage. Refer to electrode manufacturer guidelines for recommended current settings based on electrode type and material thickness.
- Initiate Arc: Bring the tip of the electrode into contact with the workpiece at a slight angle and quickly withdraw it a short distance (approximately the diameter of the electrode) to establish an arc. The Hot-Start function will assist in easy ignition.
- Maintain Arc: Maintain a consistent arc length and travel speed. The Adaptive Arc Force feature helps stabilize the arc and reduce spatter. If the electrode sticks, the Anti-Stick function will reduce the current, allowing for easier removal.
- Welding Technique: Move the electrode steadily along the joint, maintaining the arc. Observe the weld pool and adjust your technique as needed to achieve a consistent and strong weld.
- Completion: Once welding is complete, turn off the welder. Allow the workpiece and electrode holder to cool before handling.

Image: Close-up of the welding process, demonstrating arc stability.
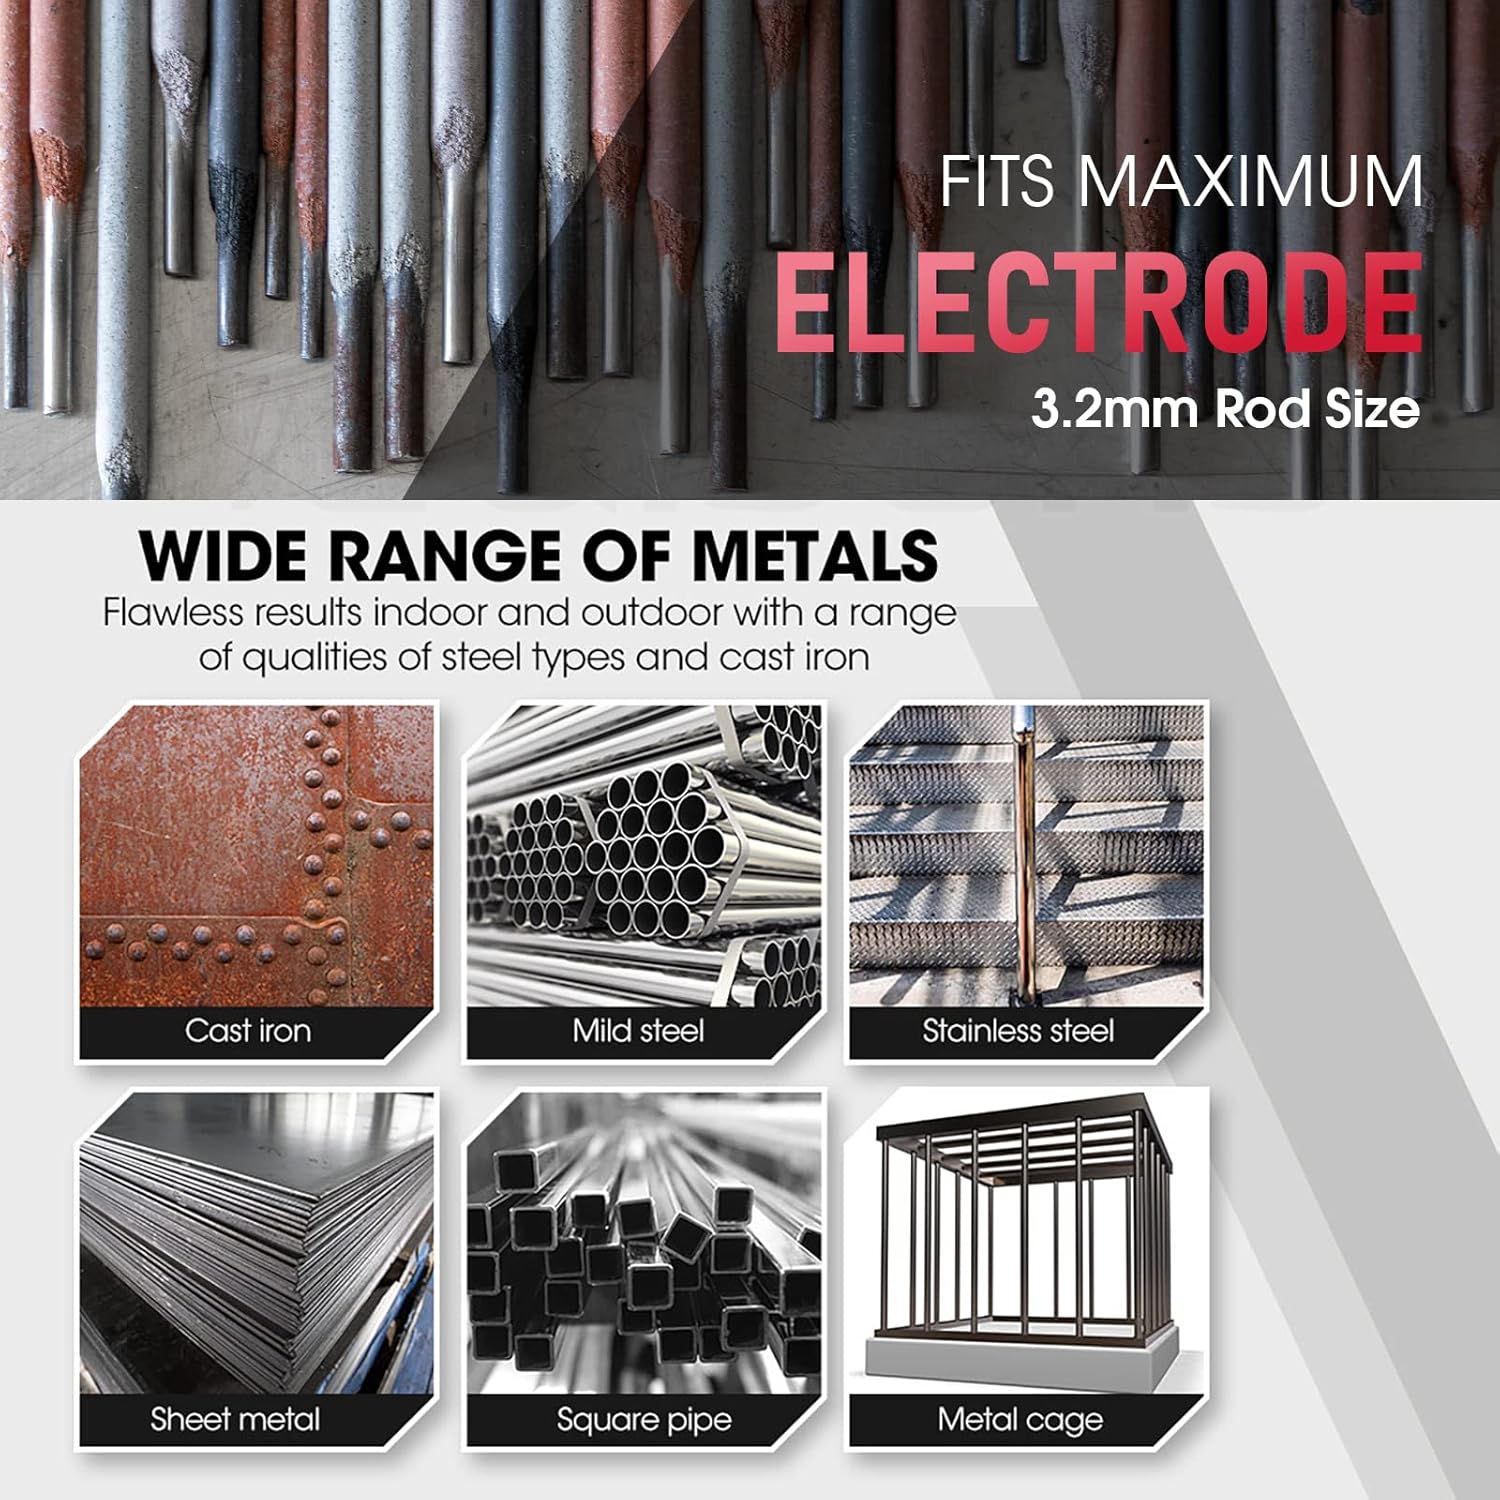
Image: Examples of metal types compatible with the welder, and maximum electrode size.
7. Maintenance
Regular maintenance ensures the longevity and optimal performance of your welder.
- Cleaning: Periodically clean the exterior of the welder with a dry cloth. Use a wire brush to clean the electrode holder and earth clamp connections to ensure good electrical contact. Ensure ventilation openings are free from dust and debris.
- Cable Inspection: Regularly inspect all cables (power, electrode, earth) for cuts, fraying, or damage. Replace damaged cables immediately to prevent electrical hazards.
- Connection Check: Ensure all connections are tight and secure. Loose connections can lead to poor performance and overheating.
- Storage: Store the welder in a dry, clean environment, away from excessive dust, moisture, and corrosive substances.
8. Troubleshooting
If you encounter issues, refer to the following common problems and solutions:
| Problem | Possible Cause | Solution |
|---|---|---|
| No power/Welder does not turn on | No power supply; Faulty power cord/plug; Internal fault | Check power outlet and circuit breaker; Inspect power cord; Contact customer support |
| No arc or weak arc | Poor earth connection; Incorrect current setting; Damp or old electrode; Faulty cables | Ensure good earth contact; Adjust current; Use dry, new electrodes; Inspect and replace cables |
| Electrode sticks frequently | Low current setting; Incorrect arc length; Damp electrode; Improper technique | Increase current; Maintain proper arc length; Use dry electrodes; Practice technique |
| Overheat indicator on | Exceeded duty cycle; Insufficient ventilation; High ambient temperature | Allow welder to cool down; Ensure clear ventilation; Operate in cooler environment |
| Excessive spatter | Too high current; Long arc length; Incorrect electrode angle | Reduce current; Shorten arc length; Adjust electrode angle |
If the problem persists after attempting these solutions, please contact customer support.
9. Specifications
| Specification | Detail |
|---|---|
| Model Number | ARC-145D |
| Manufacturer | YESWELDER |
| Input Voltage | 230 Volts (AC) |
| Output Current Range | 20 - 145 Amperes |
| Max Electrode Size | 3.2 mm |
| Rated Duty Cycle | 60% |
| Protection Grade | IP21S |
| Net Weight | 2.1 kg |
| Machine Dimensions (L x W x H) | 24.5 x 10.5 x 16 cm |
| Power Cord Length | 2 meters |

Image: Technical specifications and model details of the ARC-145D.
10. Warranty Information
For detailed warranty terms and conditions, please refer to the official YESWELDER website or contact their customer support directly. Warranty coverage typically includes manufacturing defects for a specified period from the date of purchase.
11. Customer Support
If you require further assistance, have questions about your YESWELDER ARC 145A welder, or need to report a problem, please contact YESWELDER customer support through their official website or the contact information provided with your purchase documentation.