
1. Introduction
Thank you for choosing the ARTILAURA AR-CX8153 Tachometer. This gauge is designed to provide accurate engine RPM readings for various vehicles, including cars, marine vessels, and trucks. It features a durable construction, a clear display, and customizable backlight colors to suit your preferences. Please read this manual thoroughly before installation and operation to ensure proper use and longevity of the product.

Figure 1: ARTILAURA AR-CX8153 Tachometer (Black and Silver 8000 RPM variant).
2. Key Features
- 7-Color LED Backlight: Customize your display with Blue, Red, Green, Teal, Purple, White, or Yellow backlight options.
- Durable Construction: Features a 316 stainless steel bezel and curved anti-fog glass for clear visibility and resistance to harsh environments.
- Wide RPM Range: Displays engine speeds from 0 to 8,000 RPM.
- Broad Compatibility: Suitable for 4, 6, 8, 10, and 12-cylinder gas-powered engines, operating on 9-32V electrical systems.
- RPM Sensor Compatibility: Designed to work with various tachometer RPM sensors.

Figure 2: The tachometer features 7 selectable backlight colors.

Figure 3: The tachometer is designed with IP67 waterproof rating for marine and outdoor use.
3. Installation and Wiring
3.1 Mounting the Gauge
- Before installation, create a circular opening of ⌀85mm (3 3/8 inches) in the desired panel location.
- Ensure there is sufficient clearance behind the panel, approximately 55mm, for the gauge body and wiring.
- Insert the tachometer into the prepared hole.
- Secure the gauge using the provided mounting bracket and screws.
3.2 Wiring Diagram
Connect the wires according to the following diagram:
- 1 Black: Ground (-)
- 2 Red: 9-32VDC (Power Supply)
- 3 Blue: RPM Signal
- 4 Yellow: Backlight
- 5 White: NC (Not Connected)
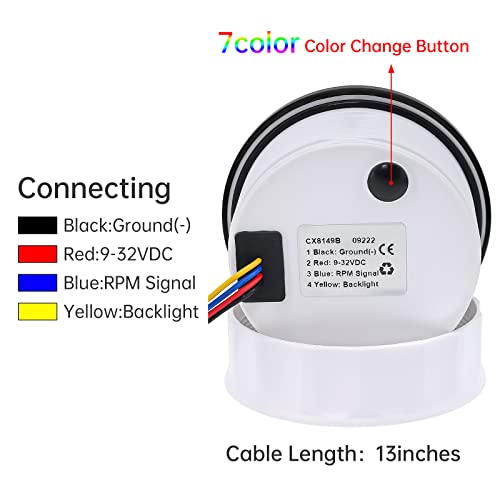
Figure 4: Detailed wiring connections and setting instructions for the tachometer.
4. Operation
4.1 Setting the Speed Ratio (Cylinder/Pole Configuration)
The tachometer requires configuration to match your engine's cylinder count or pole number for accurate RPM readings. This is done via the rubber button on the backside of the unit.
- Enter Setting Mode: Press and hold the rubber button on the backside of the tachometer for approximately 3 seconds. The display will change, indicating entry into setting mode. If the button is released for more than 3 seconds, the unit will exit setting mode.
- Adjust Value: While in setting mode, a short press of the button will increase the displayed value. Releasing the button and pressing it again will decrease the value. For quicker adjustments, press and hold the button; the value will change more rapidly. The adjustable range is 1.0 to 360, with a minimum step of 0.1.
- Save Setting: Once the desired speed ratio value is displayed, release the button. The tachometer will automatically save the setting after 3 seconds. If the setup does not meet your requirements, repeat the process.
Refer to the table below for common engine configurations and their corresponding speed ratios:
| Engine Type | Cylinders/Poles | Speed Ratio |
|---|---|---|
| Outboard | 4 Poles | 2 |
| 6 Poles | 3 | |
| 8 Poles | 4 | |
| 10 Poles | 5 | |
| 12 Poles | 6 | |
| Inboard Gas Engine (4-Cycle) | 4 Cylinders | 2 |
| 6 Cylinders | 3 | |
| 8 Cylinders | 4 | |
| 10 Cylinders | 5 | |
| 12 Cylinders | 6 | |
| Diesel Engine | Gear Number | Gear Number |
4.2 Changing Backlight Color
To change the backlight color, short press the rubber button on the backside of the tachometer. The backlight will cycle through the following sequence:
Red (Default) → Green → Blue → White → Yellow → Cyan → Purple → Automatic (cycles colors every 20 seconds).
Video 1: Demonstration of the ARTILAURA Tachometer Gauge with 7 color options and its functionality. This video shows the gauge in operation and how the backlight colors can be changed.
Video 2: Another demonstration of the ARTILAURA 7 Color Tachometer Gauge, highlighting its 0-8000 RPM range and various features.
5. Maintenance
- Cleaning: Use a soft, damp cloth to clean the gauge's surface. Avoid abrasive cleaners or solvents that could damage the bezel or glass.
- Inspection: Periodically check all wiring connections to ensure they are secure and free from corrosion. Inspect the gauge for any signs of physical damage.
- Waterproofing: While the gauge is IP67 waterproof, ensure the rear connections are properly sealed during installation to maintain water resistance.
6. Troubleshooting
- Inaccurate RPM Readings:
- Verify that the speed ratio setting (cylinder/pole configuration) is correctly set for your engine type as described in Section 4.1.
- Check the RPM signal wire connection (Blue wire) to ensure it is securely connected to the correct signal source (e.g., negative side of the ignition coil).
- Ensure the power (Red wire) and ground (Black wire) connections are stable and providing the correct voltage (9-32V).
- Gauge Not Powering On:
- Confirm that the Red wire is connected to a constant 9-32V power source and the Black wire is connected to a good ground.
- Check for any blown fuses in the power circuit.
- Backlight Not Changing:
- Ensure the Yellow backlight wire is properly connected.
- Short press the rubber button on the backside to cycle through the colors. If it remains stuck on one color, re-check wiring.
- Difficulty Entering Setting Mode:
- Ensure you are pressing and holding the rubber button for exactly 3 seconds. Releasing too early or holding too long might prevent entry into the setting mode.
7. Specifications
| Feature | Specification |
|---|---|
| Brand | ARTILAURA |
| Model Number | AR-CX8153 |
| Material | 316L Stainless Steel Bezel + Anti-fog Glass |
| Dimensions (L x W x H) | 2.2 x 2.2 x 2 inches (85mm diameter) |
| Item Weight | 6.08 ounces |
| RPM Range | 0-8000 RPM |
| Operating Voltage | 9-32V DC |
| Cylinder Compatibility | 4, 6, 8, 10, 12 Cylinder Gas Engines |
| Backlight Colors | Red, Green, Blue, White, Yellow, Cyan, Purple (7 colors + Automatic cycle) |
| Waterproof Rating | IP67 |
8. Warranty and Support
For warranty information or technical support, please refer to the documentation included with your purchase or contact ARTILAURA customer service directly. Keep your purchase receipt for warranty claims.