
Introduction
This instruction manual provides comprehensive guidance for the installation, operation, and maintenance of your Ryuwanku Waterfall Bathroom Faucet, Model 2021. Crafted from premium SUS 304 stainless steel with a brushed nickel finish, this single-handle faucet is designed for durability and ease of use. Please read this manual thoroughly before installation and retain it for future reference.
Product Features
- Single-Handle Design: Allows for precise and effortless control over water flow and temperature.
- Upgraded Quieter Waterfall Flow: Features a new internal structure for a smoother, more gentle water stream with reduced noise.
- Premium SUS 304 Stainless Steel: Constructed from 100% lead-free, high-quality SUS 304 stainless steel for excellent resistance to rust and corrosion, ensuring safe water.
- Elegant Brushed Nickel Finish: A sleek finish that resists fingerprints, scratches, and corrosion, maintaining its appearance over time.
- Easy Installation: Comes with a complete installation kit, including a deck plate and supply hoses, for straightforward setup.

Figure 1: Performance metrics highlighting durability and quiet operation.
Package Contents
Verify that all components are present before beginning installation:
- Ryuwanku Waterfall Bathroom Faucet (Brushed Nickel)
- 6-inch Deck Plate
- 80cm (31.5") Standard 9/16” U.S. Hot and Cold Supply Hoses
- Pop-Up Drain with Detachable Anti-Clogging Strainer
- All Necessary Mounting Hardware
- Instruction Manual
Specifications
| Brand | Ryuwanku |
| Model Name | 2021 |
| Finish Type | Brushed Nickel |
| Material | SUS 304 Stainless Steel |
| Mounting Type | Deck Mount |
| Number of Handles | 1 |
| Hole Count | 1 (compatible with 3-hole sinks using deck plate) |
| Spout Height | 3.9 inches |
| Spout Reach | 3 inches |
| Faucet Height | 7.1 inches |
| Mounting Hole Diameter | 1.26 inches |
| Flow Rate | 1.02 gpm |
| Special Features | Easy to Install, Lead Free, Leak Resistant, Pop Up Drain |
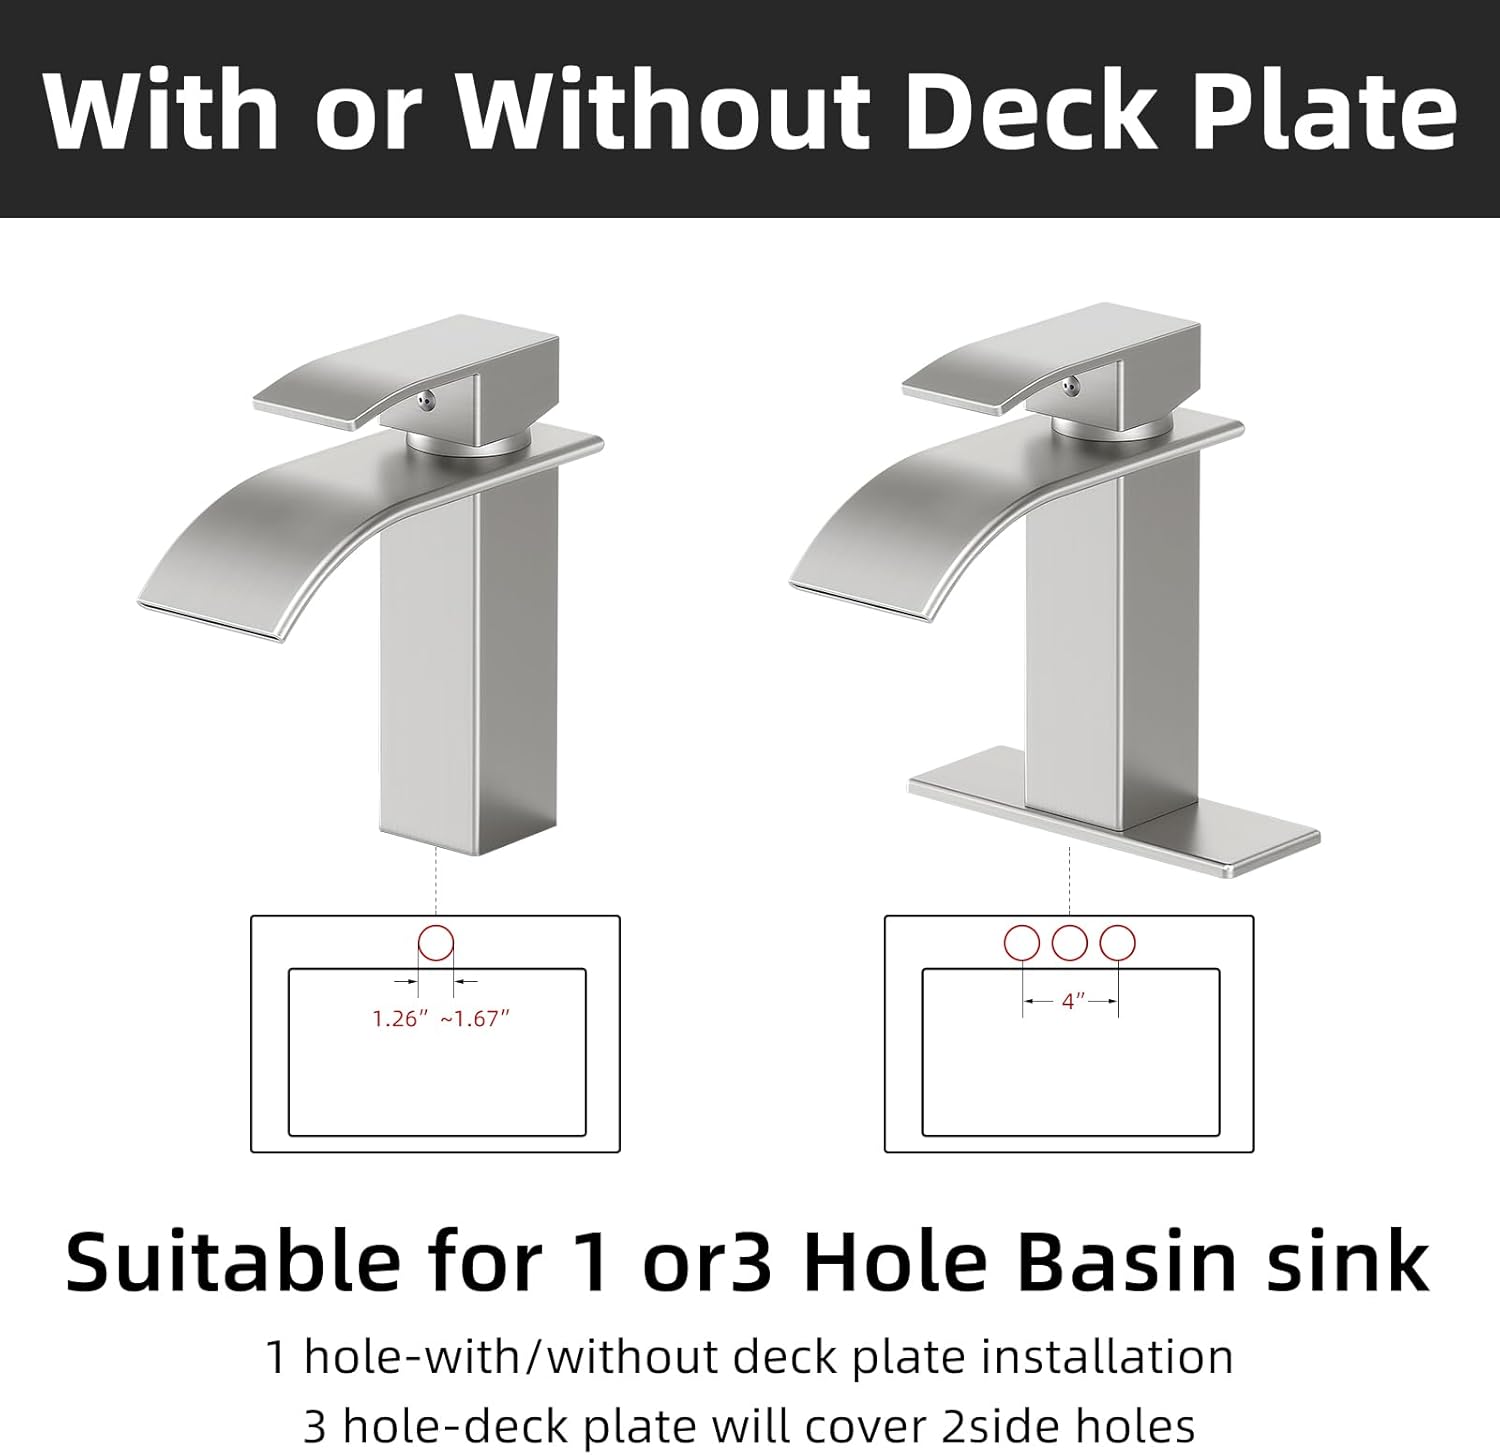
Figure 2: Product accessory sizes and dimensions.
Setup and Installation
Follow these steps carefully for proper installation. Ensure water supply is turned off before beginning.

Figure 3: Faucet compatibility with 1-hole or 3-hole basin sinks. Use the deck plate for 3-hole installations.
Installation Steps:
- Step 1: Mount the Faucet Body
Screw the short threaded end of the (1) mounting bolt clockwise into the hole at the bottom of the faucet. Ensure the short threaded end is facing upward and the long threaded end is facing downward. - Step 2: Secure the Faucet (1-hole or 3-hole)
Place the (1) O-ring over the (1) mounting bolt and (4) hoses, then place the O-ring groove at the bottom of the faucet. For 1-hole installation, proceed without the deck plate. For 3-hole installation, place the (2) deck plate over the sink holes. Then, pass the (1) mounting bolt and (2) hoses through the hole in the countertop, and adjust the faucet so it faces the sink directly. - Step 3: Install Mounting Hardware
Insert the (1) mounting bolt and (2) hoses through the hole in the countertop, and adjust the faucet so it faces the sink directly. If using a 3-hole sink, ensure the deck plate covers the side holes. - Step 4: Tighten Faucet to Sink
Place the (1) rubber gasket on top and the (2) metal washer underneath. Following the order shown in the diagram, insert them through the (3) mounting bolt. Screw the (4) mounting nut clockwise onto the (3) mounting bolt. Ensure the (1) rubber gasket and (2) metal washer are properly aligned and tightened as shown in the diagram. - Step 5: Connect Supply Hoses
Connect the cold and hot (1) water hoses to the water supply valves. Note that the threads on the cold and hot water hoses included are 9/16 inch. If your water supply uses a different size (e.g., 1/2 inch thread), an adapter will be needed (not included). - Step 6: Install Pop-Up Drain Assembly
Remove head (1) and nut, washer, black seal (from body). Apply silicone sealant to the underside of flange (1). Insert body (2) into the sink. Apply silicone grease to the inside diameter of the black seal (4). Threads on body (2) and assemble. Install nut (5) and hand tighten to the sink. Insert head into body (2). Connect overflow to drain (1). - Step 7: Flush System and Check for Leaks
Turn faucet (1) handle to the full on mixed position. Turn on hot and cold (1) water supplies and flush water lines for one minute. This helps remove any debris that could cause damage to internal parts. Check all connections for leaks. If necessary, tighten connections, but do not overtighten.

Figure 4: Detailed installation instructions.
Operating Instructions
Your Ryuwanku Waterfall Bathroom Faucet features a single handle for easy control of water flow and temperature.
- Water Flow Control: Lift the handle upwards to increase water flow. Push the handle downwards to decrease or stop water flow.
- Temperature Control: Move the handle to the left for hot water and to the right for cold water. Adjust the handle position between left and right to achieve your desired water temperature.
- Waterfall Spout: The unique waterfall design provides a gentle and quiet stream of water.
- Pop-Up Drain: Press the top of the drain stopper to close it and retain water in the basin. Press again to open it and allow water to drain.
Video 1: Demonstration of the Ryuwanku faucet's operation and water flow.
Maintenance
Regular maintenance will ensure the longevity and optimal performance of your faucet.
- Cleaning the Finish: Clean the brushed nickel finish with a soft, damp cloth. Avoid abrasive cleaners, harsh chemicals, or scouring pads, as these can damage the finish.
- Spout Cleaning: Periodically clean the waterfall spout to prevent mineral buildup or debris accumulation, which can affect water flow. Use a soft brush or cloth.
- Drain Maintenance: The pop-up drain features a detachable anti-clogging strainer. Regularly remove and clean this strainer to prevent hair and debris buildup.

Figure 5: Features of the SUS 304 Stainless Steel for easy maintenance.

Figure 6: Detachable anti-clogging strainer for easy cleaning.
Troubleshooting
Refer to this section for solutions to common issues.
| Problem | Possible Cause | Solution |
|---|---|---|
| Low Water Flow |
|
|
| Leaks from Faucet Base |
|
|
| Water Splashing Excessively |
|
|
| Drain Not Sealing/Draining |
|
|
Warranty and Support
The Ryuwanku Waterfall Bathroom Faucet comes with a lifetime warranty, ensuring peace of mind regarding its quality and durability.
For any questions, technical assistance, or warranty claims, please contact Ryuwanku customer support through the retailer where the product was purchased or refer to the contact information provided on the product packaging or official website.