1. Introduction
Thank you for choosing the CHITENG Bluetooth Wireless Barcode Scanner. This device is designed for efficient and reliable barcode scanning, supporting both 1D and 2D (QR) codes. It offers multiple connectivity options including Bluetooth, 2.4G wireless, and USB wired, ensuring compatibility with a wide range of operating systems and devices. This manual provides detailed instructions for setup, operation, and maintenance to help you maximize your scanner's performance.

Figure 1: CHITENG Bluetooth Wireless Barcode Scanner with its USB receiver.
2. Package Contents
Please check the package contents upon receipt. If any items are missing or damaged, contact customer support.
- CHITENG Bluetooth Wireless Barcode Scanner
- USB Wireless Receiver (2.4G dongle)
- USB Charging/Data Cable
- Instruction Manual (this document)
3. Product Overview
The CHITENG barcode scanner is designed for ergonomic handling and durability. It features a robust construction and intuitive controls.
3.1 Key Features
- Dual Connectivity: Bluetooth and 2.4G Wireless modes.
- Wide Compatibility: Supports Windows, Mac, Android, iOS, and Linux operating systems.
- 1D/2D Barcode Support: Capable of scanning various 1D and 2D (QR) barcodes.
- Two Upload Modes: Instant Upload and Storage Mode.
- Three Trigger Modes: Manual, Auto-sensing, and Continuous scanning.
- Durable Design: Military ABS material with anti-shock silicone, tested for 1.5m drops.

Figure 2: Scanner demonstrating 1D and 2D barcode decoding.
4. Setup and Connectivity
The scanner offers flexible connectivity options to suit various environments.
4.1 System Compatibility
The scanner is compatible with a broad range of operating systems, including:
- Windows (7, 8, 10, XP)
- Mac OS
- Android
- iOS
- Linux

Figure 3: Operating system compatibility.
4.2 Pairing Instructions
Follow these steps to connect your scanner:
Wireless 2.4G Pairing
- Scan the "Wireless 2.4G Mode" setting barcode. After the setting is completed, the receiver that was paired last time will be prioritized by default.
- Scan the "One-click Pairing" setting barcode. The blue light of the scanner will flash quickly, and the scanner enters the 2.4G pairing state.
- Plug the USB receiver into the host device (within 1 minute). You will hear a "Di" sound, and the LED2 indicator will stay on, indicating a successful connection.
Note: Refer to the user manual for specific setting barcodes. Pressing the key for 8 seconds can quickly enter Bluetooth HID pairing status.
Bluetooth HID Pairing
- Scan the "Bluetooth HID Mode" setting barcode. After the setting is completed, the Bluetooth device that was paired last time is prioritized by default.
- Scan the "One-click pairing" setting barcode. The blue LED1 and Blue LED2 indicators of the scanner will flash alternately and quickly, and the scanner enters the Bluetooth HID pairing state.
- Turn on Bluetooth on your host device and search for the "BarCode Scanner HID" device. Click on the device to connect. Once you hear a "Di" sound, the Blue LED2 indicator will stay on, confirming a successful connection.

Figure 4: Pairing instructions for 2.4G Wireless and Bluetooth modes.
5. Operating Instructions
Understand the different scanning and upload modes to optimize your workflow.
5.1 Trigger Modes
The scanner supports three operational trigger modes:
- Manual Trigger: Press the trigger button to scan each barcode.
- Auto-sensing: The scanner automatically detects a barcode within its field of view and scans it without needing to press the trigger.
- Continuous Scanning: The scanner continuously emits a scan beam, scanning any barcode that passes through it.
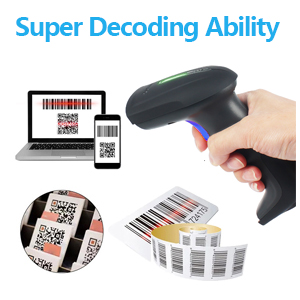
Figure 5: Available trigger modes.
5.2 Upload Modes
Choose between instant data transfer or batch storage:
- Instant Upload Mode: Scanned data is immediately transmitted to your connected computer or device. This mode is suitable for real-time inventory updates or point-of-sale transactions.
- Storage Mode: Scanned barcodes are stored in the scanner's internal memory. You can upload the accumulated data to your computer at a later time by scanning a specific upload barcode. This is useful for mobile applications or when working out of range of the host device.

Figure 6: Instant Upload and Storage Upload modes.
6. Configuration
The scanner offers advanced configuration options to customize data output.
6.1 Data Editing Functions
You can modify scanned data by adding prefixes, suffixes, or inserting characters in the middle of the barcode string. These functions are typically configured by scanning specific programming barcodes found in the full user manual.
- Add Prefix: Add specific characters before the scanned barcode data.
- Insert in the Middle: Insert characters at a specified position within the barcode data.
- Add Suffix: Add specific characters after the scanned barcode data.
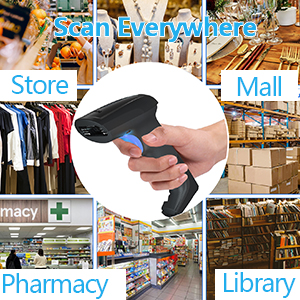
Figure 7: Data editing functions (Prefix, Middle, Suffix).
7. Maintenance
Proper maintenance ensures the longevity and optimal performance of your scanner.
7.1 Battery Information
The scanner is equipped with a 2000mAh battery.
- Continuous Scanning Time: Up to 15 days (based on 8 hours/day usage).
- Standby Time: Up to 60 days.
- Charging Time: Approximately 3-4 hours for a full charge.
Charge the scanner using the provided USB cable connected to a standard USB power source (e.g., computer USB port, USB wall adapter).

Figure 8: Battery specifications.
7.2 Cleaning
To clean the scanner, use a soft, dry cloth. For stubborn dirt, a slightly damp cloth with mild soap can be used, ensuring no liquid enters the device. Do not use abrasive cleaners or solvents.
8. Troubleshooting
If you encounter issues with your scanner, refer to the following common problems and solutions:
| Problem | Possible Cause | Solution |
|---|---|---|
| Scanner does not power on. | Low battery or no charge. | Charge the scanner for 3-4 hours using the USB cable. |
| Scanner does not connect via 2.4G wireless. | USB receiver not plugged in, out of range, or not paired. | Ensure receiver is plugged in. Move scanner closer to receiver. Re-scan "Wireless 2.4G Mode" and "One-click Pairing" barcodes. |
| Scanner does not connect via Bluetooth. | Bluetooth not enabled on host device, out of range, or not paired. | Enable Bluetooth on host device. Move scanner closer. Re-scan "Bluetooth HID Mode" and "One-click Pairing" barcodes, then search and connect on host device. |
| Scanner does not read barcodes. | Incorrect trigger mode, dirty scan window, or unsupported barcode type. | Check trigger mode settings. Clean scan window. Ensure barcode is 1D or 2D (QR). |
| Scanned data is incorrect or incomplete. | Poor barcode quality or incorrect data editing settings. | Ensure barcodes are clear and undamaged. Review data editing (prefix/suffix) settings. |
9. Specifications
Detailed technical specifications for the CHITENG Bluetooth Wireless Barcode Scanner.
| Feature | Specification |
|---|---|
| Model | B09DT3Z4P9 |
| Product Dimensions | 78 x 42 x 24 inches (Note: This dimension seems unusually large for a handheld scanner and may be a data error. Please refer to product packaging for accurate dimensions.) |
| Item Weight | 8.8 ounces |
| Connectivity Technology | Bluetooth, USB Cable, 2.4G Wireless |
| Operating Voltage | 5 Volts |
| Power Source | Corded Electric (via USB for charging) |
| Battery Capacity | 2000mAh |
| Barcode Types Supported | 1D, 2D (QR Code) |
| Durability | Anti-shock Silicone, Military ABS Material, 1.5m Drop Test |
| UPC | 786882326406 |
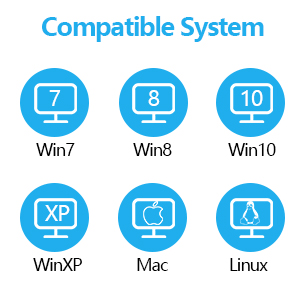
Figure 9: Anti-shock design and 1.5m drop test.
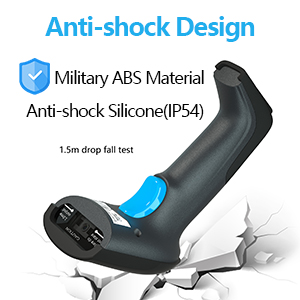
Figure 10: Super decoding ability for various barcode types.
10. Warranty and Support
For warranty information, technical support, or any inquiries not covered in this manual, please contact CHITENG customer service through your purchase platform or the official CHITENG website. Please have your model number (B09DT3Z4P9) and purchase date available when contacting support.

Figure 11: Versatile applications of the scanner in various settings.