Introduction
This manual provides comprehensive instructions for the safe and efficient operation, maintenance, and troubleshooting of your Tefal Sense CM693110 Programmable Electric Coffee Maker. Please read all instructions carefully before first use and retain this manual for future reference.
Important Safety Instructions
- Read all instructions before using the appliance.
- Do not touch hot surfaces. Use handles or knobs.
- To protect against fire, electric shock, and injury to persons, do not immerse cord, plugs, or the appliance in water or other liquid.
- Close supervision is necessary when any appliance is used by or near children.
- Unplug from outlet when not in use and before cleaning. Allow to cool before putting on or taking off parts, and before cleaning the appliance.
- Do not operate any appliance with a damaged cord or plug or after the appliance malfunctions, or has been damaged in any manner. Return appliance to the nearest authorized service facility for examination, repair, or adjustment.
- The use of accessory attachments not recommended by the appliance manufacturer may result in fire, electric shock, or injury to persons.
- Do not use outdoors.
- Do not let cord hang over edge of table or counter, or touch hot surfaces.
- Do not place on or near a hot gas or electric burner, or in a heated oven.
- Always attach plug to appliance first, then plug cord into the wall outlet. To disconnect, turn any control to "off", then remove plug from wall outlet.
- Do not use appliance for other than intended use.
- The carafe is designed for use with this appliance. It must never be used on a range top.
- Do not place a hot carafe on a wet or cold surface.
- Do not use a cracked carafe or a carafe having a loose or weakened handle.
- Do not clean carafe with cleansers, steel wool pads, or other abrasive materials.
Product Overview
Familiarize yourself with the components of your Tefal Sense CM693110 coffee maker.

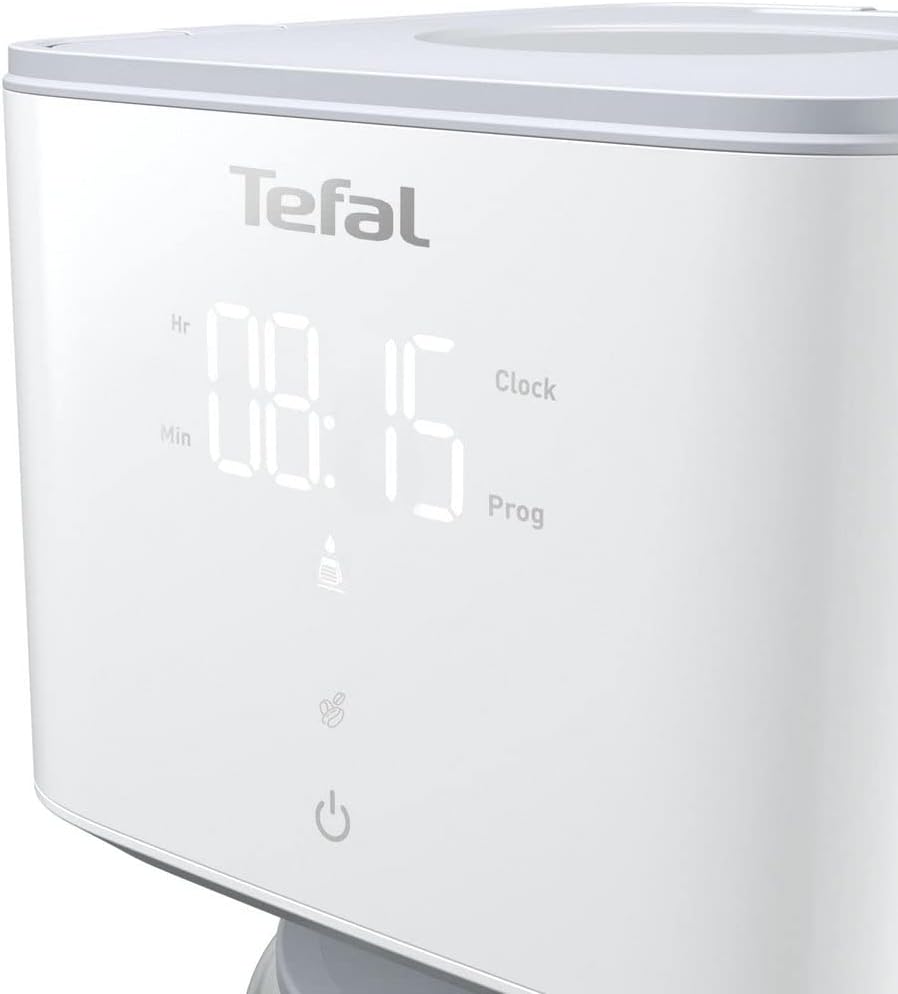
- Digital Display: Integrated into the body, shows time, program, and timer with large digits.
- Control Panel: Touch-sensitive buttons for operation.
- Water Tank: Located on the side, with a clear water level indicator.
- Filter Holder: Removable basket for coffee grounds and filter paper.
- Glass Carafe: With a lid, capacity for 10-15 cups (3.6 Liters).
- Heating Plate: Keeps coffee warm after brewing.
- Spiral Nozzle: Ensures optimal humidification of coffee powder for enhanced aroma.
- On/Off Switch: Illuminated for clear indication.
Setup
- Unpacking: Carefully remove all packaging materials and dispose of them responsibly. Ensure all components are present and undamaged.
- First Use Cleaning: Before first use, clean the glass carafe and filter holder with warm, soapy water. Wipe the exterior of the coffee maker with a damp cloth. Run two full cycles with only water (no coffee) to rinse the internal components.
- Placement: Place the coffee maker on a flat, stable, heat-resistant surface, away from water sources and direct heat. Ensure adequate ventilation around the appliance.
- Set the Clock: Plug in the coffee maker. The digital display will illuminate. Use the "Hr" and "Min" touch controls to set the current time.
Operating Instructions
Brewing Coffee
- Fill Water Tank: Open the lid and fill the water tank with fresh, cold water up to the desired level, indicated by the markings on the side. The carafe can be used to measure water for 10-15 cups.
- Add Coffee Grounds: Open the top lid and place a paper filter (size 1x4 or similar) into the filter holder. Add the desired amount of ground coffee. Close the lid securely.
- Place Carafe: Ensure the glass carafe with its lid is correctly placed on the heating plate.
- Start Brewing: Press the illuminated On/Off button (⏻) to start the brewing process. The indicator light will remain on.
- Aroma Function: To enhance coffee aroma, press the aroma function button (often indicated by a coffee bean icon) before starting the brew. This function optimizes water distribution over the coffee grounds using a spiral nozzle.


Setting the Programmable Timer
The programmable timer allows you to set a specific time for the coffee maker to start brewing automatically.
- Prepare the coffee maker with water and coffee grounds as described above.
- Press the "Prog" (Program) button. The display will show "Prog" and allow you to set the desired start time using the "Hr" and "Min" buttons.
- Once the desired time is set, press the "Prog" button again to confirm. The display will revert to the current time, and the "Prog" indicator will remain lit, signifying the timer is active.
- The coffee maker will automatically start brewing at the programmed time.

Keep Warm Function
After brewing, the coffee maker automatically enters a keep-warm phase, maintaining the coffee's temperature for 30 minutes. After this period, the appliance will automatically shut off for safety and energy saving.
Maintenance and Cleaning
Regular cleaning ensures optimal performance and extends the lifespan of your coffee maker.
Daily Cleaning
- Unplug the coffee maker and allow it to cool completely.
- Remove the filter holder and glass carafe. Wash them in warm, soapy water or place them in the dishwasher if they are dishwasher-safe (refer to product specifications for confirmation).
- Wipe the exterior of the coffee maker, including the heating plate, with a damp cloth. Do not use abrasive cleaners or scouring pads.
- Do not immerse the main unit in water or any other liquid.
Descaling
Mineral deposits from water can build up over time, affecting performance. Descale your coffee maker regularly (e.g., every 2-3 months, or more often in hard water areas).
- Fill the water tank with a descaling solution (e.g., white vinegar and water in a 1:2 ratio, or a commercial descaling agent according to its instructions).
- Place an empty paper filter in the filter holder and the empty carafe on the heating plate.
- Start a brewing cycle without coffee. Allow half of the solution to brew through, then turn off the coffee maker and let it stand for 15-20 minutes.
- Turn the coffee maker back on to complete the brewing cycle.
- After descaling, run at least two full cycles with fresh, clean water to rinse out any remaining descaling solution.
Troubleshooting
| Problem | Possible Cause | Solution |
|---|---|---|
| Coffee does not brew. | No water in tank; appliance not plugged in; power outage; timer not set correctly. | Fill water tank; check power connection; reset timer. |
| Coffee tastes weak. | Not enough coffee grounds; coffee too coarsely ground; aroma function not activated. | Add more coffee; use finer grind; activate aroma function. |
| Coffee overflows from filter. | Too much coffee grounds; filter clogged; carafe not placed correctly. | Reduce coffee amount; clean filter holder; ensure carafe is properly seated. |
| Appliance leaks. | Water tank overfilled; carafe not positioned correctly; anti-drip valve clogged. | Do not overfill; ensure carafe is centered; clean anti-drip valve. |
| Digital display not working. | Power issue; internal malfunction. | Check power connection. If problem persists, contact customer support. |
Specifications
| Feature | Detail |
|---|---|
| Model Number | CM6931 |
| Brand | Tefal |
| Power | 1000 Watts |
| Voltage | 230 Volts |
| Capacity | 3.6 Liters (10-15 cups) |
| Dimensions (L x W x H) | 24.6 x 19.4 x 31.7 cm |
| Weight | 2.1 Kilograms |
| Material | Glass, Plastic |
| Special Features | Programmable Timer, Digital Display, Aroma Function, Keep Warm Function (30 min), Anti-Drip System, Water Level Indicator |
| Automatic Shut-off | Yes (after 30 minutes of keep-warm) |
Warranty and Support
For information regarding warranty coverage, service, or technical support, please refer to the warranty card included with your product or visit the official Tefal website.
Note: Information regarding spare parts availability is not provided in the product details.


