1. Introduction
The Tccmebius TCC-QL5E is a 5.25-inch PC multifunction dashboard designed to fit into a standard PC drive bay. It provides convenient access to various ports and card reader slots from the front of your computer. This unit integrates USB 3.0, USB 2.0, e-SATA, SATA, audio ports, and a five-in-one card reader to expand your PC's connectivity options.
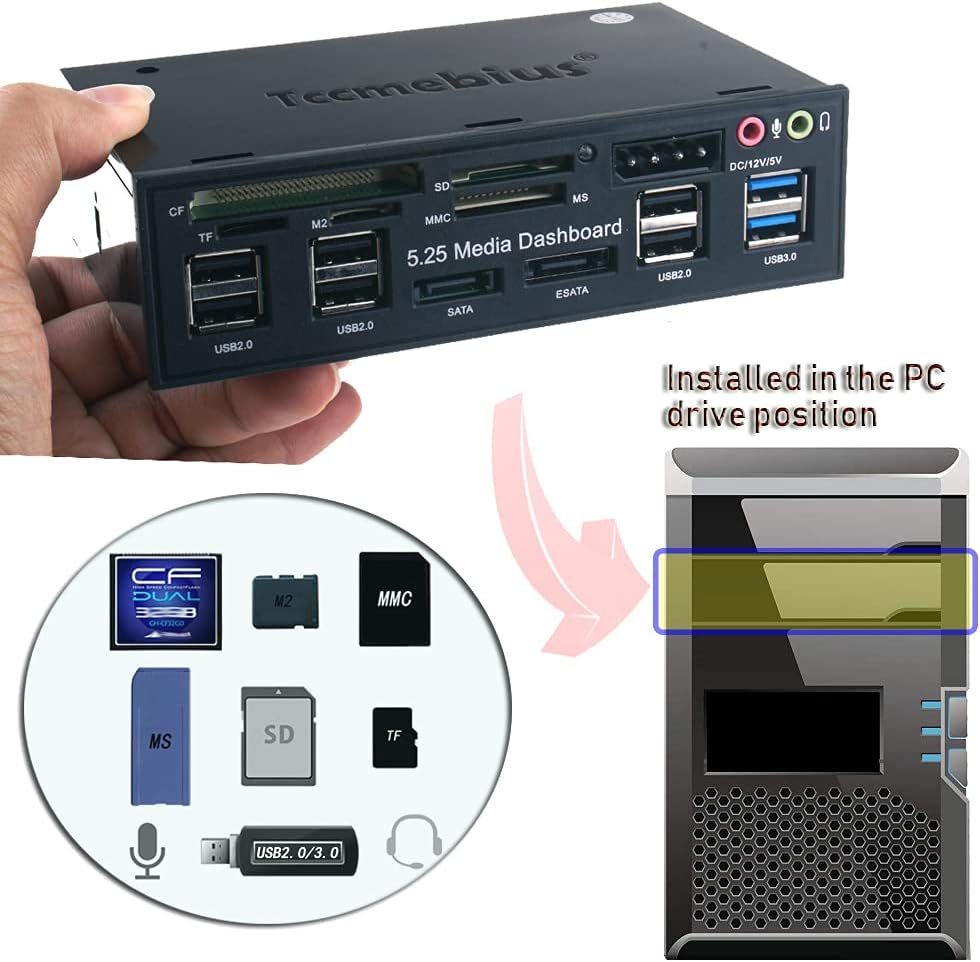
Image 1.1: Tccmebius TCC-QL5E unit and its typical installation location in a PC.
2. Product Features
- Material: Constructed from ABS material with an etched surface for durability and stability.
- High-Speed Connectivity: Features 2 USB 3.0 ports (up to 5.0Gbps), 6 USB 2.0 ports (up to 480Mbps), an e-SATA port (up to 3.0Gbps), and a SATA port (up to 1.5Gbps).
- Multi-Card Reader: Supports SD, MMC, CF, MS, TF, and M2 memory card formats. Note: Only one memory card can be read at a time.
- Audio Ports: Includes front panel audio input (microphone) and output (earphone) ports.
- Power Output: Provides 12V/5V power output via a 4-pin IDE Power port.

Image 2.1: Labeled ports and card reader slots on the TCC-QL5E front panel.
3. Package Contents
Please verify that all items are present in the package:
- Tccmebius TCC-QL5E Multifunction Dashboard Unit
- USB 3.0 20-pin Header Cable
- USB 2.0 Header Cable
- 4-pin IDE Power Connector Cable
- Audio Header Cable
- SATA Data Cables (x2)
- Mounting Screws (typically included)

Image 3.1: TCC-QL5E unit and included cables.
4. Installation Guide
Follow these steps to properly install the TCC-QL5E multifunction dashboard into your PC.
4.1 Physical Installation
- Step 1: Identify an available 5.25-inch drive bay in your PC case.
- Step 2: Gently slide the TCC-QL5E unit into the chosen 5.25-inch bay from the front of the PC until it is flush with the case.
- Step 3: Secure the unit to the PC case using the provided mounting screws. Typically, two screws on each side are sufficient.
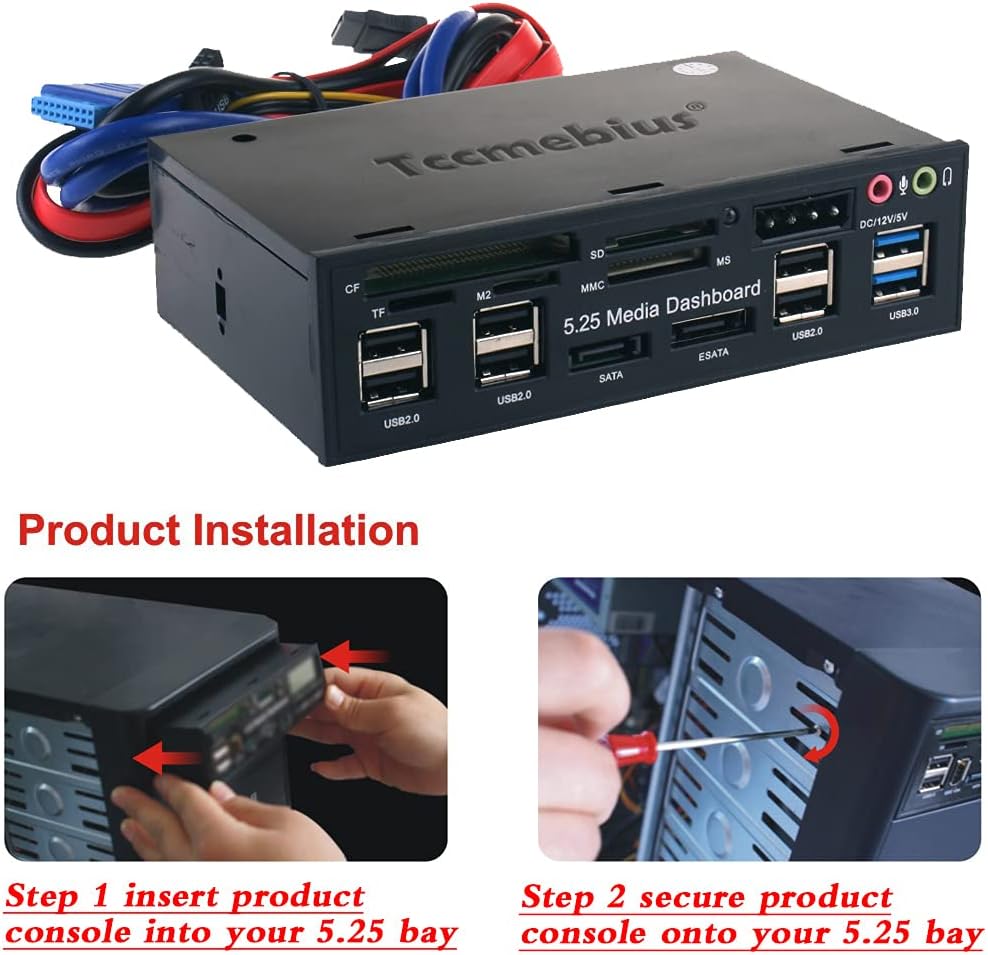
Image 4.1: Physical installation into a 5.25-inch drive bay.
4.2 Internal Cable Connections
Connect the necessary cables from the TCC-QL5E to your motherboard and power supply unit (PSU).
- Power Cable Installation: Connect the 4-pin IDE power connector from the TCC-QL5E to an available 4-pin power cable from your PSU. Ensure correct orientation to prevent short circuits. Refer to Image 4.2 for correct connection.
- USB 3.0 Installation: Connect the blue USB 3.0 20-pin header cable from the TCC-QL5E to the corresponding USB 3.0 header on your motherboard.
- USB 2.0 Installation: Connect the USB 2.0 header cable from the TCC-QL5E to an available USB 2.0 header on your motherboard. Ensure correct pin alignment.
- SATA Installation: Connect the SATA data cables from the TCC-QL5E to available SATA ports on your motherboard.
- Audio Installation: Connect the audio header cable from the TCC-QL5E to the front panel audio header on your motherboard.

Image 4.2: Detailed internal cable connections.

Image 4.3: Correct and incorrect 4-pin power connection. Ensure the connector is aligned properly to avoid damage.
5. Operating Instructions
Once installed, the TCC-QL5E operates as an extension of your PC's internal ports.
- USB Ports: Connect USB devices (e.g., flash drives, external hard drives, keyboards, mice) to the available USB 2.0 or USB 3.0 ports. USB 3.0 ports offer higher transfer speeds for compatible devices.
- Card Reader: Insert compatible memory cards (SD, MMC, CF, MS, TF, M2) into their respective slots. The system will recognize the card as a removable drive. Only one card can be read at a time.
- e-SATA/SATA Ports: Connect external SATA devices or internal SATA drives (if routed externally) to these ports for high-speed data transfer.
- Audio Ports: Plug in headphones or a microphone to the front panel audio jacks for convenient access.
6. Maintenance
To ensure optimal performance and longevity of your TCC-QL5E unit:
- Keep the front panel clean and free of dust. Use a soft, dry cloth for cleaning.
- Avoid inserting foreign objects into the ports or card reader slots.
- Ensure proper ventilation around your PC to prevent overheating, which can affect all internal components.
- Periodically check cable connections inside the PC to ensure they remain secure.
7. Troubleshooting
If you encounter issues with your TCC-QL5E, consider the following:
- Device Not Recognized: Ensure all internal cables (USB 3.0, USB 2.0, SATA, power) are securely connected to both the TCC-QL5E and the motherboard/PSU.
- USB 2.0 Ports or Card Reader Not Functioning: Some units may have an incorrect pinout for the USB 2.0 header cable. If these ports are not working, carefully check the wiring of the USB 2.0 connector. The standard pinout for a USB 2.0 header is typically: Pin 1 (VCC), Pin 2 (D-), Pin 3 (D+), Pin 4 (GND). If the wires are incorrectly arranged, you may need to re-pin the connector. This requires careful removal and reinsertion of the individual pins.
- Slow USB Transfer Speeds: Ensure you are using the USB 3.0 ports for USB 3.0 compatible devices. USB 2.0 ports will operate at their maximum speed of 480Mbps.
- Audio Not Working: Verify the audio header cable is correctly connected to the motherboard's front panel audio header. Check your PC's audio settings to ensure the front panel audio is enabled and configured correctly.
- Power Issues: Confirm the 4-pin IDE power connector is firmly seated and correctly oriented (refer to Image 4.3). An incorrect connection can lead to a short circuit or non-functional ports.
8. Specifications
| Model Number | TCC-QL5E |
| Product Dimensions | 5.83 x 3.54 x 1.61 inches (148mm x 89mm x 41mm) |
| Item Weight | 10.9 ounces |
| Hardware Interface | USB 3.0, USB 2.0, e-SATA, SATA, MicroSD, SD, MMC, CF, MS, TF, M2 |
| Compatible Devices | Desktops, Hard Disk Drive, Keyboards, Mouse, USB Flash Drives |
| Special Feature | Indicator Light |
| Color | Black |

Image 8.1: TCC-QL5E product dimensions.
9. Warranty and Support
For warranty information or technical support, please refer to the documentation provided with your purchase or contact Tccmebius customer service through their official website or the retailer where the product was purchased. Keep your purchase receipt for warranty claims.


