
1. Product Overview
The Godox V860III-C is a high-performance TTL camera flash designed for Canon cameras, offering advanced features for professional and enthusiast photographers. It integrates a powerful 2.4G wireless X system, high-speed sync (HSS), and a built-in adjustable modeling light. This manual provides detailed instructions for the safe and effective use of your V860III-C flash unit.
2. What's in the Box
Upon unboxing your Godox V860III-C, please verify that all the following components are included:
- Flash Unit x 1
- Lithium Battery x 1
- Charger x 1
- Protection Case x 1
- USB Cable x 1
- Instruction Manual x 1
- Mini Stand x 1
- USB Battery Charger x 1

Image: All components included in the Godox V860III-C retail package.
3. Key Features
- Upgraded V860III Design: This flash unit is an enhanced version of its predecessor, incorporating user feedback for improved functionality and ease of use.
- Adjustable Modeling Light: A new modeling light is integrated into the flash head, offering 10 levels of brightness adjustment for pre-visualization of lighting effects and blending with ambient light.

Image: Demonstrates the 10-level adjustable modeling light for precise light preview.
- Quick TTL/Manual Switch: A dedicated quick button on the side allows for instant switching between TTL (Through-The-Lens) automatic mode and Manual flash mode, streamlining your workflow.
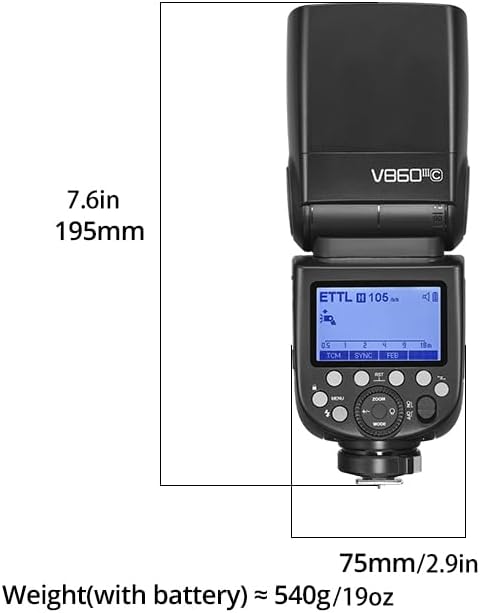
Image: Detail of the one-click TTL/M switchover button.
- Enhanced Battery Performance: Powered by a 7.2V / 2600mAh lithium-ion battery, the V860III-C provides a rapid 1.5-second recycling time and approximately 450 full-power flashes. This battery is also compatible with the Godox V1 flash, offering convenience for users with multiple Godox units.

Image: Visual representation of the optimal battery performance with fast recycling and high flash count.
- Quick Release Lock: The hot shoe mounting mechanism features an updated quick lever lock, ensuring secure and swift attachment or detachment of the flash unit to your camera's hot shoe.

Image: Detail of the quick release lock for secure mounting.
4. Product Specifications
| Specification | Value |
|---|---|
| Product Dimensions | 2.95 x 2.32 x 7.68 inches |
| Item Weight | 1.1 pounds |
| Item Model Number | V860III |
| Batteries | 1 Lithium Ion batteries required. |
| Compatible Mountings | Canon |
| Camera Flash Type | Hotshoe |
| Flash Sync Speed | 1/250 |
| Included Components | Godox X system |
| Manufacturer | GODOX |
| Date First Available | August 18, 2021 |
5. Setup
5.1 Battery Installation
To install the lithium-ion battery:
- Locate the battery compartment on the rear of the flash unit.
- Slide the battery compartment cover open.
- Insert the VB26A lithium battery, ensuring the contacts align correctly.
- Close the battery compartment cover until it clicks securely into place.
5.2 Charging the Battery
Use the provided charger and USB cable to charge the battery. A full charge typically takes approximately 1.5 hours. The charger's indicator light will change from red to green when charging is complete.
5.3 Mounting the Flash to Camera
To mount the V860III-C onto your camera's hot shoe:
- Ensure the flash unit is powered off.
- Slide the flash's hot shoe foot into your camera's hot shoe.
- Push the quick release lock lever forward until it locks the flash securely in place.
6. Operating Instructions
6.1 Power On/Off
To power on the flash, slide the power switch to the "ON" position. To power off, slide it to "OFF". The flash defaults to TTL mode upon power-on.
6.2 Mode Selection (TTL/M/Multi)
Press the MODE button to cycle through TTL (Through-The-Lens), M (Manual), and MULTI (Stroboscopic) flash modes. The selected mode will be displayed on the LCD screen.
6.3 Adjusting Flash Output / Exposure Compensation
In TTL mode, press the +/- button and turn the dial to adjust the exposure compensation value. In Manual mode, turn the dial to adjust the flash output power (e.g., 1/1 to 1/256).
6.4 Zoom Adjustment
Press the ZOOM button and turn the dial to adjust the focal distance of the light head. This allows you to match the flash's coverage to your lens's focal length.
6.5 Modeling Light Operation
Press the modeling light button (indicated by a light bulb icon) to activate the modeling light. Turn the dial to adjust its brightness from 1 to 10 levels. Press the MODEL button on the display to turn the modeling light on/off when flashing.
6.6 Wireless Connectivity (Godox 2.4G Wireless X System)
The V860III-C features a built-in Godox 2.4G Wireless X System for seamless integration with other Godox flashes and triggers. This allows for advanced multi-flash setups.
Video: An operational tutorial demonstrating various functions of the Godox V860III flash, including modeling light adjustment, mode switching, and wireless setup. This video is provided by the seller and offers a comprehensive guide to the flash's features.
6.6.1 Setting Channel and ID
To ensure proper wireless communication, set the same channel (CH) and wireless ID (ID) on both the transmitter (e.g., another Godox X system trigger or flash) and the receiver flash (V860III-C).
- Press the MENU button.
- Navigate to the C.Fn (Custom Function) menu.
- Select "CH" and turn the dial to set the desired channel (e.g., 18). Press the setting button to confirm.
- Select "ID" and turn the dial to set the desired ID (e.g., 01). Press the setting button to confirm.
6.6.2 Setting Group Mode (Transmitter/Receiver)
The V860III-C can function as both a transmitter and a receiver unit within the Godox X system.
- Transmitter Unit: Set the flash to Group A (or any desired group) and select M/TTL/Off mode. Adjust flash output as needed.
- Receiver Unit: Set the flash to receiver unit mode. Select the corresponding group (e.g., Group B) and ensure the channel and ID match the transmitter.
6.7 Sync Modes (HSS, Rear-Curtain)
Press the SYNC button on the display to toggle between high-speed sync (HSS) and rear-curtain sync modes. HSS allows for flash photography at shutter speeds faster than the camera's native sync speed, while rear-curtain sync fires the flash just before the second curtain closes, creating a motion blur effect behind the subject.
6.8 S1/S2 Optical Slave Modes
In Manual mode, press the S1/S2 button on the display to select S1 or S2 flash mode. These modes allow the V860III-C to be triggered by another flash unit optically.
- S1 Mode: The flash will fire in response to the first flash from the master unit.
- S2 Mode: The flash will ignore the pre-flash from the master unit (if any) and fire in response to the main flash. This is useful for cameras that use a pre-flash for TTL metering.
6.9 Multi-Flash Mode (Stroboscopic)
In MULTI mode, press the Times button and turn the dial to adjust the number of flashes. Press the Hz button and turn the dial to adjust the flash frequency. Use the +/- button and dial to adjust the flash output. Press the setting button to confirm your selections.
7. Maintenance
Proper maintenance ensures the longevity and optimal performance of your Godox V860III-C flash unit:
- Keep the device dry. Do not handle with wet hands or immerse in water.
- Clean the flash head and body with a soft, dry cloth. Avoid using harsh chemicals or abrasive materials.
- Store the flash unit in a cool, dry place, away from direct sunlight and extreme temperatures.
- Remove the battery if the flash will not be used for an extended period to prevent leakage.
- Avoid strong impacts or dropping the device.
8. Troubleshooting
If you encounter issues with your Godox V860III-C, try the following common troubleshooting steps:
- Flash not firing:
- Check if the flash is powered on and fully charged.
- Ensure the flash is securely mounted on the camera's hot shoe.
- Verify that the flash mode (TTL/M/Multi) is correctly set.
- If using wireless mode, confirm that the channel, ID, and group settings match between the transmitter and receiver.
- Incorrect exposure:
- Adjust the flash exposure compensation in TTL mode.
- In Manual mode, increase or decrease the flash output power.
- Check camera settings (ISO, aperture, shutter speed) for compatibility with flash.
- Flash head not zooming:
- Ensure the flash is not in a mode that overrides automatic zoom (e.g., manual zoom set).
- Check for any obstructions to the zoom mechanism.
- Resetting to Default Settings:
If the flash behaves unexpectedly, you can reset all parameters to their factory defaults. Long-press the second and third buttons simultaneously (TCM and SYNC buttons) until "RESET" appears on the display. This will clear all custom settings.
- Control Panel Locked:
If the control panel is unresponsive, it might be locked. Long-press the MENU button to lock/unlock the control panel. "LOCKED" will appear on the display when locked.
- Clearing Menu Settings:
To clear all menu settings, long-press the CLEAR button (usually the "RST" button) indicated on the display until "OK" appears. This will reset all menu settings to their default values.
9. Warranty and Support
The Godox V860III-C comes with a standard manufacturer's warranty. For specific warranty terms and conditions, please refer to the warranty card included in your product packaging or visit the official Godox website.
Additional protection plans may be available for purchase to extend coverage beyond the standard warranty period. These plans typically cover accidental damage and extended malfunctions.
- 2-Year Protection Plan: Available for extended coverage.
- 3-Year Protection Plan: Available for extended coverage.
- Complete Protect: A monthly plan covering eligible past and future purchases.
For technical support, troubleshooting assistance, or service inquiries, please contact Godox customer service or your authorized dealer. You can find contact information on the Godox official website or in your product documentation.