1. Introduction
The Godox V860III-O is a high-performance camera flash designed for Olympus and Panasonic cameras. It features a powerful lithium battery, 2.4G wireless X system, and various flash modes to enhance your photography experience. This manual provides detailed instructions for setup, operation, and maintenance.

Figure 1.1: Godox V860III-O Flash Unit.
2. Key Features
- Better Battery Performance: Upgraded 7.2V/2600mAh lithium battery offers 1.5s recycle time and 480 full power flashes. Interchangeable with V1 battery.
- Modeling Light: Front-facing modeling light with 10 dimmable levels for pre-visualization and ambient light blending.
- Built-in Godox 2.4G Wireless X System: Provides all-in-one functions and 100-meter transmission distance. Supports optical transmission for stable output.
- Master & Slave Flash: Functions as a master flash to trigger Olympus/Panasonic speedlites and as a slave flash to receive signals.
- Quick Button and Release Lock: Dedicated quick button for switching between manual and TTL modes. Updated quick release lever for secure camera hotshoe mounting.
3. What's in the Box
- 1 * Godox V860III-O Flash Unit
- 1 * Lithium Battery (7.2V/2600mAh)
- 1 * Charger
- 1 * Protection Case
- 1 * USB Cable
- 1 * Instruction Manual
- 1 * Mini Stand
- 1 * USB Battery Charger
4. Setup
4.1 Battery Installation
To install the lithium battery, slide open the battery compartment cover located on the side of the flash unit. Insert the battery with the contacts facing inward, ensuring it clicks securely into place. Close the compartment cover.
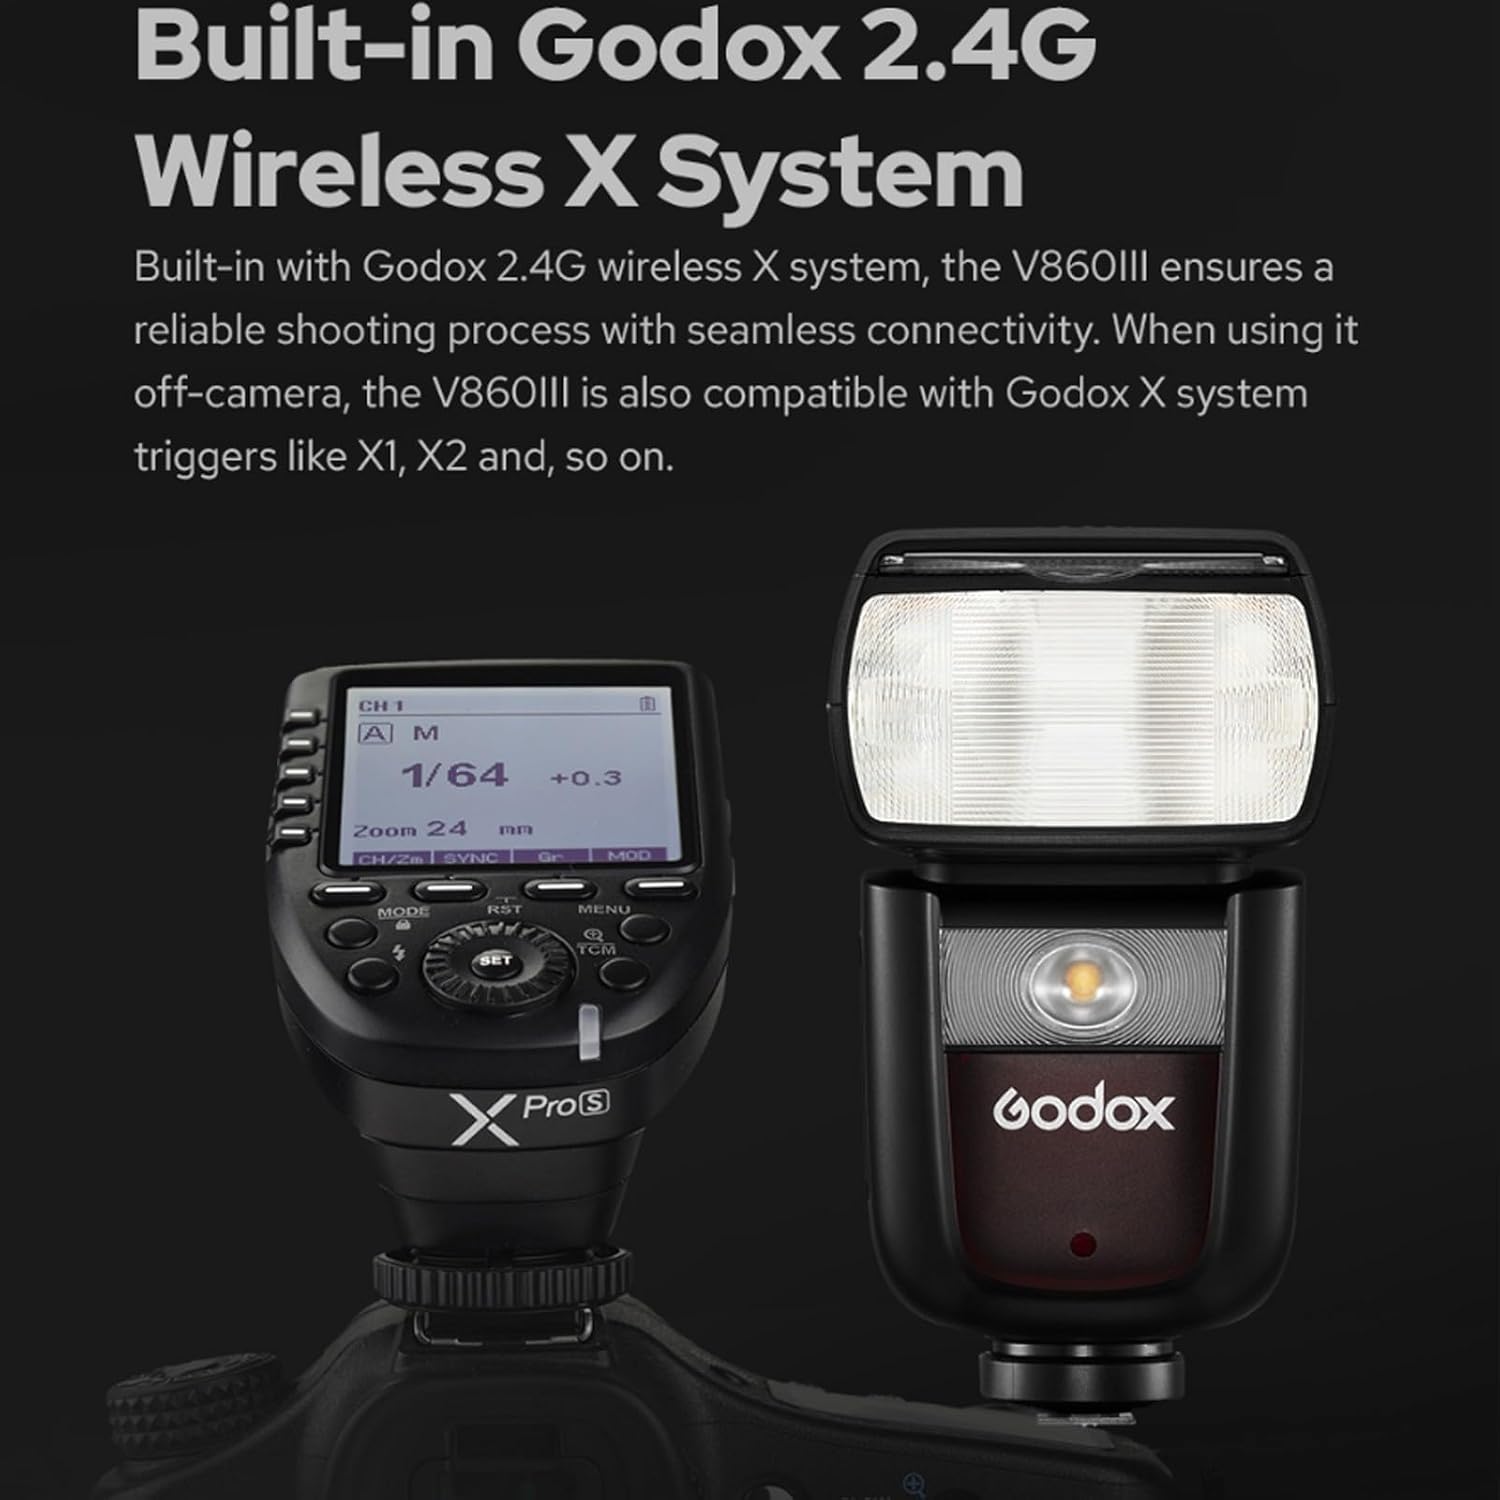
Figure 4.1: Inserting the battery into the flash unit.
4.2 Mounting to Camera
Align the flash unit's hotshoe with your camera's hotshoe. Slide the flash forward until it stops. Use the quick release lever to lock the Speedlite firmly into place on your camera's hotshoe. To remove, unlock the lever and slide the flash backward.

Figure 4.2: The quick release lock for secure camera mounting.
5. Operating Modes
5.1 Power On/Off and Test Flash
Press the power button to turn the flash on or off. Once powered on, the flash defaults to TTL mode. Press the test flash button (green button) to fire a test flash and confirm functionality.
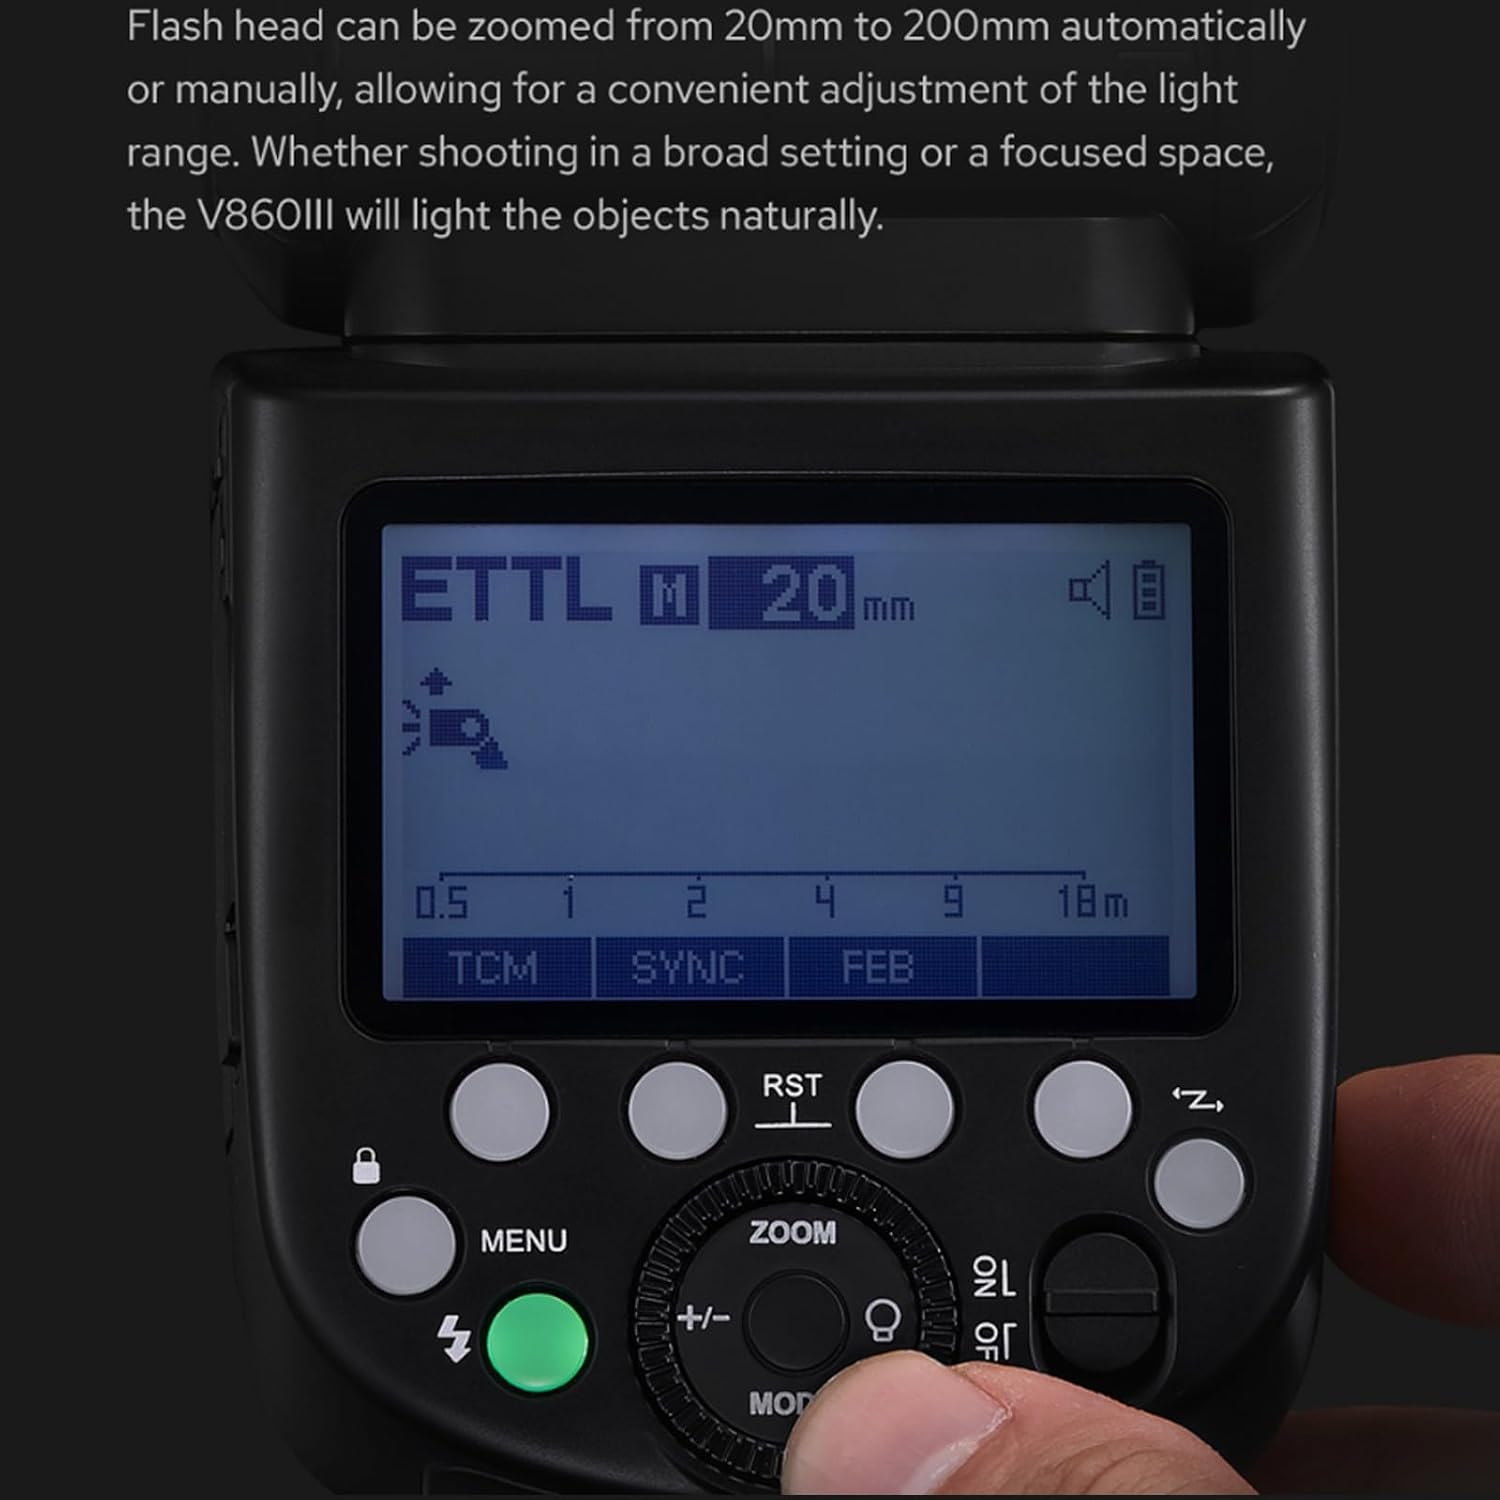
Figure 5.1: Flash controls and display panel.
5.2 Modeling Light
The V860III-O features a front-facing modeling light. Press the 'MODEL' button on the display to activate it. Turn the dial to adjust the brightness across 10 levels. This light aids in pre-visualization and blending with ambient light.

Figure 5.2: The modeling light in operation.
5.3 TTL, Manual, and Multi-Flash Modes
Press the 'MODE' button to cycle through TTL (Through-The-Lens), Manual (M), and Multi-Flash modes. In TTL mode, press the '+/-' button and turn the dial to adjust exposure compensation. In Manual mode, adjust flash output using the dial. In Multi-Flash mode, adjust flash times and frequency.

Figure 5.3: Quick switch for TTL and Manual modes.
5.4 Flash Head Zoom
The flash head can be zoomed automatically or manually from 20mm to 200mm. Press the 'ZOOM' button and turn the dial to adjust the focal distance of the light head, ensuring natural illumination for broad or focused shots.

Figure 5.4: Adjusting the flash head zoom.
5.5 Swivel Angle
The flash head offers a swivel angle from 0° to 330° horizontally and from -7° to 120° vertically, allowing for direct flash, bounce flash, and various other shooting techniques.

Figure 5.5: Demonstrating the flash head's swivel capabilities.
6. Wireless Connectivity (2.4G X System)
The built-in Godox 2.4G wireless X system allows the V860III-O to function as both a master and slave unit. It is compatible with Godox X system triggers like X1 and X2.
6.1 Setting up Master/Slave Mode
To set the flash as a master or slave unit, enter the custom function (C.Fn) menu. Select 'CH' (Channel) and 'ID' to match the settings of other Godox X system flashes or triggers. Ensure the master unit is set to transmit (TX) and the slave unit is set to receive (RX).

Figure 6.1: The V860III-O flash unit with a compatible Godox XPro trigger.
7. Custom Functions (C.Fn)
Access the custom function menu by pressing the 'MENU' button. Use the dial to navigate and select various settings:
- Distance Indicator: Switch between meters (m) and feet (Ft).
- AF Assist Beam: Turn the autofocus assist beam on or off.
- Auto Sleep: Enable or disable the auto sleep function (e.g., 30min, 60min).
- Backlight Time: Adjust the LCD backlight duration (e.g., 12 seconds, off, on).
- LCD Contrast: Adjust the contrast of the LCD panel (from -3 to 3).
- Beep: Turn the beep sound on or off.
- Transmitter Flash: Enable or disable the transmitter flash function.
8. Resetting Settings
To reset the flash parameters to their default factory settings, long-press the second and third buttons simultaneously (often labeled 'SYNC' and 'FEB' or similar) until 'RESET' appears on the display. Confirm the reset to clear all custom settings.
9. Locking the Control Panel
To prevent accidental changes to settings during use, you can lock the control panel. Long-press the 'MENU' button to lock or unlock the control panel. A 'LOCKED' indicator will appear on the display when activated.
10. Specifications
| Feature | Value |
|---|---|
| Product Dimensions | 8.27 x 9.06 x 3.15 inches |
| Item Weight | 2.2 pounds |
| Item Model Number | Godox V860III Olympus |
| Batteries | 1 Lithium Polymer batteries required (included) |
| Compatible Mountings | Olympus |
| Battery Life | 3 years |
| Camera Flash Type | Slave |
| Flash Sync Speed | 1/8000s |
11. Troubleshooting
If you encounter issues with your Godox V860III-O Flash, consider the following:
- Flash not firing: Ensure the battery is charged and correctly inserted. Check if the flash is securely mounted on the camera's hotshoe. Verify flash mode and power settings.
- Inconsistent exposure: Check camera and flash settings (aperture, shutter speed, ISO, flash power). Ensure the flash head zoom matches your lens focal length.
- Wireless communication issues: Verify that master and slave units are set to the same channel and ID. Ensure no obstructions are blocking the wireless signal.
- Slow recycle time: This may indicate a low battery. Recharge or replace the battery.
- Flash not recognized by camera: Ensure the flash is fully seated in the hotshoe. Check camera compatibility and firmware versions for both camera and flash.
12. Maintenance
To ensure the longevity and optimal performance of your Godox V860III-O Flash:
- Keep the flash unit clean and free from dust and moisture.
- Store the flash in its protective case when not in use.
- Avoid exposing the flash to extreme temperatures or direct sunlight for prolonged periods.
- Regularly check battery contacts for cleanliness and corrosion.
- Charge the battery fully before extended storage to maintain battery health.
13. Warranty and Support
This product is covered by a manufacturer's warranty. Please refer to the warranty card included in your product packaging for specific terms and conditions. For technical support or service inquiries, please contact Godox customer service or visit their official website.
14. Product Videos
14.1 Godox V860III-O Unboxing and Overview
Video 14.1: An unboxing and initial overview of the Godox V860III-O flash unit, demonstrating its components and basic features.
14.2 Godox V860III-O Operation Tutorial
Video 14.2: A detailed tutorial on operating the Godox V860III-O flash, covering various settings and modes for effective use.


