1. Introduction
The ZYHOBBY T-REX 450L Dominator Super Combo 6S 3D RC Helicopter is an advanced model designed for both beginners and experienced pilots. This manual provides essential information for the safe assembly, setup, operation, and maintenance of your helicopter. It features a Microbeast PLUS flybarless system, DFC flybarless head assembly, 6S voltage 460MX brushless motor, RCE-BL45P brushless speed controller, and DS450/DS455 digital servos, all contributing to its stable and agile flight performance.

Figure 1.1: Overview of the ZYHOBBY T-REX 450L Dominator Super Combo 6S 3D RC Helicopter. This image displays the complete helicopter with its main rotor blades, tail rotor, and sleek canopy design, highlighting its overall structure and aesthetic.
2. Safety Information
Operating an RC helicopter requires caution and adherence to safety guidelines to prevent injury or damage. Please read and understand all instructions before operating this product.
- Age Recommendation: This product is recommended for users 14 years and older. Adult supervision is advised for younger operators.
- Read the Manual: Always read the entire instruction manual to become familiar with the product's features before operation.
- Operating Environment: Operate the helicopter in open, clear areas, away from people, animals, buildings, and power lines. Avoid flying in strong winds or adverse weather conditions.
- Battery Safety: Use only recommended batteries and chargers. Follow all battery charging and handling instructions to prevent fire, explosion, or injury. Never leave charging batteries unattended.
- Pre-Flight Check: Before each flight, inspect the helicopter for any damage, loose parts, or signs of wear. Ensure all controls are functioning correctly.
- Maintain Distance: Keep a safe distance from the rotating blades during operation. The blades can cause severe injury.
- Emergency Procedures: Know how to safely shut down the helicopter in an emergency.
3. Product Overview and Components
The T-REX 450L Dominator Super Combo includes a comprehensive set of components for a high-performance RC helicopter experience.
3.1 Included Components:
- T-REX 450L DOMINATOR Set (1 set)
- Microbeast PLUS Flybarless System (1 set)
- 360 Carbon Fiber Blades (1 set)
- 65 Tail Blade (1 set)
- RCE-BL45P Brushless ESC (1 unit)
- 460MX Brushless Motor (1800KV/2222) (1 unit)
- DS450 Digital Servo (3 units)
- DS455 Digital Servo (1 unit)
3.2 Required for Assembly and Operation:
- Transmitter (6-channel or more, helicopter system compatible)
- Receiver (6-channel or more)
- Pitch gauge or Digital Pitch Gauge
- 6S Li-Po 1100~1400mAh battery (1 unit)
- Appropriate tools for assembly (e.g., screwdrivers, hex wrenches, thread-lock)
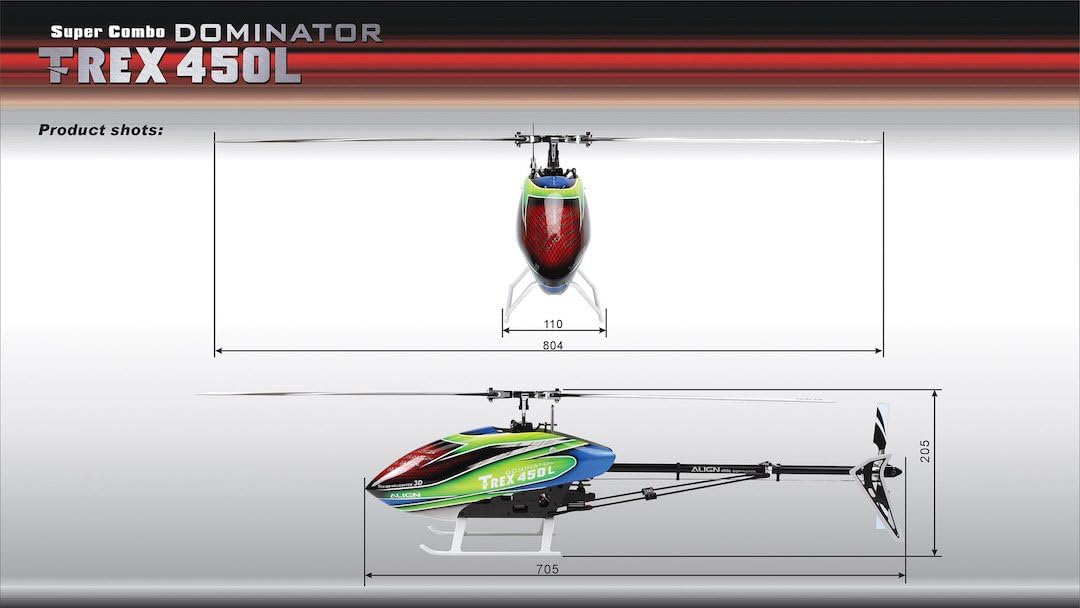
Figure 3.1: Dimensional overview of the T-REX 450L Dominator. This diagram illustrates the helicopter's length (705mm), height (205mm), width (110mm), main rotor diameter (804mm), and main blade length (360mm), providing key physical specifications.
4. Key Features and Design
The T-REX 450L Dominator incorporates several advanced design elements for enhanced performance and durability.
4.1 Carbon Fiber Main Frame
The main frame is constructed from 1.2mm 3K carbon fiber, utilizing material integration technology for side plate design. This design includes integrated battery mounting rails and open spaces within the frame for rigidity and convenient application.

Figure 4.1: Detailed view of the carbon fiber main frame and DFC flybarless head assembly. The image highlights the robust 3K carbon fiber construction and the low center of gravity design of the DFC head, which contributes to stable and agile flight performance.
4.2 DFC Flybarless Head Assembly
Equipped with a DFC flybarless head assembly, the helicopter achieves extremely low center of gravity (CG) to minimize wind resistance and enhance flight stability and agility. It is paired with 360 3G main rotor blades.
4.3 Power System: Motor and ESC
The 6S voltage 460MX (1800KV/2222) brushless motor, combined with the RCE-BL45P brushless speed controller, provides superior efficiency, high power output, extreme torque, and maintains low current and temperature during operation.

Figure 4.2: Close-up of the 460MX brushless motor, RCE-BL45P brushless ESC, and direct servo CCPM control with integrated servo mounts. This view emphasizes the compact and efficient power system and the precise servo integration.
4.4 Digital Servos
Brand new DS450 and DS455 digital servos control the swashplate and rudder. These servos support V8.4 high voltage input, offering improved torque and speed to effectively enhance flight performance.
4.5 Battery Mounting and Swash Anti-Rotation
A new battery mounting plate with a latching design simplifies battery installation while providing protection. The new style swash anti-rotation guide features embedded anti-wear material to minimize wear between the swashplate long ball and guide.

Figure 4.3: Illustration of the new battery mounting plate with latching design and the swash anti-rotation guide. This image details how the battery is secured and the mechanism for smooth swashplate movement.
4.6 Extended Tail Boom and Rudder Servo Mount
The extended length of the tail boom supports 360mm main blades, contributing to more stable and effective flight performance. A vertical rudder servo mount design allows for a closer center of gravity, increasing the sportiness of 3D flights.

Figure 4.4: View of the extended tail boom and the vertical rudder servo mount. This image shows how these components are integrated to optimize flight stability and 3D performance.
4.7 Tail Control Assembly and Blade Grips
A new style dual point supported tail control assembly ensures a slop-free tail. Brand new tail blade grips with thrust bearing design dramatically increase rudder precision and tail locking effectiveness.

Figure 4.5: Close-up of the new style dual point supported tail control assembly and tail blade grips with thrust bearings. This image highlights the precision engineering for improved tail control and responsiveness.
5. Setup and Assembly
The T-REX 450L Dominator is a Super Combo kit, meaning many components are included, but assembly is still required. It is recommended that assembly be performed by an experienced individual or under the guidance of one.
5.1 Pre-Assembly Steps
- Unpack all components and verify against the included parts list.
- Organize all hardware and tools. Ensure you have thread-locking compound for metal-to-metal fasteners.
- Familiarize yourself with the main frame, head assembly, and tail assembly components.
5.2 Main Frame Assembly
- Assemble the carbon fiber main frame sections, ensuring all screws are properly tightened with thread-lock where specified.
- Install the motor and ESC into their designated positions within the frame.
- Mount the DS450 digital servos for the swashplate.
5.3 Head and Tail Assembly
- Assemble the DFC flybarless head, ensuring smooth movement of all linkages.
- Attach the main rotor blades, ensuring they are balanced.
- Assemble the tail boom and tail rotor assembly, including the DS455 digital servo for rudder control.
- Install the tail blades, ensuring correct orientation and balance.
5.4 Electronics Installation and Wiring
- Install the Microbeast PLUS Flybarless System and receiver.
- Connect all servos, ESC, and motor to the flybarless system and receiver according to the Microbeast PLUS manual.
- Route all wires neatly and secure them to prevent interference with moving parts.
5.5 Initial Setup and Calibration
- Perform initial setup and calibration of the Microbeast PLUS system as per its dedicated instruction manual. This includes servo centering, collective pitch range, cyclic pitch, and tail gain settings.
- Bind your transmitter to the receiver.
- Set up your transmitter with appropriate helicopter flight modes and curves (pitch, throttle).
- Use a pitch gauge to accurately set the main blade pitch angles.
6. Operating Instructions
Proper operation ensures safe and enjoyable flights. Always prioritize safety and follow local regulations for RC aircraft.
6.1 Pre-Flight Checks
- Ensure the battery is fully charged and securely mounted.
- Check all screws and fasteners for tightness.
- Verify that all control surfaces (swashplate, tail rotor) move freely and correctly in response to transmitter inputs.
- Inspect main and tail blades for any damage or cracks.
- Confirm that the flybarless system has initialized correctly.
- Check the flight area for obstacles, people, or animals.
6.2 Basic Flight Controls
- Collective Pitch: Controls the lift of the helicopter. Increasing collective pitch increases lift, decreasing it reduces lift.
- Cyclic Pitch (Aileron/Elevator): Controls the tilt of the main rotor disc, allowing the helicopter to move forward, backward, left, or right.
- Yaw (Rudder): Controls the rotation of the helicopter around its vertical axis.
- Throttle: Controls the speed of the main rotor, typically linked to collective pitch in a collective pitch helicopter.
6.3 First Flight Considerations
- Start with gentle hovering in a stable flight mode.
- Gradually increase collective pitch to lift off the ground.
- Make small, precise control inputs.
- If you are a beginner, seek assistance from an experienced RC helicopter pilot.
6.4 Post-Flight Procedures
- Land the helicopter gently and disarm the motor.
- Disconnect the flight battery immediately after landing.
- Inspect the helicopter for any damage or loose components that may have occurred during flight.
- Allow the motor, ESC, and battery to cool down before handling or recharging.
7. Maintenance
Regular maintenance is crucial for the longevity and safe operation of your T-REX 450L Dominator.
7.1 Routine Inspections
- After every flight, check for loose screws, worn gears, or damaged blades.
- Inspect all linkages and ball links for wear or binding.
- Check wiring for any fraying or loose connections.
7.2 Cleaning
- Keep the helicopter clean from dirt, dust, and debris. Use a soft brush or compressed air.
- Avoid using solvents that may damage plastic or electronic components.
7.3 Component Checks
- Bearings: Check all bearings for smooth operation. Replace any rough or noisy bearings.
- Gears: Inspect main gear, auto-rotation gear, and tail gears for stripped teeth or excessive wear.
- Blades: Replace main and tail blades if they show any signs of damage, cracks, or imbalance.
- Servos: Ensure servos operate smoothly and without excessive slop.
7.4 Storage
- Store the helicopter in a cool, dry place, away from direct sunlight and extreme temperatures.
- Store Li-Po batteries at a storage voltage (typically 3.8V per cell) and in a fire-safe container.
8. Troubleshooting
This section provides solutions to common issues you might encounter.
8.1 Common Issues and Solutions
- Helicopter is unstable or drifts:
- Check main blade balance and tracking.
- Verify flybarless system settings and calibration.
- Ensure all servo linkages are free of binding and slop.
- Loss of power during flight:
- Check battery charge level and condition.
- Inspect ESC and motor connections.
- Ensure ESC is not overheating.
- Tail wags or does not hold:
- Adjust tail gain in the flybarless system.
- Check tail servo operation and linkages.
- Inspect tail blades and tail rotor assembly for damage or binding.
- No response from controls:
- Ensure transmitter is on and bound to the receiver.
- Check battery connection to the receiver/flybarless system.
- Inspect all wiring for loose connections.
9. Specifications
| Specification | Value |
|---|---|
| Length | 705mm |
| Height | 205mm |
| Width | 110mm |
| Main Blade Length | 360mm |
| Main Rotor Diameter | 804mm |
| Tail Rotor Diameter | 171mm |
| Motor Drive Gear | 11T |
| Main Drive Gear | 121T |
| Autorotation Tail Drive Gear | 106T |
| Tail Drive Gear | 26T |
| Drive Gear Ratio | 11:1:4.07 |
| Weight (w/o battery) | 730g |
| Package Dimensions | 11.81 x 6.89 x 6.69 inches |
| Manufacturer Recommended Age | 14 years and up |
| Manufacturer | ZYHOBBY |
10. Support
For further assistance, technical support, or inquiries regarding replacement parts, please contact ZYHOBBY customer service. Always refer to your product model number (T-REX 450L Dominator Super Combo) when seeking support.
Please note that specific warranty details are not provided in this manual. Refer to your purchase documentation or contact the retailer for warranty information.