1. Introduction
Thank you for purchasing the SZELAM 7-inch LED Mirror Digital Alarm Clock. This device combines a clear digital time display with a reflective mirror surface, dual USB charging ports, and adjustable brightness settings. Please read this manual carefully to ensure proper use and optimal performance.
2. Product Overview
Familiarize yourself with the components and controls of your alarm clock.

Figure 1: Front view of the SZELAM Digital Alarm Clock. The large LED display shows the time 10:05, and the mirror surface reflects a modern living room interior.
2.1 Components and Controls

Figure 2: Detailed diagram of the alarm clock's features and controls.
- Light Sensor: Automatically adjusts display brightness.
- M Button: Mode button for setting time and alarm.
- + Button: Increase value / 12/24H format switch.
- - Button: Decrease value / Alarm ON/OFF.
- SNOOZE Button: Activates snooze function / Adjusts brightness.
- 2 USB Charging Ports: For charging external devices.
- Power Cable Connection: DC-5V/1A USB power input.
- CR2032 Battery Compartment: For memory backup (time/alarm settings).
- Removable Stand: For desktop use.
- Wall Hanging Hole: For wall mounting.
3. Setup
3.1 Power Connection
- Connect the provided USB power cable to the power cable connection port on the back of the alarm clock.
- Plug the other end of the USB cable into a DC-5V/1A USB power adapter (not included) or a compatible USB port.
- The display will light up, indicating the clock is powered on.
3.2 Memory Battery Installation
The clock uses a CR2032 button cell battery (not included) for memory backup. This battery preserves time and alarm settings during a power outage, but the display will not be visible without USB power.
- Locate the CR2032 battery compartment on the back of the clock.
- Open the compartment cover.
- Insert a CR2032 battery with the positive (+) side facing up.
- Close the compartment cover securely.
3.3 Removing Protective Film
Before first use, please remove the protective film from the mirror display surface for optimal clarity.

Figure 3: Gently peel off the protective film from the display surface to reveal the clear mirror.
4. Operating Instructions
4.1 Time Setting
- Press and hold the M button for 3 seconds to enter time setting mode. The hour digits will flash.
- Use the + or - buttons to adjust the hour.
- Press the M button again to confirm the hour and move to minute setting. The minute digits will flash.
- Use the + or - buttons to adjust the minutes.
- Press the M button again to confirm and exit time setting mode.
4.2 12/24 Hour Format
In normal time display mode, press the + button to switch between 12-hour and 24-hour formats. In 12-hour format, 'AM' or 'PM' will be displayed.
4.3 Alarm Setting
- Press the M button once to enter alarm setting mode. The alarm icon and hour digits will flash.
- Use the + or - buttons to adjust the alarm hour.
- Press the M button again to confirm the alarm hour and move to minute setting. The minute digits will flash.
- Use the + or - buttons to adjust the alarm minutes.
- Press the M button again to confirm and exit alarm setting mode.
4.4 Alarm ON/OFF
In normal time display mode, press the - button to toggle the alarm ON or OFF. When the alarm is ON, an alarm icon will appear on the display.
4.5 Snooze Function
When the alarm sounds:
- Press the large SNOOZE button on the top of the clock. The alarm will pause and sound again after 5 minutes (default snooze time).
- To adjust the snooze duration (5-60 minutes), press and hold the SNOOZE button during the snooze period, then use the + or - buttons to set the desired time.
- To turn off the alarm completely, press any other button (M, +, -) on the back of the clock.

Figure 4: Activating the snooze function by pressing the large button on top.
4.6 Brightness Adjustment
The clock offers three brightness levels (Low, Medium, High) and an automatic dimming feature.
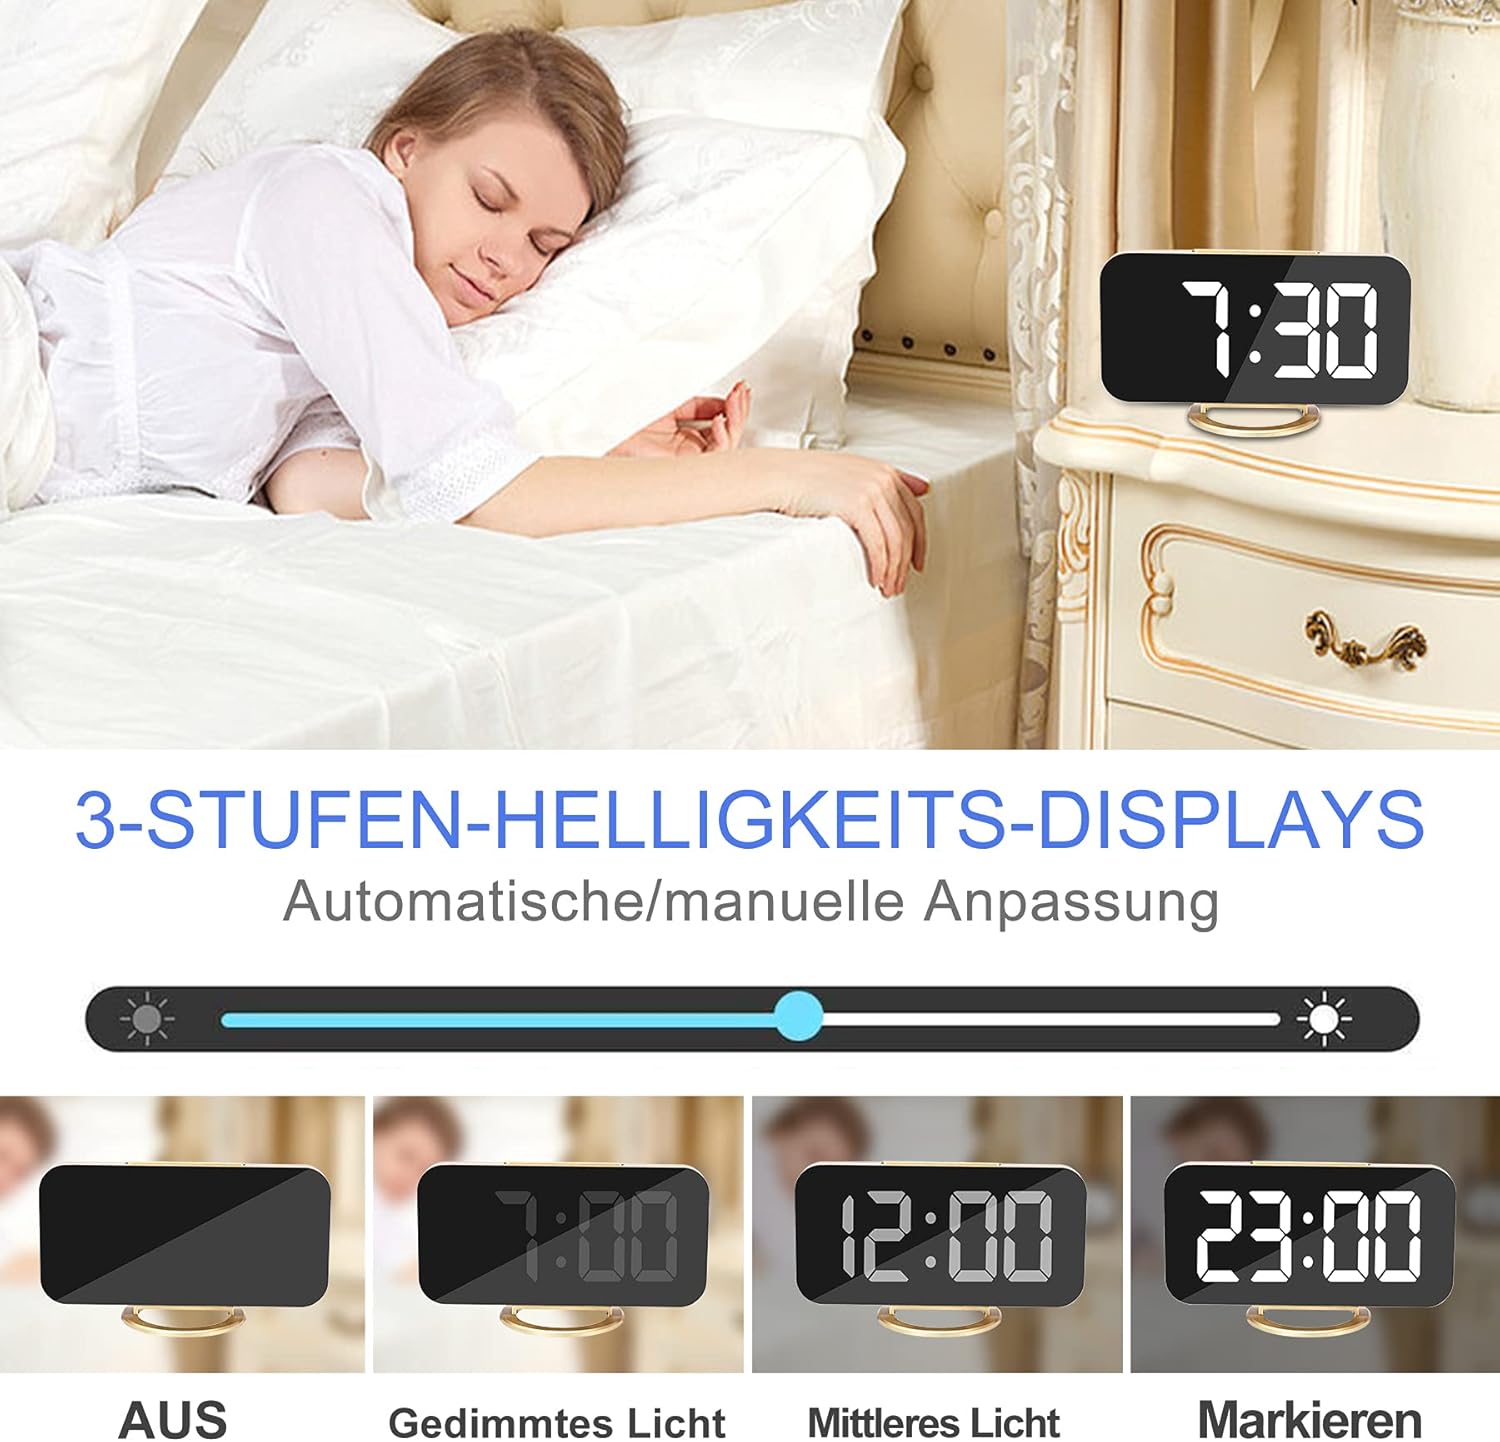
Figure 5: Visual representation of the different brightness settings: Off, Dimmed Light, Medium Light, and Highlight.
- Manual Adjustment: In normal time display mode, short press the SNOOZE button to cycle through Low, Medium, High brightness levels.
- Automatic Adjustment: The clock is equipped with a photosensitive sensor that automatically adjusts the display brightness based on ambient light conditions. This feature ensures optimal visibility without being too bright in dark environments.
4.7 Night Mode
The night mode automatically switches the LED display to its lowest brightness level during a set period to avoid disturbing sleep. To activate and set Night Mode:
- Press the M button twice to enter Night Mode setting. The display will show 'ON' or 'OFF'.
- Use the + or - buttons to toggle Night Mode ON/OFF.
- If ON, press M again to set the start hour, then minutes.
- Press M again to set the end hour, then minutes.
- Press M to confirm and exit.
4.8 USB Charging Ports
The alarm clock features two USB ports (DC-5V/1A output) on the side, allowing you to charge your mobile phone, tablet, or other USB-powered devices.

Figure 6: Two smartphones charging simultaneously via the clock's USB ports.
Simply connect your device's USB charging cable to one of the clock's USB ports. Ensure the alarm clock is powered via its main USB input for the charging ports to function.
5. Placement Options
The versatile design allows for various placement options.
5.1 Desktop / Bedside Placement
Attach the removable stand to the bottom of the clock for stable placement on a desk, bedside table, or shelf.

Figure 7: The alarm clock positioned on a bedside table, showing the time 6:00.
5.2 Wall Mounting
Remove the stand to use the clock as a wall-mounted display. Use the hanging hole on the back of the clock to secure it to a wall hook or screw.
5.3 Mirror Function
The clock's display surface doubles as a mirror, which can be used for quick checks or makeup application.

Figure 8: The clock's reflective surface can be used as a convenient mirror.
6. Maintenance
To maintain your alarm clock in good condition:
- Wipe the display and body with a soft, dry cloth.
- Avoid using abrasive cleaners or solvents, as they may damage the surface.
- Keep the device away from excessive heat, direct sunlight, and moisture.
7. Troubleshooting
| Problem | Possible Cause | Solution |
|---|---|---|
| Display is blank. | No power or loose connection. | Ensure the USB power cable is securely connected to both the clock and a working power source. |
| Time/Alarm settings reset after power loss. | CR2032 memory battery is missing or depleted. | Install a new CR2032 battery. |
| Alarm does not sound. | Alarm is turned OFF or set incorrectly. | Check if the alarm icon is displayed. Re-set the alarm time. |
| USB charging ports not working. | Clock is not powered via its main USB input. | Ensure the clock is connected to a power source via its main USB input. |
| Display is too bright/dim. | Brightness setting needs adjustment or Night Mode is active. | Manually adjust brightness using the SNOOZE button. Check Night Mode settings. |
8. Specifications
| Feature | Detail |
|---|---|
| Brand | SZELAM |
| Model Number | 3S-51Q0-6DMM |
| Display Type | 7-inch LED Digital |
| Material | Glass (Mirror Surface) |
| Dimensions (L x W x H) | 15.24 x 0.03 x 17.78 cm (approx. 6.0 x 0.01 x 7.0 inches) |
| Weight | 220 g |
| Power Source | USB DC-5V/1A |
| Memory Battery | CR2032 (not included) |
| USB Output | 2 x DC-5V/1A Ports |
| Special Features | Alarm, Large Display, Adjustable Brightness, USB Charging Ports, Snooze, Mirror Surface, Automatic Dimming, Night Mode, Wall Mountable |
9. Warranty and Support
This product is covered by a standard manufacturer's warranty. For specific warranty details, please refer to the documentation provided at the time of purchase or contact your retailer. For technical support or inquiries, please reach out to SZELAM customer service through your purchase platform.


