1. Introduction and Overview
This manual provides detailed instructions for the setup, operation, and maintenance of your ZERFUN G8 4-Channel UHF Wireless Microphone System. This system is designed for professional audio applications, offering four independent channels with dedicated microphones and a receiver box with individual volume control. It features automatic frequency scanning and automatic transmitter setup for seamless synchronization.
The ZERFUN G8 system is suitable for various uses, including church events, karaoke, singing performances, and commercial applications, providing clear and reliable audio transmission.
2. Package Contents
Please verify that all items listed below are included in your package:
- 4 x ZERFUN Wireless Microphones
- 1 x G8 Receiver Box
- 2 x Antennas
- 1 x Power Adapter
- 1 x 6.35mm to 6.35mm Cable
- 1 x 3.5mm to 3.5mm Cable
- 1 x Audio Cable
- 4 x Microphone Windscreens
- 4 x Antiskid Rings
- 1 x User Manual (this document)

Figure 2.1: All components included in the ZERFUN G8 Wireless Microphone System package.
3. Setup Instructions
3.1 Microphone Battery Installation
Each wireless microphone requires 2 x AA batteries (not included). To install, unscrew the bottom part of the microphone, insert the batteries according to the polarity indicators, and then re-attach the bottom part securely.

Figure 3.1: Illustration of microphone components, including battery compartment and display.
3.2 Receiver Connection to Audio Devices
The G8 receiver offers versatile output options to connect to various audio equipment such as audio interfaces, amplifiers, or mixing boards. It features balanced XLR outputs (one for each channel) and mixed 1/4-inch and 1/8-inch outputs for all channels.

Figure 3.2: Front and rear views of the G8 receiver box, highlighting volume controls and various output ports.
Connecting via XLR Ports (Recommended for Mixers/Amplifiers)
Use XLR cables (not included) to connect the balanced XLR outputs on the receiver to the corresponding input channels on your audio mixer or amplifier. This provides individual control over each microphone channel.
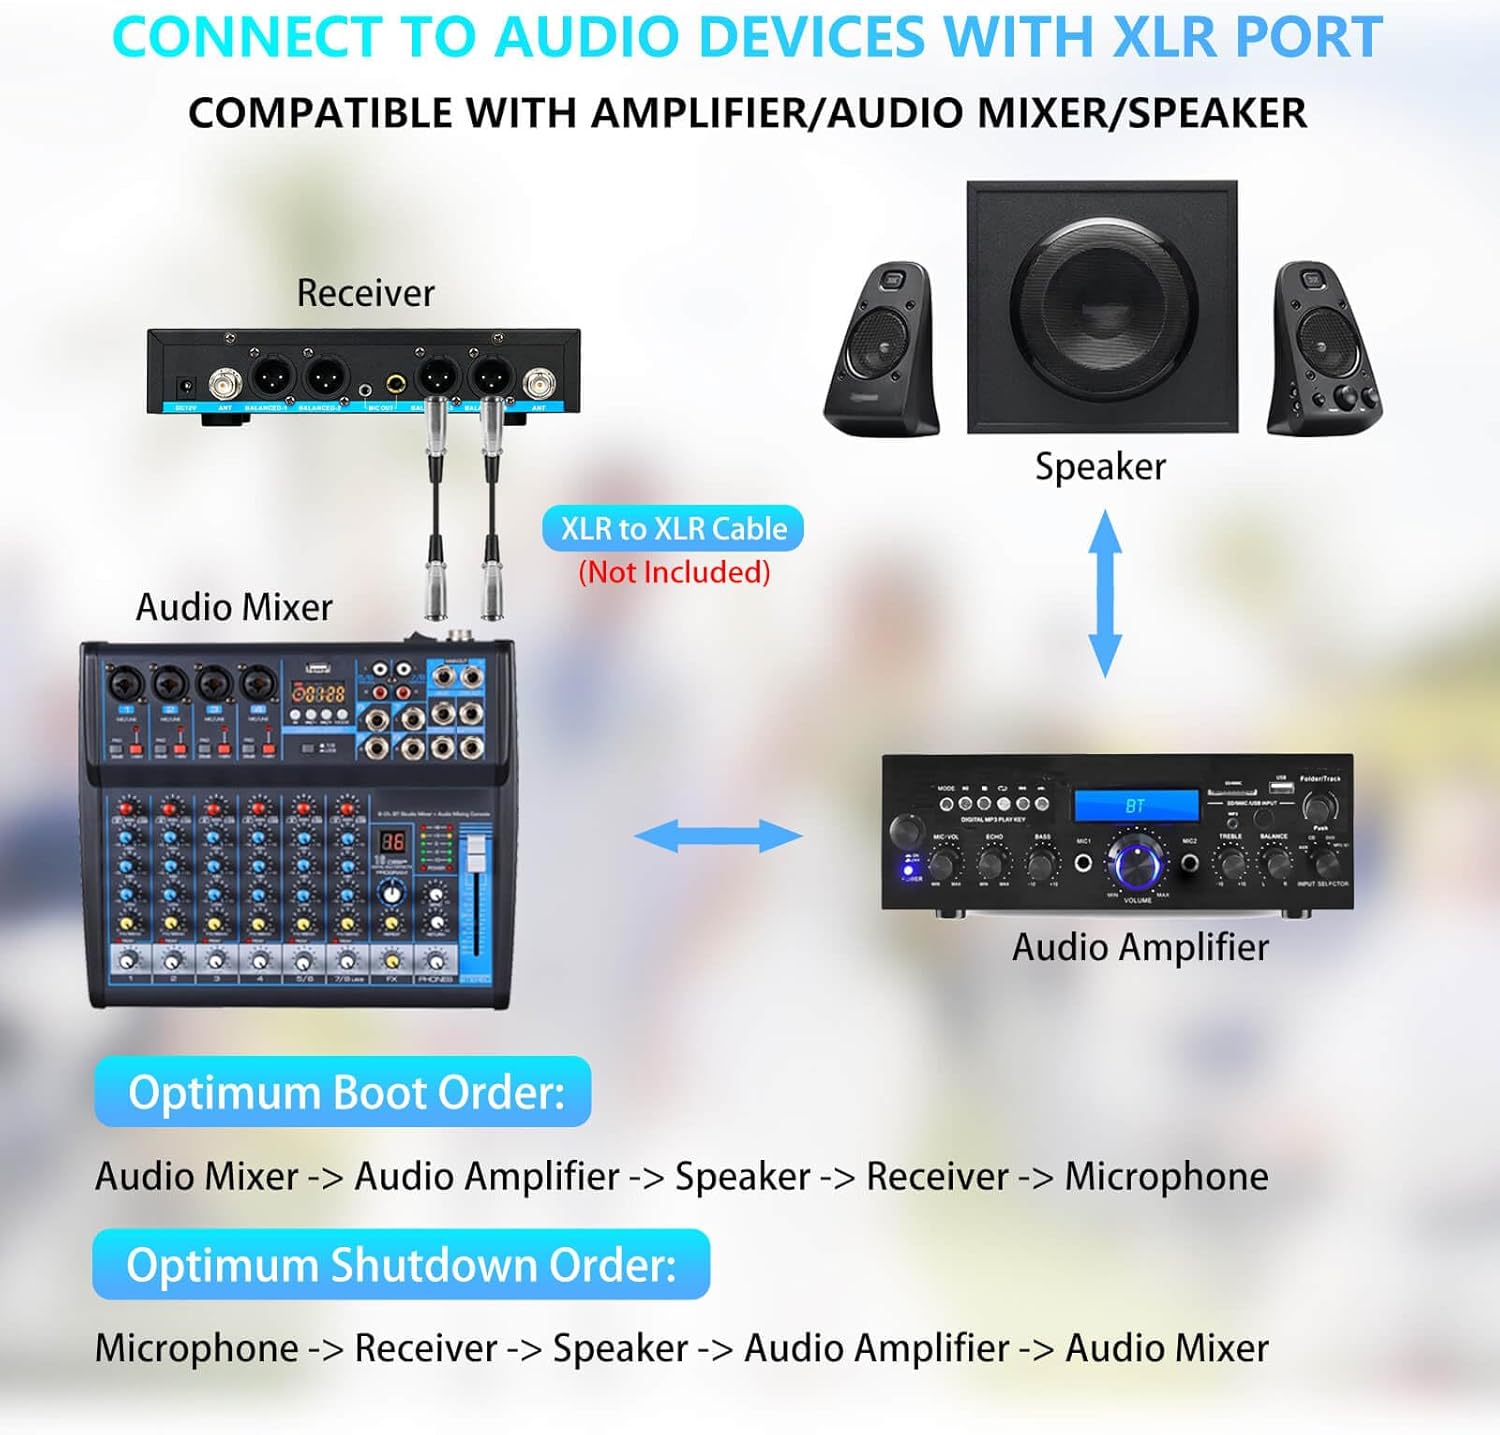
Figure 3.3: Connection diagram for the receiver to an audio mixer and amplifier using XLR cables.
Connecting via 1/4-inch or 1/8-inch Mixed Output (for Speakers/TVs)
For simpler setups, use the mixed 1/4-inch or 1/8-inch output to connect to a speaker or TV. Ensure the cable is inserted into the "MIC" input port on your amplifier or speaker.

Figure 3.4: Connection diagram for the receiver to a TV and speaker using 1/4-inch or 1/8-inch audio cables.
Connecting to Multiple Devices (Overview)
The receiver's rear panel provides all necessary ports for comprehensive audio integration.

Figure 3.5: Detailed view of the receiver's rear panel, illustrating various connection possibilities for amplifiers and speakers.
3.3 Powering On and Synchronization
Connect the power adapter to the receiver and a power outlet. The system features automatic frequency scanning and transmitter setup for easy synchronization between the microphones and the receiver.
Optimum Boot Order:
- Audio Mixer
- Audio Amplifier
- Speaker
- Receiver
- Microphone
Optimum Shutdown Order:
- Microphone
- Receiver
- Speaker
- Audio Amplifier
- Audio Mixer
Following these orders helps prevent sudden loud noises (pops) and protects your audio equipment.
4. Operating Instructions
4.1 Channel and Frequency Adjustment
The ZERFUN G8 system offers 50 compatible frequencies on each of its 4 channels (4 x 50 total) for interference-free reception. Use the channel adjust and pairing button on each microphone to change frequencies and pair with the receiver if needed.
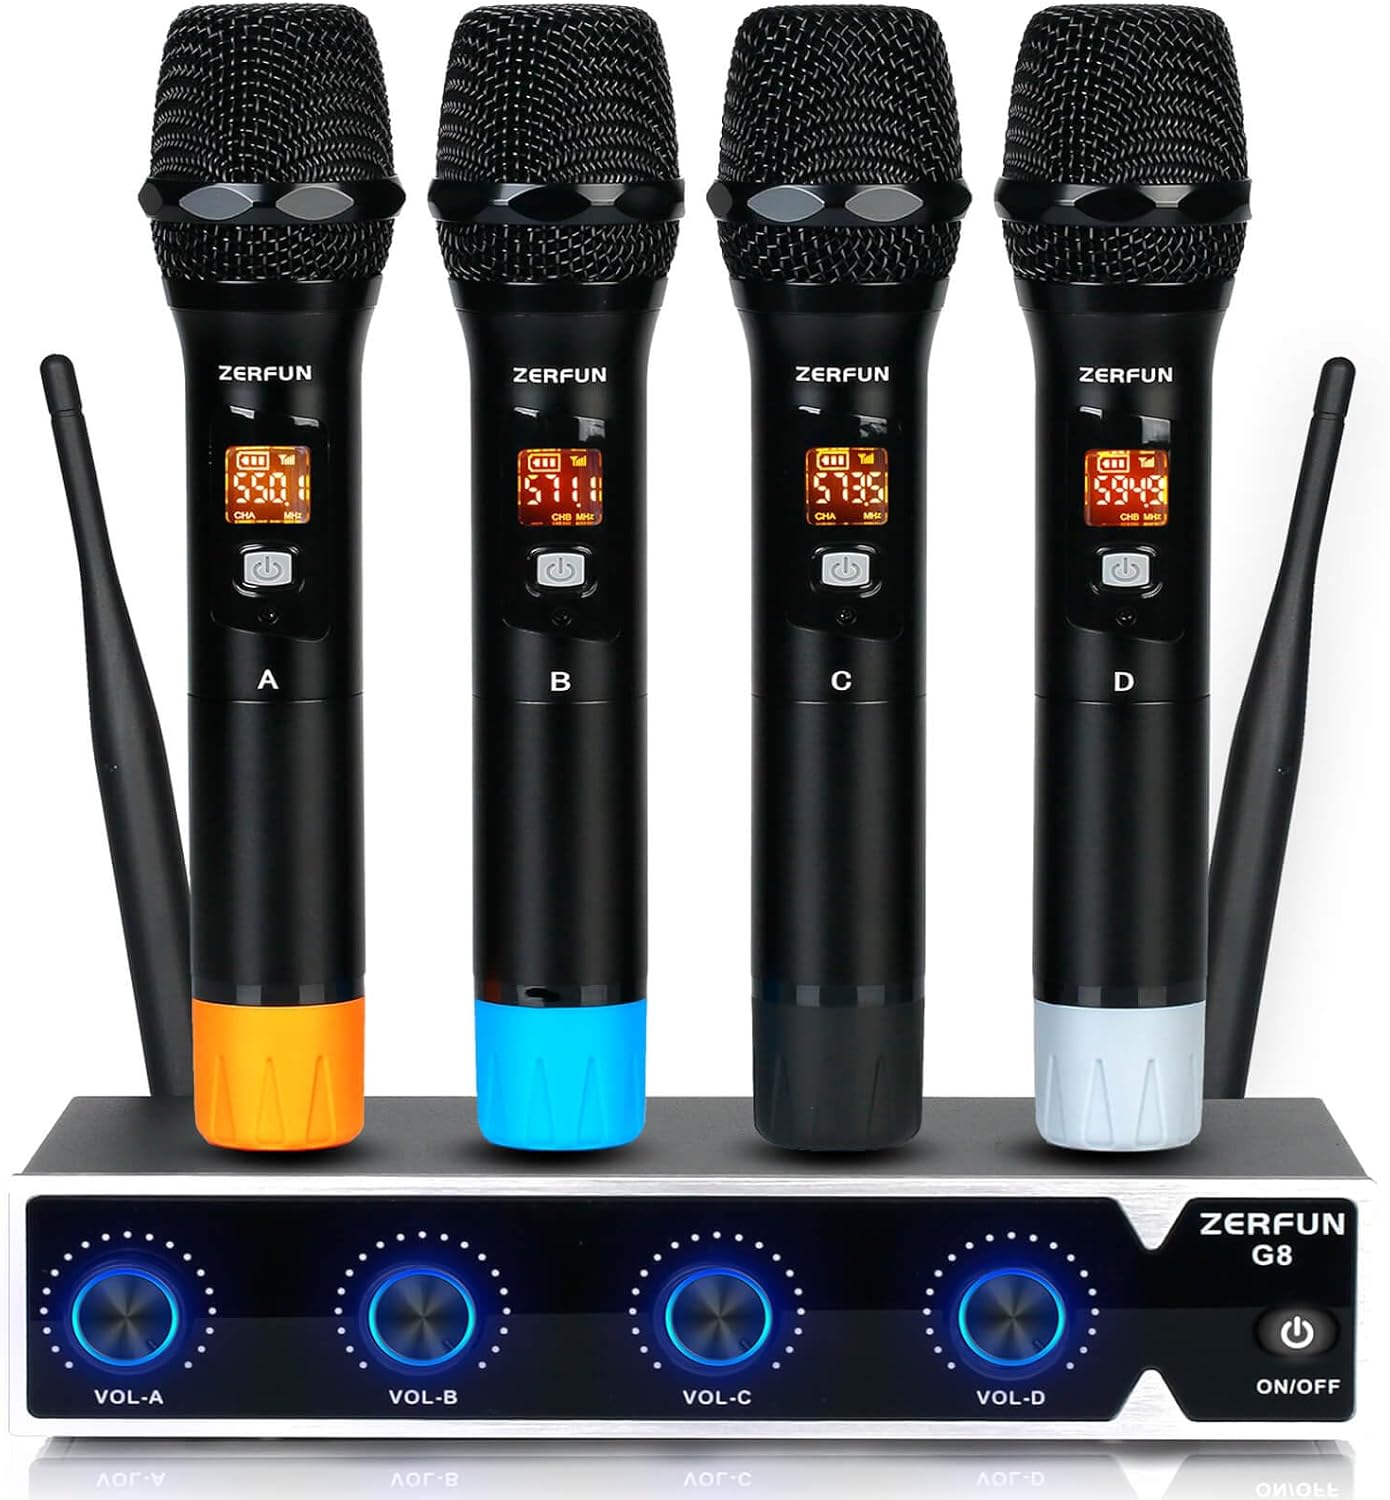
Figure 4.1: The ZERFUN G8 Wireless Microphone System, showing the receiver and four handheld microphones.
4.2 Volume Control
Each microphone channel on the receiver has an individual volume control knob (VOL-A, VOL-B, VOL-C, VOL-D). Adjust these to achieve the desired audio levels for each microphone.
4.3 Microphone Usage and Characteristics
The handheld microphones feature sturdy all-metal construction and are cardioid (unidirectional). This means they primarily pick up sound from the front, effectively isolating vocals from background noise. For optimal performance, speak directly into the top of the microphone.
The microphones also feature a channel, battery, and signal display for easy monitoring.
Each microphone bottom comes with a different color silicone cover (orange, blue, black, white) to help you color-code your mics and provide protection.
4.4 Transmission Range and Battery Life
The ZERFUN G8 Wireless Microphone System supports a transmission range of up to 200 feet (approximately 60 meters) in optimal conditions. The UHF frequencies (500 - 599 MHz) are compliant with FCC regulations.
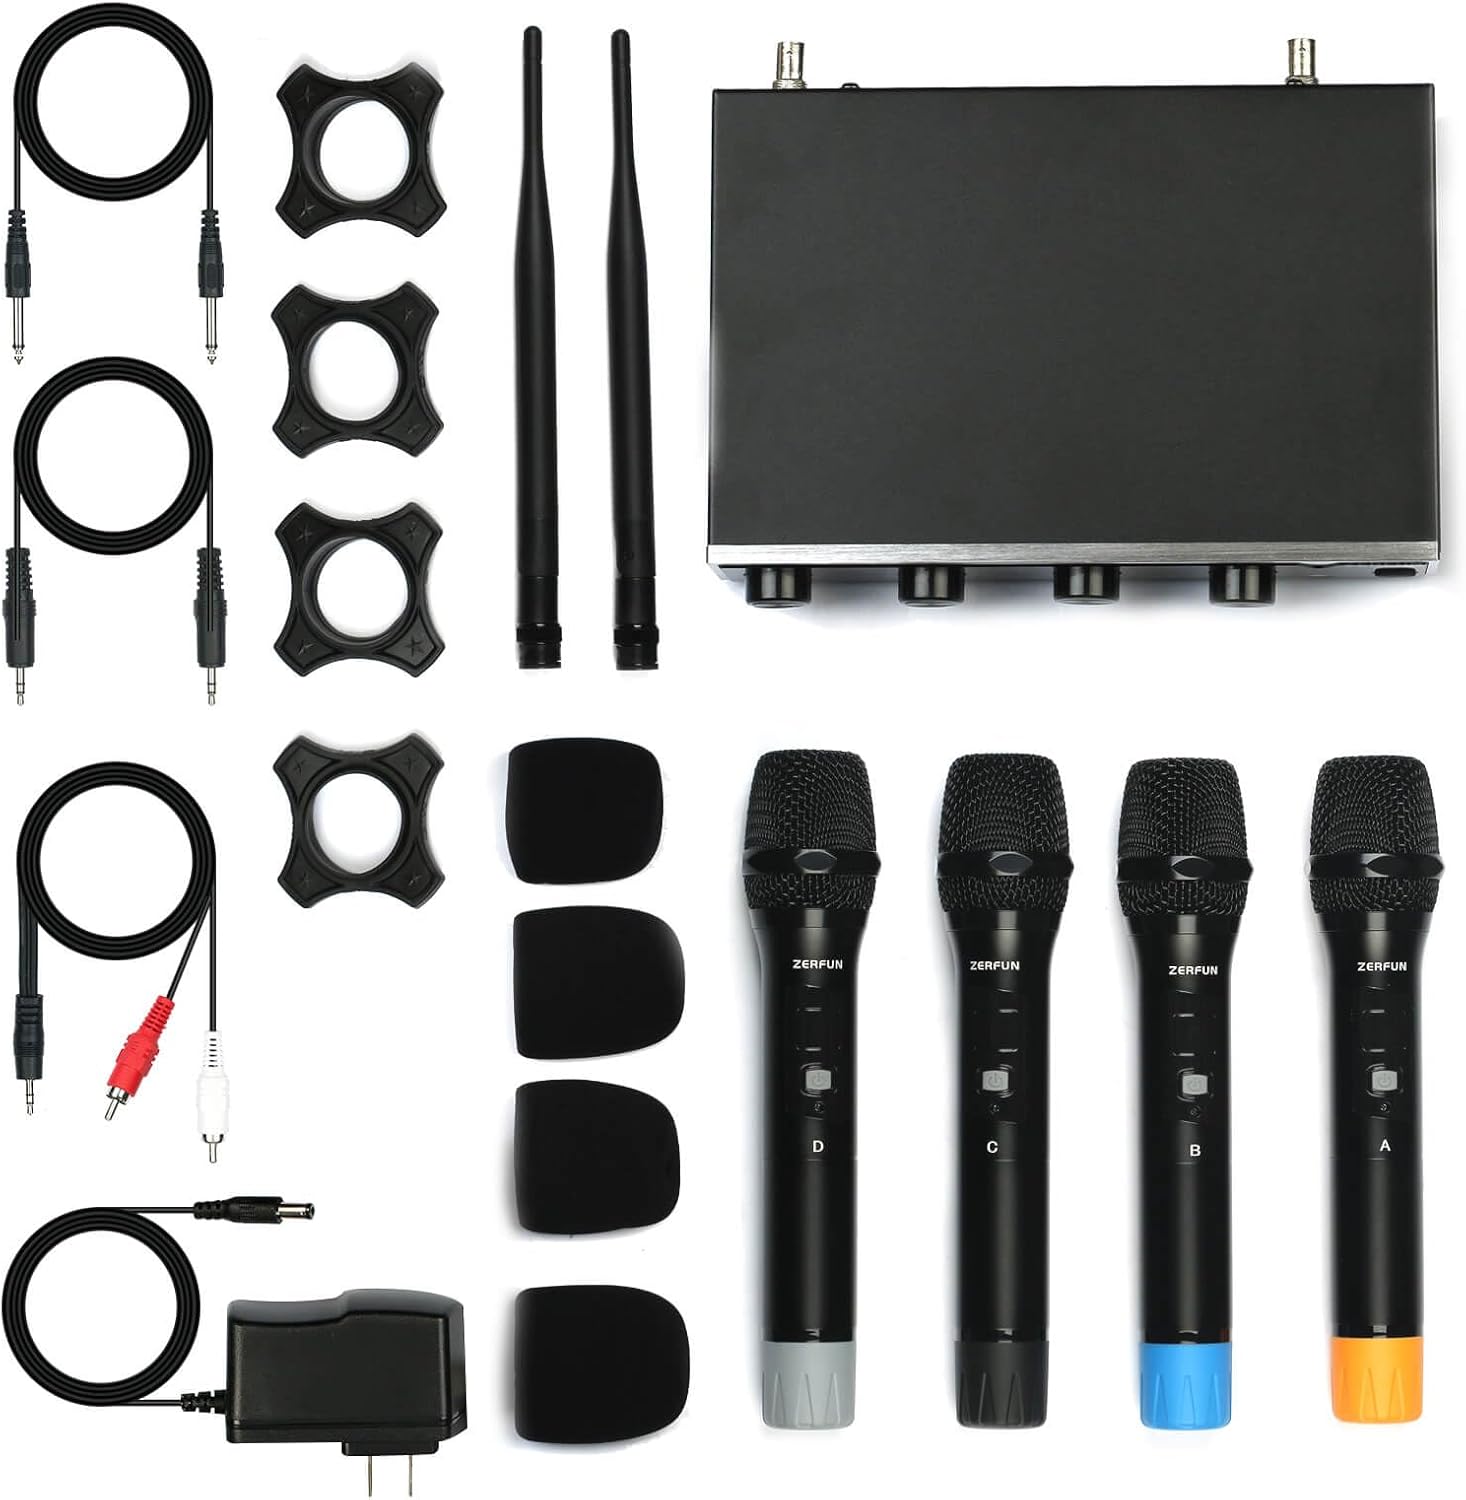
Figure 4.2: Visual representation of the system's 200-foot wireless transmission range.
Each microphone provides approximately 7-8 hours of continuous use from fresh AA batteries.
4.5 Official Product Video
Video 4.1: An official product video demonstrating the ZERFUN G8 Wireless Microphone System. This video provides a visual overview of the product and its components.
5. Maintenance
- Cleaning: Use a soft, dry cloth to clean the receiver and microphones. Avoid using abrasive cleaners or solvents.
- Storage: When not in use for extended periods, store the system in a cool, dry place. Remove batteries from the microphones to prevent leakage and damage.
- Handling: Handle microphones and receiver with care to prevent physical damage. Avoid dropping the units.
6. Troubleshooting
| Problem | Possible Cause | Solution |
|---|---|---|
| No sound from microphone |
|
|
| Sound cuts in and out / Interference |
|
|
| Poor sound quality (e.g., weak, distorted) |
|
|
7. Specifications
| Feature | Detail |
|---|---|
| Brand | ZERFUN |
| Model Name | G8 |
| Microphone Form Factor | Handheld |
| Number of Channels | 4 |
| Frequency Range | 500 - 599 MHz (UHF) |
| Adjustable Frequencies | 4x50 (200 total) |
| Connectivity Technology | UHF Wireless |
| Polar Pattern | Unidirectional (Cardioid) |
| Transmission Range | Up to 200 feet |
| Microphone Power Source | 2 x AA Batteries (per mic) |
| Microphone Battery Life | 7-8 hours (continuous use) |
| Receiver Outputs | 4 x Balanced XLR, 1 x 1/4-inch Mixed, 1 x 1/8-inch Mixed |
| Item Weight | 5.35 pounds (total system) |
| Product Dimensions (L x W x H) | 5.47 x 8.26 x 11.61 inches |
| Color | Black |
8. Warranty and Support
Genuine ZERFUN Wireless Microphone products come with a 12-month Manufacturer Assurance. For any inquiries or assistance, please contact ZERFUN's 24-Hours After-Sales Customer Service.
For further support, you may visit the official ZERFUN store on Amazon: ZERFUN Store