
Range Tour Range Tour z7
Contents
Range Tour Dash Cam Hardwire Kit Mini USB Instruction Manual
Model: Range Tour z7
1. Introduction
This manual provides detailed instructions for the installation, operation, and maintenance of your Range Tour Dash Cam Hardwire Kit Mini USB. This kit is designed to provide continuous power to your dash camera, enabling 24-hour surveillance and low voltage protection for your vehicle's battery. Please read this manual thoroughly before installation and use.

Image: Overview of the Range Tour Dash Cam Hardwire Kit components.
2. Package Contents
Please verify that all items listed below are included in your package:
- 1 x Hardwire Kit (13.12ft / 4m)
- 8 x Adapters (4 Types: ACU(ATO), ACS(Mini), ACZ(Micro 2), ACN(Micro))
- 2 x Fuse Tap Cable
- 1 x Installing Crowbar / Wiring Trim Tool
- 3 x Adhesive Cable Organizers
- 2 x Cable Ties
- 2 x 7.5A Fuses
- 4 x 2A Fuses
- 1 x Opening Tool Bar

Image: All components included in the Range Tour Hardwire Kit package.
3. Specifications
| Feature | Detail |
|---|---|
| Input Power | 12V-24V DC |
| Output Power | 5V / 2.5A Max (also fits for 1-2A) |
| Input Protective Fuse | 2A |
| Battery Drain Protection (12V) | 11.7V (±0.1V) |
| Battery Drain Protection (24V) | 23.7V (±0.1V) |
| Operation Temperature | -20°C to +70°C |
| Cable Length | 4m / 13.12ft |
| Connector Type | Mini USB |
| Product Dimensions | 2.36 x 0.79 x 1.57 inches |
| Item Weight | 6.9 ounces |
This hardwire kit is compatible with most dash cams on the market. However, we recommend that you inquire about the compatibility of your device before purchase.
4. Installation Guide
Proper installation is crucial for the optimal performance of your hardwire kit. If you are unsure about any steps, it is advised to seek professional assistance.
4.1. Identifying ACC and BAT Wires
Before connecting, you need to identify the ACC (Accessory) and BAT (Battery) wires in your car's fuse box. The ACC wire provides power only when the ignition is on, while the BAT wire provides constant power even when the car is off.
- Locate the Fuse Box: Find and open the fuse box of your car. The location varies by vehicle model (often under the dashboard, in the glove compartment, or under the hood).
- Identify ACC Wire: Use a multimeter or a circuit test light to find a fuse that only has power when the ignition is on. One of the wires connected to this fuse should read 12-24V when the ignition is on and 0V when off. This is your ACC wire.
- Identify BAT Wire: Search for a fuse that has power even when the ignition is turned off. This is your BAT wire.

Image: Using a circuit test light to identify ACC and BAT wires in the fuse box.
4.2. Fuse Tap Cable Installation
The kit includes various fuse adapters to match your car's original fuse interface. Choose the appropriate adapter for your vehicle.
- Remove Original Fuse: Carefully remove the original fuse from the identified ACC or BAT slot in your car's fuse box.
- Insert Fuses into Tap: Insert the original car fuse into the lower slot of the fuse tap. Insert the provided 2A fuse (for the dash cam) into the upper slot of the fuse tap. If the car's original fuse does not match, please use the provided 7.5A fuse in the lower slot.
- Install Fuse Tap: Plug the assembled fuse tap into the empty fuse slot in your car's fuse box. Ensure it is securely seated.

Image: Step-by-step guide for assembling and installing the fuse tap cable.
4.3. Connecting the Hardwire Kit Wires
Connect the wires of the hardwire kit to the corresponding fuse taps and ground point.
- Yellow Wire (BAT+): Connect this to the fuse tap installed in the constant power (BAT) fuse slot.
- Red Wire (ACC): Connect this to the fuse tap installed in the ignition-switched power (ACC) fuse slot.
- Black Wire (GND): Connect this to a metal part of the car's chassis, such as a bolt or screw, to establish a ground connection. Ensure the connection is secure.

Image: Detailed wiring diagram showing connections for BAT, ACC, and GND.
Important: Once the hardwire kit is connected to the constant and ignition-switched fuse, you can slip the ground wire under any metal bolt or screw in your vehicle. The nut or bolt you choose to ground with requires a socket wrench set to get loosened.
4.4. Routing the Cable
Use the provided wiring trim tool and adhesive cable organizers to neatly route the cable along the car's interior, typically along the A-pillar and headliner, to the dash cam's mounting location. This ensures a clean and hidden installation.
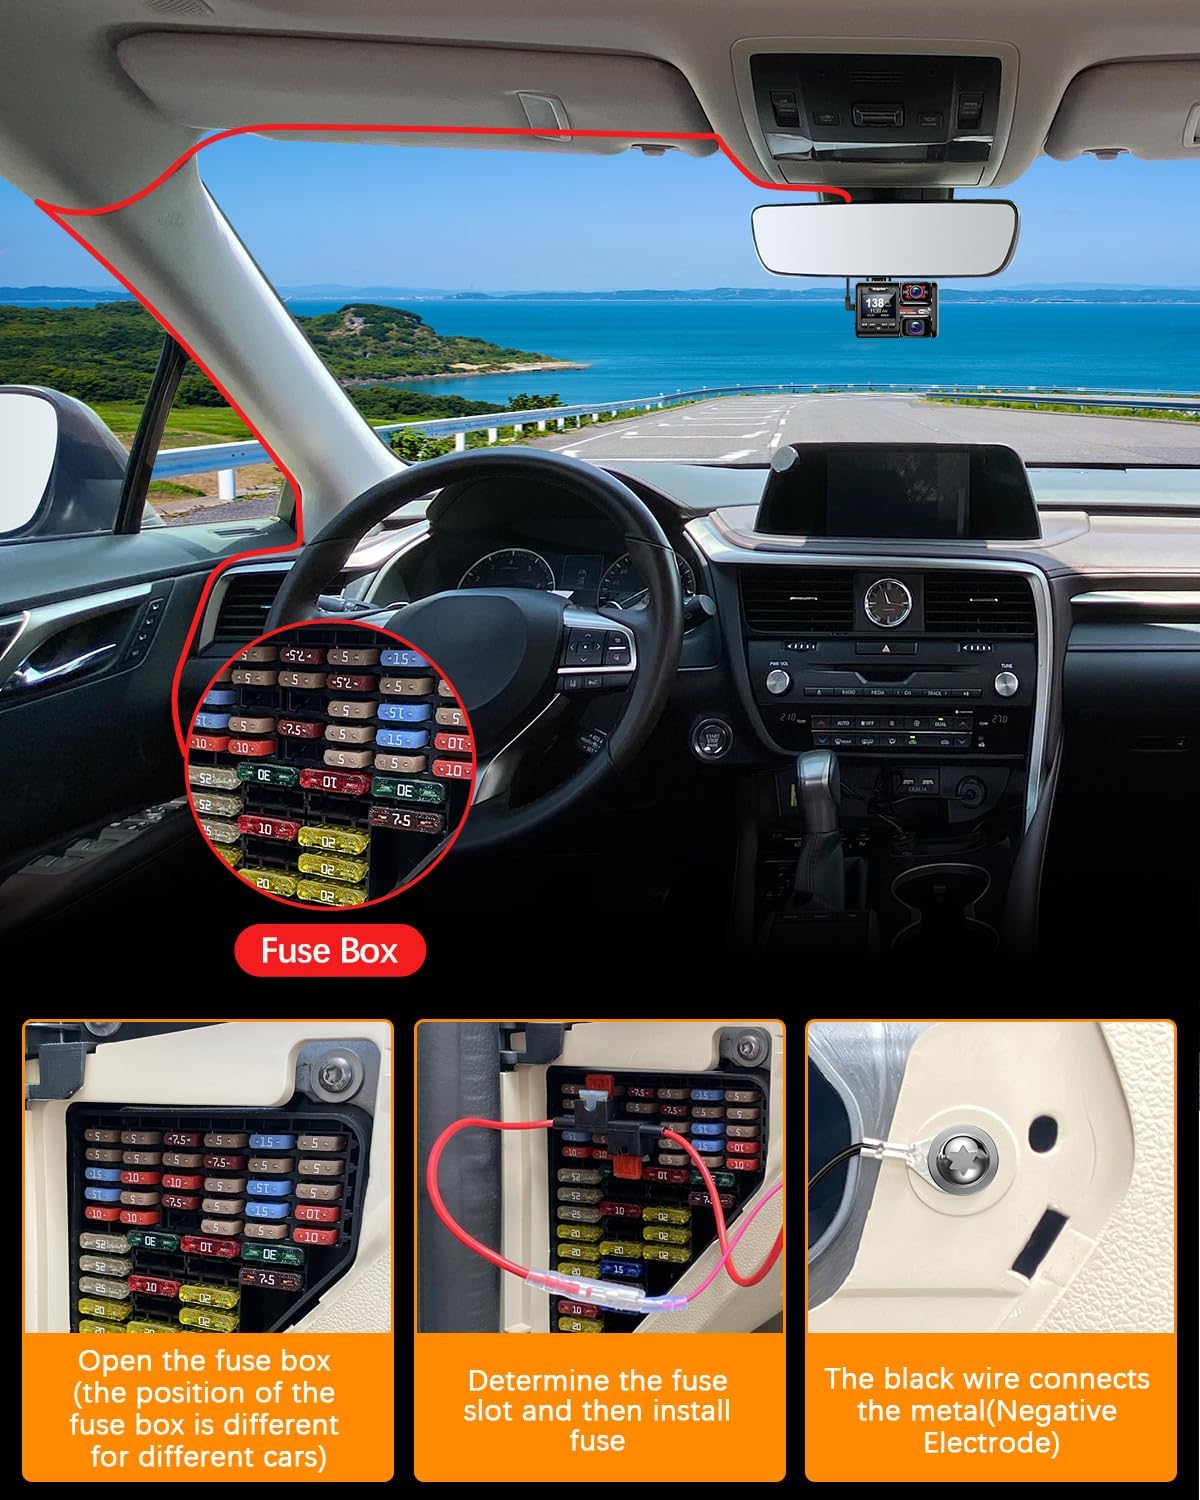
Image: Illustration of how to route the hardwire kit cable for a hidden installation.
4.5. Installation Video Guide
For a visual guide on the installation process, please refer to the official video below:
Video: Official installation guide for the Dash Camera Hardwire Kit. This video demonstrates the steps for connecting the kit to your vehicle's fuse box and routing the cables.
5. Operating Instructions
5.1. 24-Hour Surveillance (Parking Mode)
This hardwire kit enables your dash cam to operate continuously for 24 hours, even when your vehicle is turned off, provided your dash cam supports parking mode. Ensure your dash cam's menu has parking monitoring and includes a G-sensor or Time-lapse recording function.
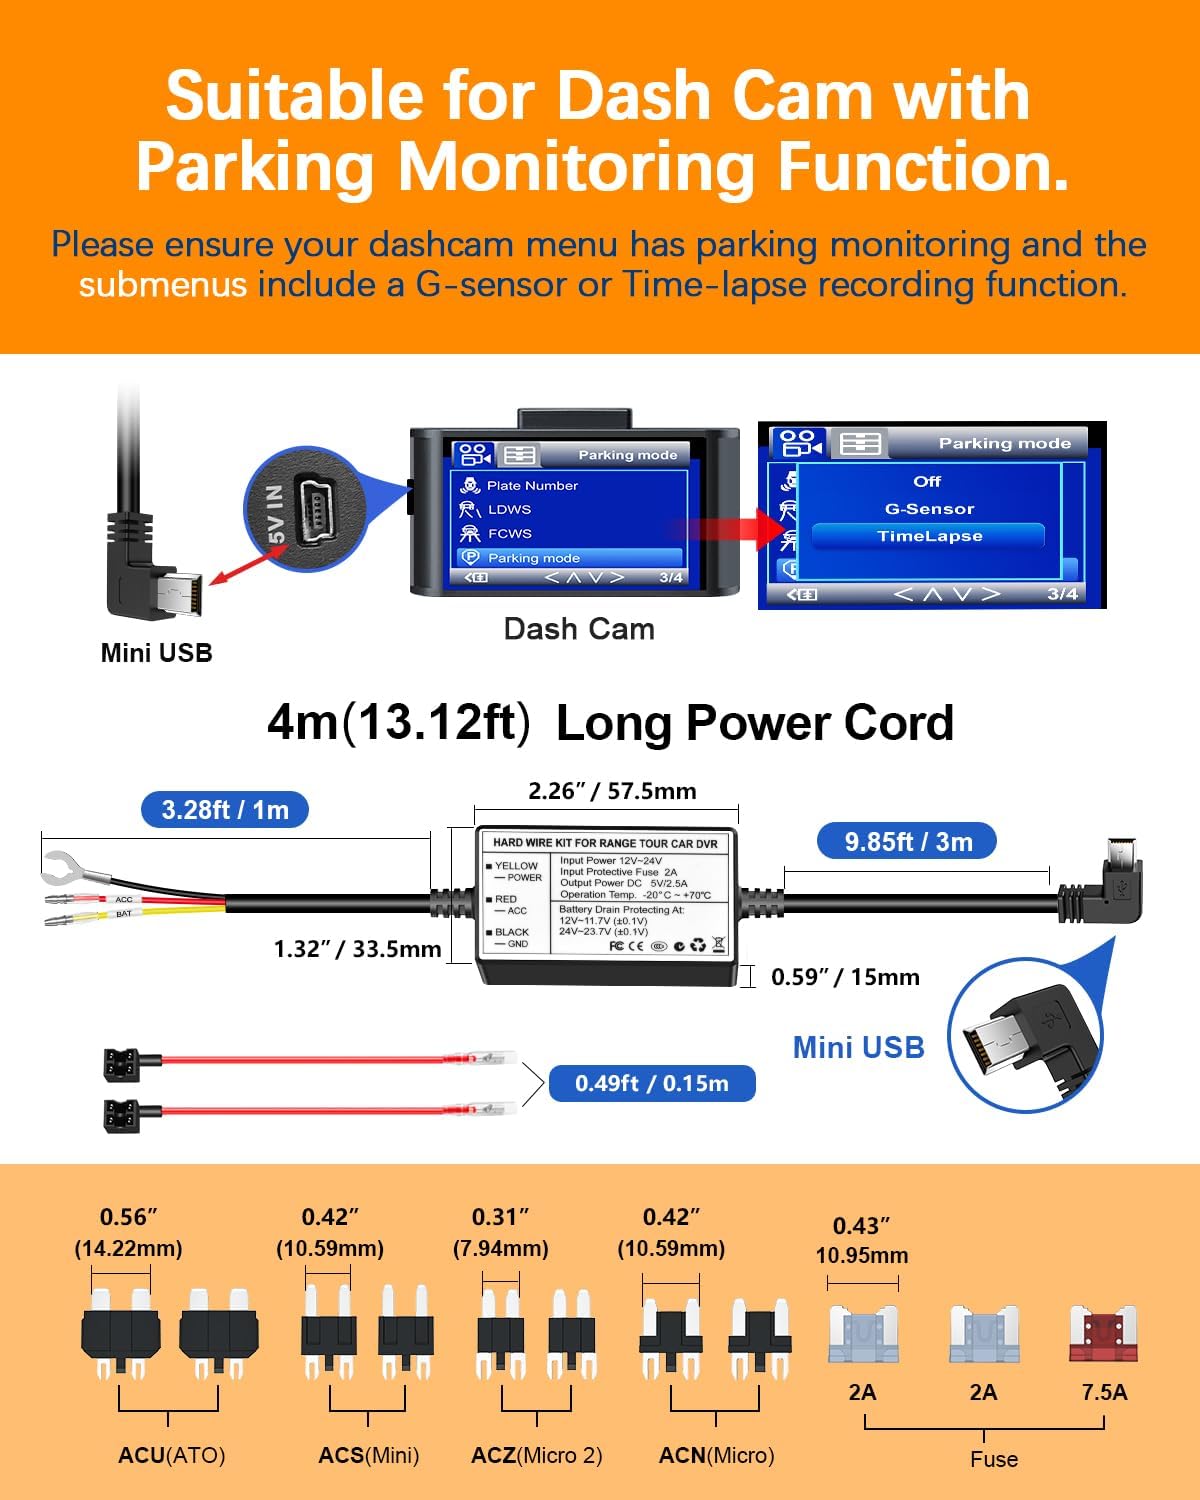
Image: Explanation of dash cam parking monitoring function and required settings.
5.2. Low Voltage Protection
The hardwire kit features a sensitive voltage sensing switch that monitors your car battery's voltage in real-time. If the voltage drops below a safe threshold (11.7V for 12V systems, 23.7V for 24V systems), the kit will automatically cut off power to the dash cam, leaving sufficient power to ignite your engine.

Image: Diagram illustrating the low voltage protection feature and thresholds.
6. Maintenance
The Range Tour Hardwire Kit is designed for durability and requires minimal maintenance. Periodically check the connections to ensure they remain secure and free from corrosion. Keep the cables neatly tucked away to prevent damage from snagging or pinching.
If you notice any signs of wear or damage to the cables or connectors, discontinue use and replace the affected components immediately to ensure safe operation.
7. Troubleshooting
| Problem | Possible Cause | Solution |
|---|---|---|
| Dash cam does not power on after installation. | Incorrect wiring (ACC/BAT/GND), blown fuse, loose connection. | Double-check all connections. Ensure ACC and BAT wires are connected to the correct fuse types. Check fuses in the fuse tap and replace if blown. Verify ground connection is secure. |
| Parking mode not working. | Dash cam does not support parking mode, incorrect dash cam settings, incorrect BAT wire connection. | Ensure your dash cam explicitly supports parking mode and has G-sensor or Time-lapse recording enabled in its settings. Verify the BAT wire is connected to a constant power source. |
| Car battery drains quickly. | Low voltage protection not functioning, dash cam power consumption too high, prolonged parking mode use. | Confirm the low voltage protection feature is active. Check dash cam settings for power saving options in parking mode. If the issue persists, consult a professional. |
| Radio interference. | Electrical noise from the hardwire kit or dash cam. | Ensure proper grounding. If interference persists, consider adding ferrite beads to the power cable (not included). |
If you are unsure of the circuit system or encounter persistent issues, we advise that you hire a professional to do it.
8. Safety Information
- WARNING: To avoid choking hazards, keep this bag away from babies and children!
- This product is not a toy!
- When connecting the hardwire kit, please make sure that the engine is off.
- Always ensure proper insulation of all connections to prevent short circuits.

Image: Safety warnings and manufacturer contact information.
9. Warranty and Support
For warranty information or technical support, please contact Range Tour customer service. Refer to the product packaging or the manufacturer's official website for the most up-to-date contact details.
Manufacturer: Shenzhenshilanyikejiyouxiangongsi
Contact Person: Yanshan Wang
Email: RangeTour.SERVICE@gmail.com
UK REP: Sea&Mew Accounting Ltd (Email: info@seamew.net)
EC REP: Sea&Mew Consulting GmbH (Email: Compliance.EU@outlook.com)
Ask a question about this manual
Ask about setup, troubleshooting, compatibility, parts, safety, or missing instructions. Manuals+ will review the question and use this page’s manual context to help answer it.