1. Introduction
This manual provides essential instructions for the safe and efficient use of your Kenwood Cooking Chef XL Stand Mixer, model KCL95.424SI. This versatile kitchen machine features a metal body, induction/cooking function, built-in weighing scale, and comes with a stainless steel bowl and multiple tools. Please read this manual thoroughly before first use and retain it for future reference.

Image 1.1: Kenwood Cooking Chef XL Stand Mixer, front view with K-beater and stainless steel bowl.
2. Important Safety Instructions
- Always ensure the appliance is switched off and unplugged before cleaning, assembling, or disassembling parts.
- Do not immerse the motor unit in water or any other liquid.
- Keep hands, hair, clothing, and utensils away from moving parts during operation.
- Use only genuine Kenwood attachments and accessories.
- Exercise caution when handling sharp blades, especially during cleaning.
- Ensure the splashguard is fitted when using the induction heating function.
- This appliance is for household use only.
3. Setup and Assembly
Before first use, clean all parts that will come into contact with food. Ensure the mixer is placed on a stable, flat, and dry surface.
- Attaching the Bowl: Place the stainless steel bowl onto the base of the mixer and twist clockwise until it locks securely into position.
- Lifting the Head: Press the head release lever and lift the mixer head until it clicks into place.
- Inserting Bowl Tools: Select the desired bowl tool (K-beater, whisk, or dough tool). Align the tool with the attachment shaft and push upwards, then twist to secure it.
- Lowering the Head: Press the head release lever again and gently lower the mixer head until it locks.
- Attaching the Splashguard: Slide the splashguard onto the mixer head from the front, ensuring it fits snugly around the bowl.

Image 3.1: User interacting with the CookAssist™ touchscreen display.
The Kenwood Cooking Chef XL features EasyWeigh scales, allowing you to weigh ingredients directly into the bowl or attachments. The weight is displayed on the CookAssist™ touchscreen.
4. Operating Instructions
4.1 Power and Speed Control
Plug the mixer into a suitable power outlet. Use the speed control dial to select one of the 13 available speeds. Turn the dial clockwise to increase speed and counter-clockwise to decrease. The mixer also features one-touch pre-sets for common tasks, accessible via the full-color touchscreen.
4.2 Induction Cooking Function
The Cooking Chef XL can heat ingredients from 20°C to 180°C using its integrated induction function. This allows for tasks such as melting chocolate, proving dough, slow cooking, and preparing sauces directly in the mixing bowl. Always ensure the splashguard is correctly fitted when using the heating function.
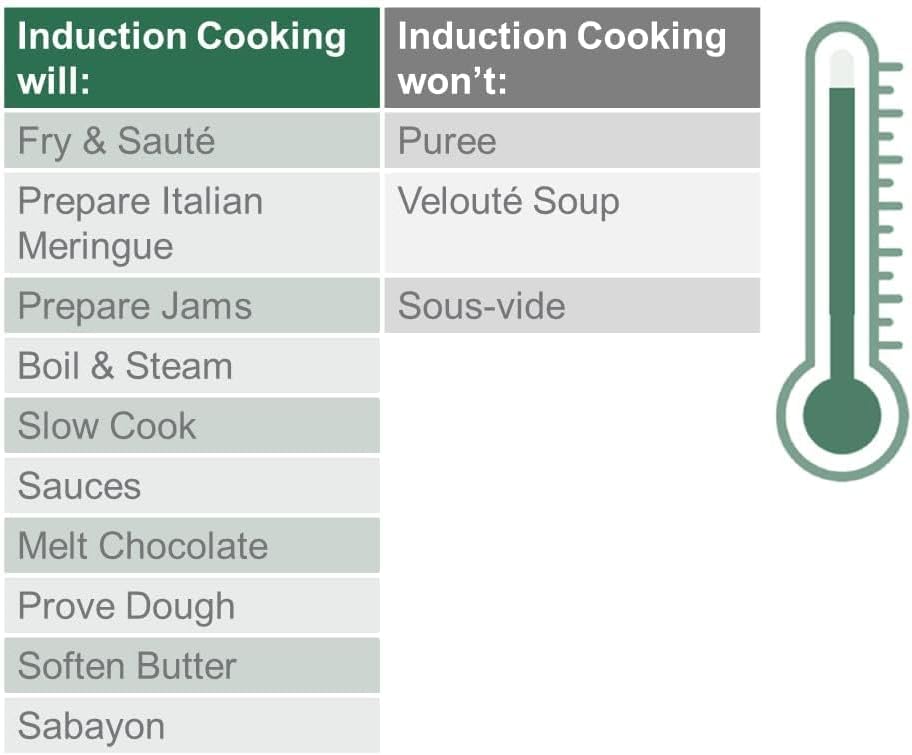
Image 4.1: Overview of tasks suitable and unsuitable for induction cooking.
4.3 Using Attachments
The mixer comes with various bowl tools and supports additional attachments for diverse culinary tasks.

Image 4.2: Detailed descriptions of standard bowl tools and accessories.
- K-Beater: Ideal for making cakes, biscuits, pastry, icing, fillings, éclairs, and mashed potato.
- Whisk: Used for eggs, cream, batters, fatless sponges, meringues, cheesecakes, mousses, and soufflés.
- Dough Tool: Designed for mixing bread dough, pizza dough, pasta dough, and brioche.
- Creaming Beater: Specifically designed for creaming butter and sugar, also suitable for preparing sauces and choux pastry.
- Stir Tool: For simmering dishes, ratatouilles, compotes, or jams. Gently mixes ingredients to prevent sticking.
- Steamer Basket: Used for steaming food in the Cooking Chef XL bowl. Place water in the main bowl, insert the steamer basket, and cover with the heat shield and splashguard.

Image 4.3: Visual representation of various attachments and their culinary applications.
5. Care and Maintenance
Proper care ensures the longevity and optimal performance of your Kenwood Cooking Chef XL.
- Cleaning the Main Unit: Wipe the main motor unit with a damp cloth. Do not use abrasive cleaners or immerse in water.
- Cleaning Bowl and Tools: The stainless steel bowl and most bowl tools are dishwasher safe. Refer to individual attachment instructions for specific cleaning guidelines. For hand washing, use warm soapy water and a non-abrasive sponge.
- Drying: Ensure all parts are thoroughly dry before reassembling or storing.
- Storage: Store the mixer and its attachments in a clean, dry place.
6. Troubleshooting
If you encounter issues with your Kenwood Cooking Chef XL, refer to the following common problems and solutions:
| Problem | Possible Cause | Solution |
|---|---|---|
| Mixer does not start. | Not plugged in; power switch off; head not fully lowered. | Check power connection; ensure power switch is on; lower mixer head until it clicks. |
| Attachments not fitting correctly. | Incorrect alignment; debris in shaft. | Ensure tool is aligned with shaft and twisted to lock; clean attachment shaft. |
| Induction heating not working. | Splashguard not fitted; incorrect temperature setting. | Ensure splashguard is in place; verify temperature settings on touchscreen. |
| Unusual noise during operation. | Overloaded; attachment not properly secured. | Reduce load; ensure all attachments are securely locked. |
If the problem persists, please contact Kenwood customer support.
7. Technical Specifications
| Feature | Specification |
|---|---|
| Model Number | KCL95.424SI |
| Power / Wattage | 1500 watts |
| Voltage | 220 Volts |
| Bowl Capacity | 6.7 Liters |
| Number of Speeds | 13 |
| Product Dimensions (L x W x H) | 13.58 x 15.75 x 14.57 cm |
| Item Weight | 10.4 Kilograms |
| Material | Metal |
| Special Features | Digital Display, Induction Heating, Built-in Weighing Scale |

Image 7.1: Product dimensions of the Kenwood Cooking Chef XL.
8. Warranty and Support
For detailed warranty information and customer support, please refer to the warranty card included with your product or visit the official Kenwood website. Keep your proof of purchase for warranty claims.


