
DEWENWILS B09C23D9GG
Contents
DEWENWILS 3-Zone Sprinkler Timer
User Manual
1. Introduction
Thank you for choosing the DEWENWILS 3-Zone Sprinkler Timer. This device is designed to automate your garden watering, providing convenience and efficiency. It features three independent watering zones, multiple programming options, and functions like rain delay and manual watering to meet diverse irrigation needs. This manual provides detailed instructions for installation, operation, maintenance, and troubleshooting to ensure optimal performance of your sprinkler timer.

Image: Front view of the DEWENWILS 3-Zone Sprinkler Timer, showing the LCD screen and control buttons.
2. Safety Information
- Ensure the timer is installed securely to prevent accidental detachment.
- Do not expose the timer to extreme temperatures (below freezing or excessive heat) for prolonged periods, as this may damage the internal components.
- Use only the specified battery type (2 x 1.5V AA batteries).
- Do not attempt to disassemble or repair the unit yourself. Contact customer support for assistance.
- Keep out of reach of children.
3. Package Contents
Please check the package to ensure all items are present:
- 1 x DEWENWILS 3-Zone Sprinkler Timer
- 1 x User Manual
Note: 2 x 1.5V AA batteries are not included and must be purchased separately.
4. Product Overview
Familiarize yourself with the main components of your sprinkler timer:
- LCD Screen: Displays time, watering schedules, and current settings.
- Control Buttons: Five buttons (OK, Up, Down, Left, Right) for navigation and setting adjustments.
- Faucet Connector: Top inlet for connecting to a standard 3/4" outdoor water faucet. Features a pure zinc metal leak-proof interface.
- Water Outlets (A, B, C): Three independent outlets for connecting hoses to different watering zones.
- Battery Compartment: Located at the back, requires 2 AA batteries.

Image: Close-up view of the timer's LCD screen and control buttons, illustrating the easy programming design.
5. Setup
5.1 Battery Installation
The timer requires two 1.5V AA batteries (not included).
- Locate the battery compartment on the back of the timer.
- Slide the battery cover open.
- Insert two AA batteries, ensuring correct polarity (+/-).
- Close the battery cover securely.
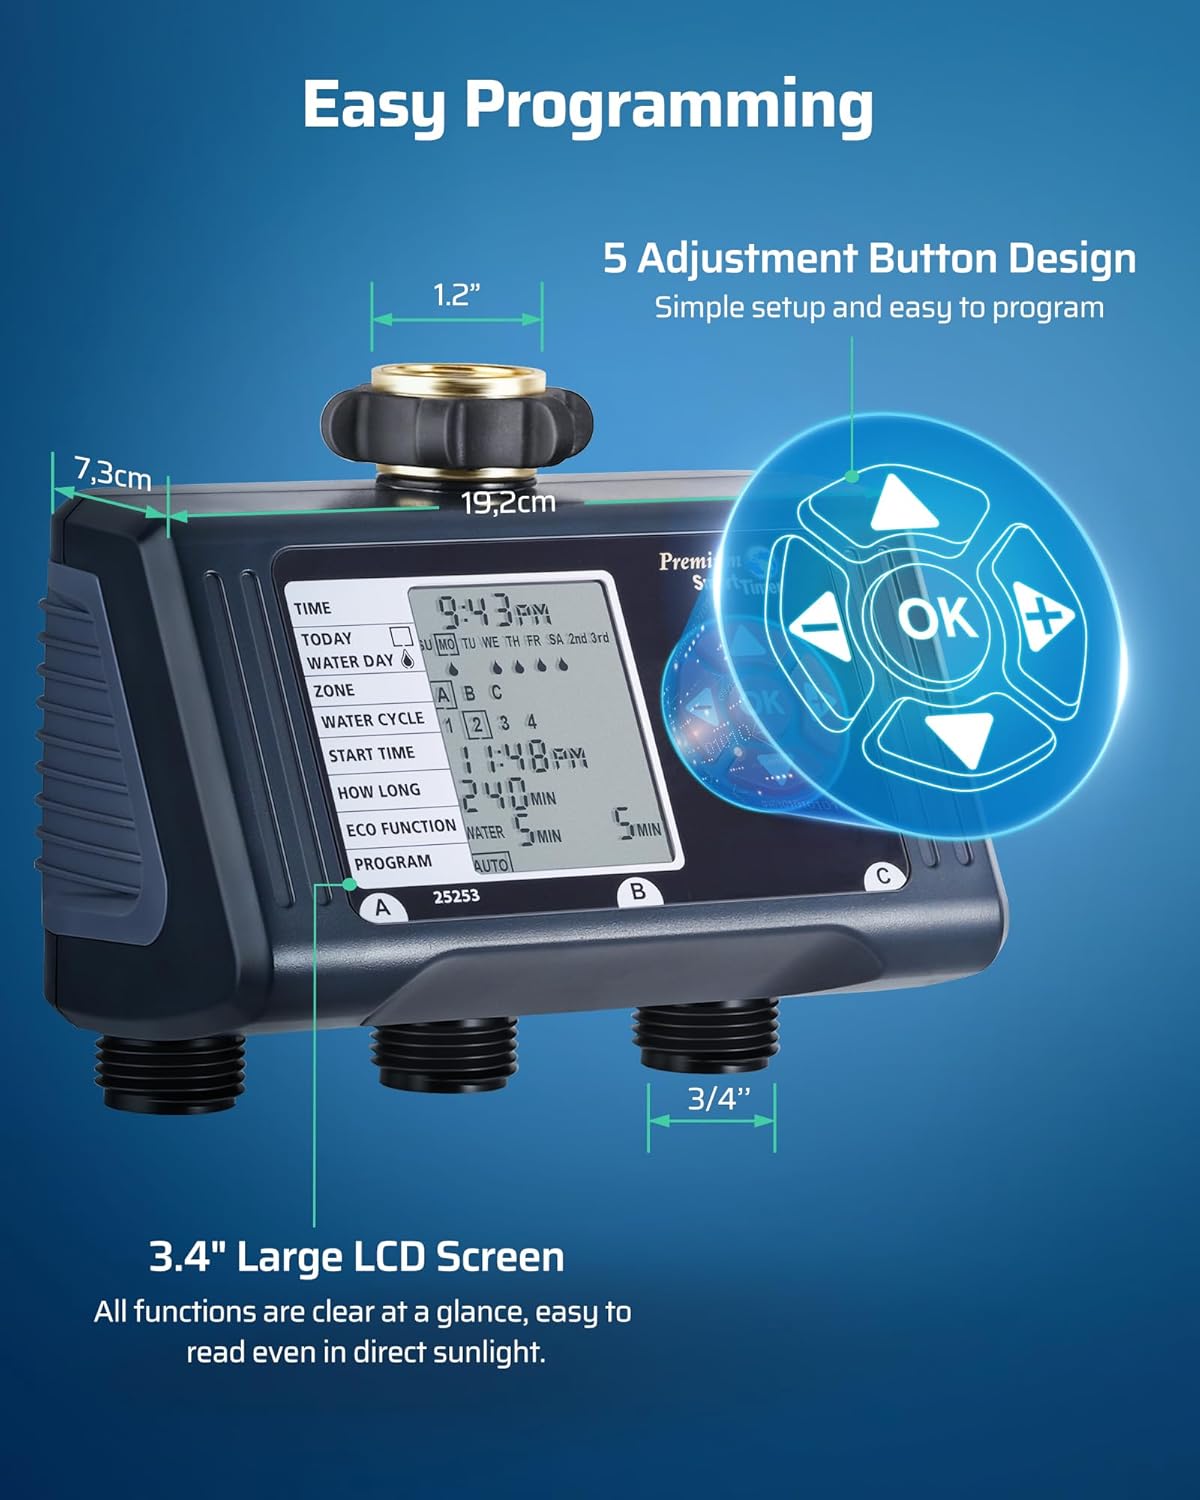
Image: View of the timer's battery compartment, highlighting the sealing ring for moisture protection.
5.2 Attaching to Faucet
Connect the timer to your outdoor water faucet.
- Ensure the faucet is clean and free of debris.
- Screw the timer's top connector onto your standard 3/4" outdoor water faucet. Hand-tighten only to prevent damage. The pure zinc integrated tap connector is designed to prevent leaks.

Image: The sprinkler timer connected to an outdoor water faucet, ready for use.
5.3 Connecting Hoses/Outlets
Attach your garden hoses to the three independent outlets (A, B, C) at the bottom of the timer.
- Screw each hose onto its respective outlet.
- Ensure connections are tight to prevent leaks.
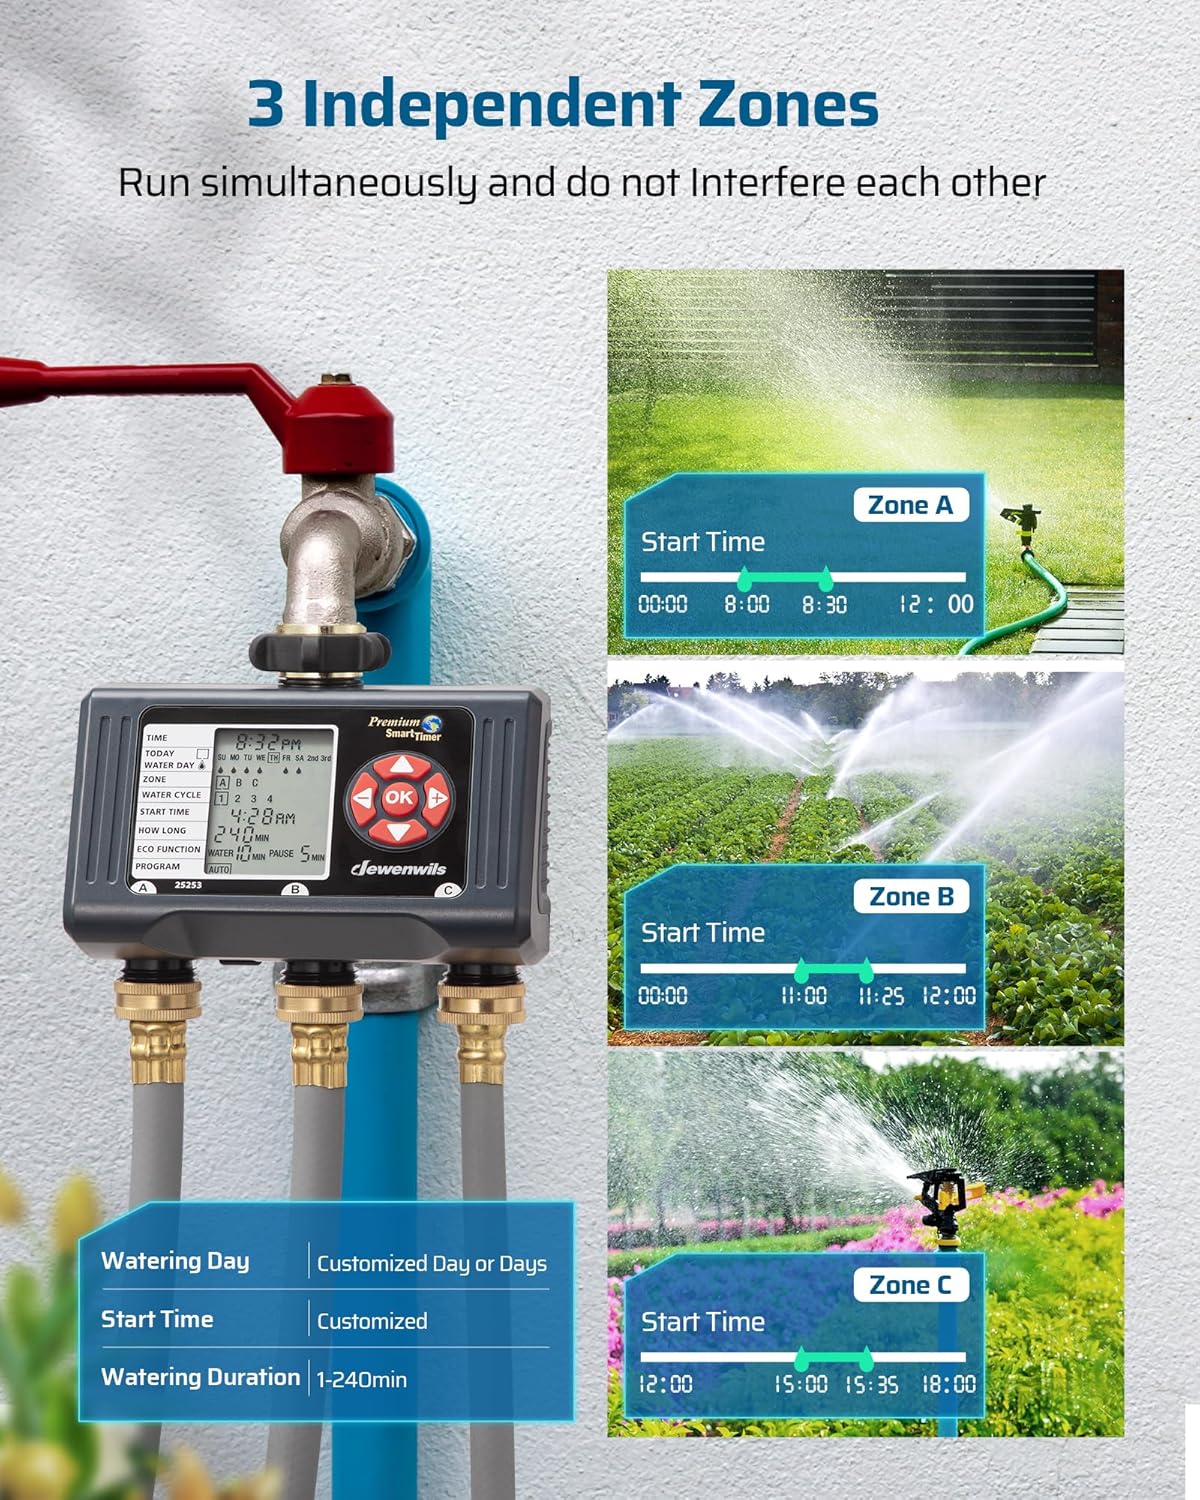
Image: The sprinkler timer with three hoses connected to its independent outlets, ready for zoned watering.
5.4 Setup Video Guide
Watch this video for a visual guide on setting up your DEWENWILS Sprinkler Timer:
Video: A short demonstration of installing batteries, attaching the timer to a faucet, and connecting hoses to the outlets.
6. Operating Instructions
The large LCD screen and intuitive buttons make programming straightforward.
6.1 Setting Current Time
Before programming, set the current time:
- Press the "OK" button to enter the setting mode.
- Use the "Up" or "Down" buttons to navigate to "TIME".
- Press "OK" to select. Use "Up"/"Down" to adjust hours/minutes and "Left"/"Right" to move between them.
- Press "OK" to confirm.
6.2 Programming Watering Schedules (Auto Watering Mode)
The timer supports up to 4 watering cycles per outlet per day, with flexible day selection.
- From the main screen, use "Up" or "Down" to navigate through settings like "WATER DAY", "ZONE", "WATER CYCLE", "START TIME", "HOW LONG".
- Select Zone: Use "Left"/"Right" to select Zone A, B, or C. Each zone can be programmed independently.
- Watering Day: Choose specific days of the week (SU, MO, TU, WE, TH, FR, SA) or set to water every 2nd or 3rd day.
- Water Cycle: Select one of the four available watering cycles (1, 2, 3, 4) for the chosen zone.
- Start Time: Set the desired start time for each water cycle.
- How Long: Set the watering duration from 1 to 240 minutes.
- Press "OK" after each setting to confirm and move to the next.
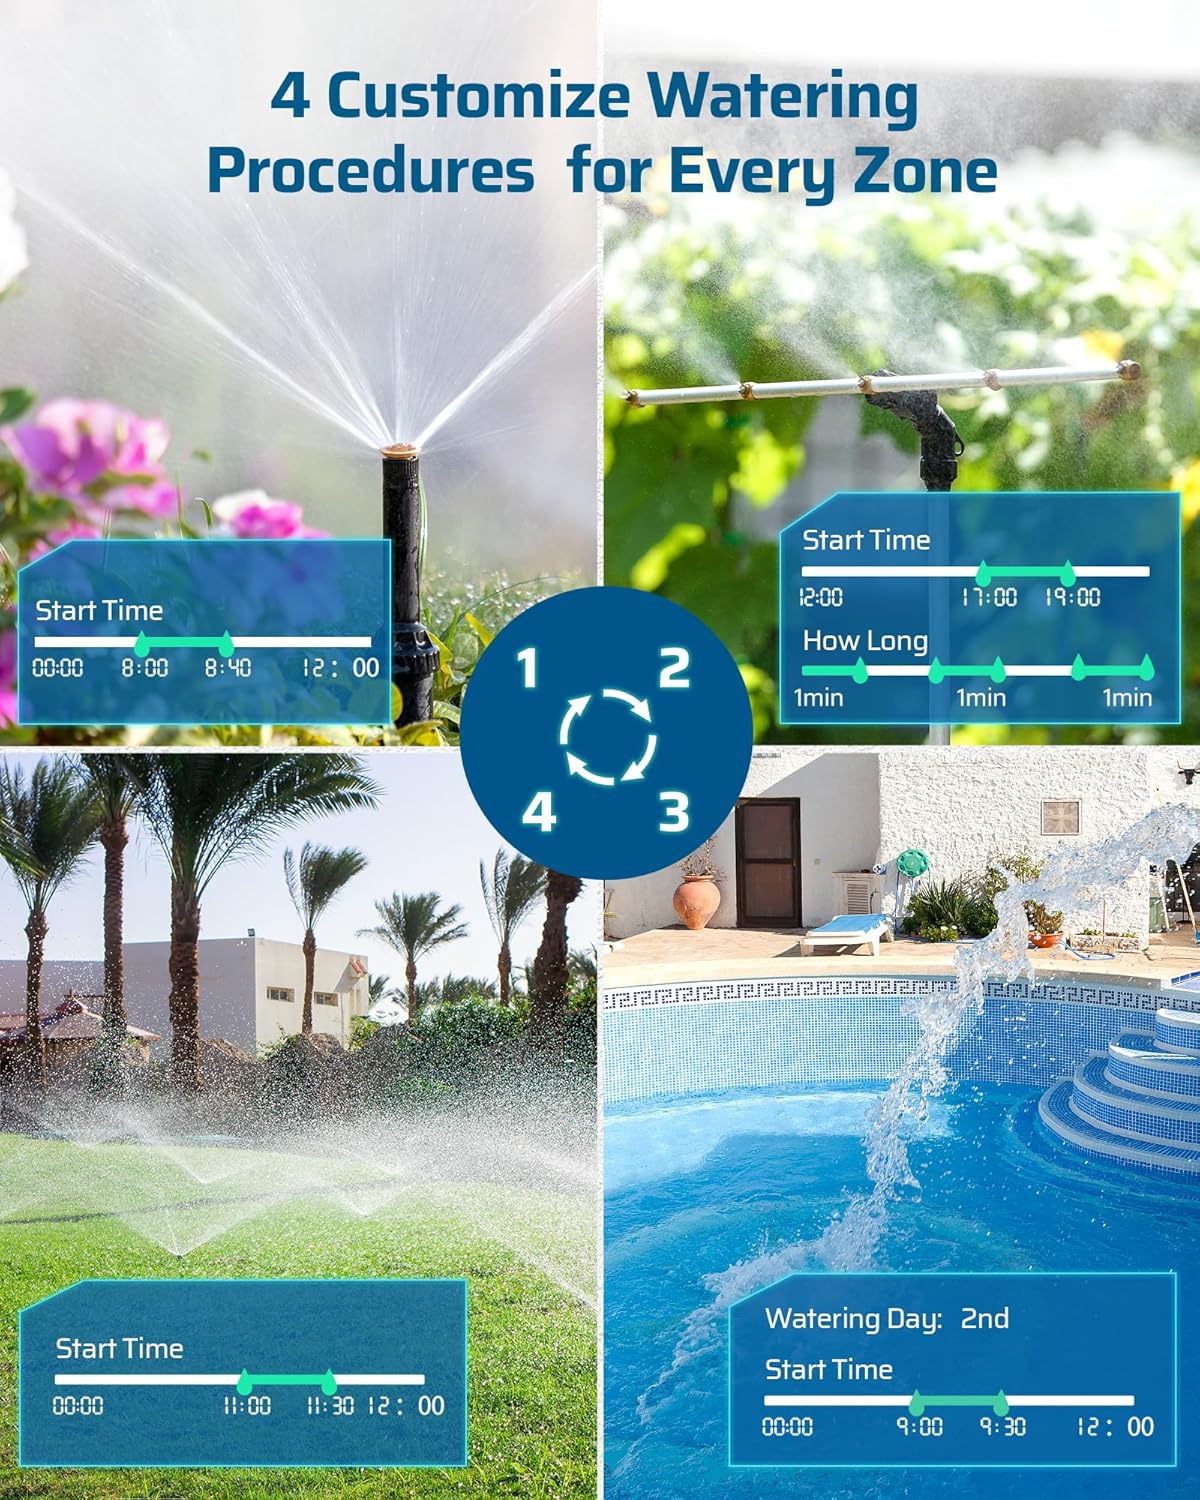
Image: Illustration of the three independent watering zones (A, B, C) and their customizable start times and durations.

Image: Visual representation of four customizable watering procedures for each zone, demonstrating flexibility in scheduling.
6.3 Repeat Watering Mode (ECO Function)
This innovative feature allows for intermittent watering within a scheduled period, ideal for specific plant needs or lawn care.
- Navigate to "ECO FUNCTION" in the settings.
- Set the "WATER" duration (e.g., 5 minutes) and "PAUSE" duration (e.g., 15 minutes).
- The timer will cycle ON/OFF according to these settings within the programmed start and end times.
6.4 Rain Delay Mode
To conserve water and prevent over-watering during rainy periods, activate the Rain Delay function.
- From the main screen, press the "Rain Delay" button (usually indicated by a cloud icon or specific button).
- Use "Up" or "Down" to select the delay duration (1-6 days).
- Press "OK" to confirm. Watering will resume automatically after the delay period.
6.5 Manual Watering Mode
For immediate, one-time watering without affecting your programmed schedules.
- From the main screen, press the "Manual" button (often indicated by a water drop icon or specific button).
- Select the zone(s) you wish to water manually.
- Set the desired duration for manual watering.
- Press "OK" to start. The timer will revert to its automatic schedule once manual watering is complete.

Image: Visual explanation of the Eco Function for intermittent watering, Rain Delay mode for water conservation, and Manual Watering for immediate needs.
7. Maintenance
7.1 Battery Replacement
The timer features a low battery indicator. Replace batteries promptly when the indicator appears to ensure continuous operation and prevent over-watering in case of power loss.
- Follow the battery installation steps in Section 5.1.
- After replacing batteries, you may need to reset the current time, but programmed schedules are typically retained.
7.2 Cleaning
Clean the exterior of the timer with a soft, damp cloth. Do not use abrasive cleaners or immerse the unit in water.
7.3 Winterization
Before the first frost, remove the timer from the faucet, drain any remaining water, and store it indoors in a dry, protected area. Remove batteries if storing for extended periods.
8. Troubleshooting
| Problem | Possible Cause | Solution |
|---|---|---|
| Timer not turning on/LCD blank | Dead or incorrectly installed batteries. | Replace batteries, ensuring correct polarity. |
| No water flow | Faucet off, low water pressure, clogged filter, incorrect programming. | Ensure faucet is fully open. Check water pressure (max 120 psi). Clean the filter screen in the faucet connector. Verify programming. |
| Water leakage from connections | Loose connections, worn washers, damaged threads. | Tighten connections. Check and replace rubber washers if worn. Ensure threads are not cross-threaded. |
| Timer not watering at scheduled time | Incorrect time setting, rain delay active, programming error. | Verify current time. Check if Rain Delay is active. Review and correct watering schedules. |
9. Specifications
- Brand: DEWENWILS
- Model: B09C23D9GG
- Color: Gray
- Material: Plastic, Acrylonitrile Butadiene Styrene
- Product Dimensions: 7.3"D x 19.2"W x 10"H
- Item Weight: 13 ounces
- Number of Settings: 4 (Watering Procedures)
- Screen Size: 3.4 Inches
- Max Sustainable Water Pressure: 120 psi
- Power Source: 2 x 1.5V AA Batteries (not included)
10. Warranty and Support
DEWENWILS products are designed for reliability and performance. For warranty information or technical support, please visit the official DEWENWILS store on Amazon or contact their customer service directly.
DEWENWILS Store: https://www.amazon.com/stores/DEWENWILS/page/1C02159F-F2CE-44B2-9F70-211ED27C8DEB
Ask a question about this manual
Ask about setup, troubleshooting, compatibility, parts, safety, or missing instructions. Manuals+ will review the question and use this page’s manual context to help answer it.