1. Introduction
Thank you for purchasing the E58 Eachine JY019 Foldable RC Quadcopter. This manual provides essential information for the safe operation, setup, and maintenance of your drone. Please read it thoroughly before first use to ensure proper functionality and to avoid damage.
1.1 Package Contents
Upon opening the package, please verify that all the following components are included:
- 1 x RC Quadcopter (2MP Camera)
- 1 x Transmitter (Remote Controller)
- 1 x 3.7V 500mAh Lipo Battery (for drone)
- 1 x USB Charging Cable
- 4 x Protection Covers (Propeller Guards)
- 4 x Spare Blades (Propellers)
- 1 x Screwdriver
- 1 x User Manual (this document)

Figure 1.1: Overview of the E58 Eachine JY019 drone and its included accessories. The image displays the folded drone, remote controller, propellers, propeller guards, USB charging cable, screwdriver, and the drone battery.

Figure 1.2: The retail packaging for the JY019 Pocket Drone, showing the drone in both folded and unfolded states, along with the remote controller. This image confirms the product model and its compact design.
2. Safety Guidelines
To prevent injury or damage, please observe the following safety precautions:
- Always operate the drone in open areas, away from people, animals, buildings, and obstacles.
- Do not fly in strong winds or adverse weather conditions.
- Keep a safe distance from the rotating propellers. Do not touch them during operation.
- Ensure the drone battery is fully charged before each flight.
- Do not overcharge the battery.
- Supervise children when they are operating the drone.
- Do not attempt to modify or disassemble the drone or its components.
- Turn off the drone and remote controller when not in use.
- Dispose of batteries responsibly according to local regulations.
3. Product Overview
3.1 Drone Features
- Foldable Design: Compact and portable for easy transport.
- HD 2.0MP Camera: 120° Wide-Angle lens for high-resolution images and videos (720P).
- Altitude Hold Mode: Maintains a consistent altitude for stable flight and video recording.
- Trajectory Flight: Allows drawing a flight path on your mobile device for the drone to follow.
- One Key Take Off/Landing: Simplifies flight initiation and termination.
- 360° Flip: Performs aerial stunts with a single button.
- 6-Axis Gyro: Provides stable and easy control.

Figure 3.1: Illustration of the drone's 120° wide-angle 720P HD camera, highlighting its field of view and image capture capabilities. A simulated phone screen shows the live video feed from the drone.

Figure 3.2: Dimensions of the E58 Eachine JY019 drone. The image shows the drone both folded (12.5cm x 7.5cm x 5cm) and unfolded (27cm x 19.5cm x 5cm), demonstrating its compact and portable design.
3.2 Remote Controller Layout
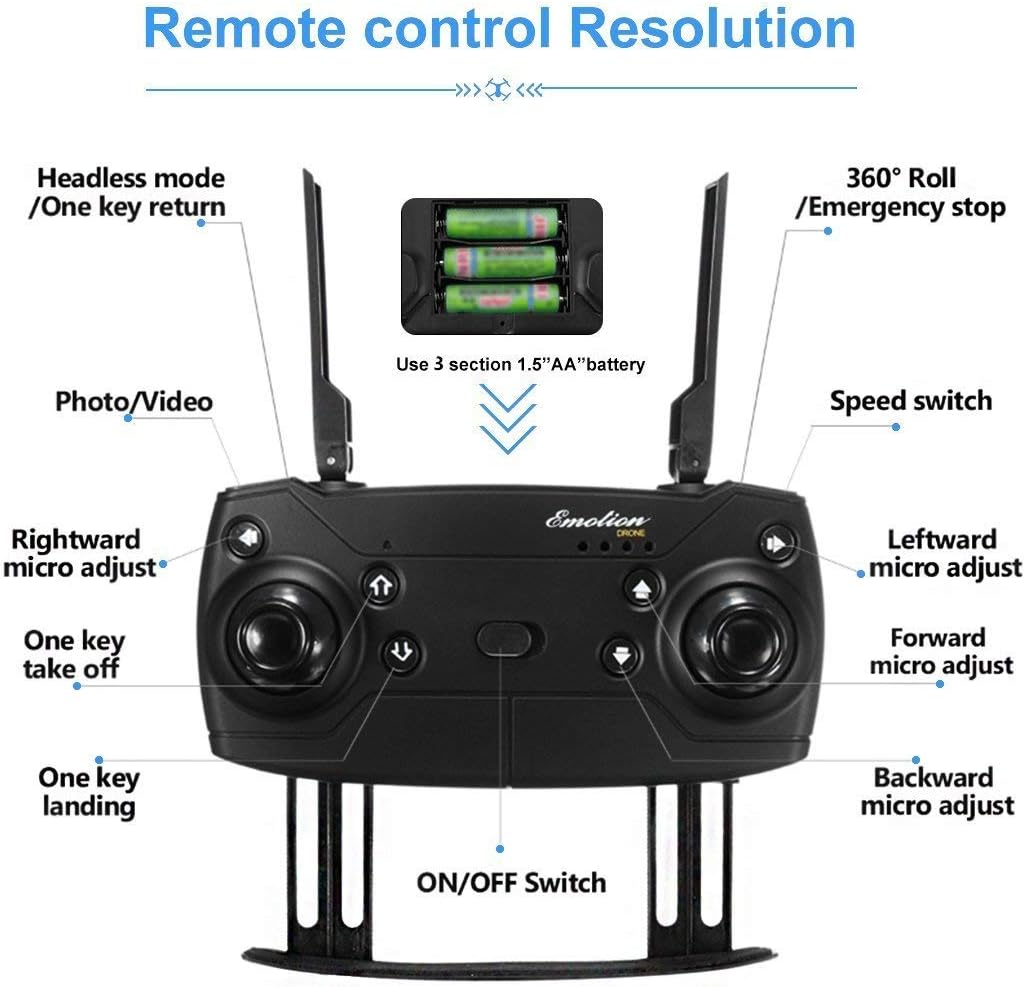
Figure 3.3: Detailed layout of the remote controller for the E58 Eachine JY019 drone. Key functions such as Headless mode/One key return, 360° Roll/Emergency stop, Photo/Video button, Speed switch, One key take off/landing, and various micro-adjustments (rightward, leftward, forward, backward) are clearly labeled. The battery compartment for 3 x 1.5V AA batteries is also indicated.
Familiarize yourself with the remote controller's buttons and joysticks:
- Left Joystick: Controls altitude (up/down) and rotation (left/right).
- Right Joystick: Controls forward/backward and left/right flight.
- One Key Take Off/Landing Button: Initiates automatic take-off or landing.
- Photo/Video Button: Captures photos or starts/stops video recording.
- Speed Switch: Adjusts flight speed (e.g., low, medium, high).
- Headless Mode/One Key Return: Activates headless mode or returns the drone to the take-off point.
- 360° Roll/Emergency Stop: Performs a 360-degree flip or initiates an emergency stop.
- Trim Buttons: Fine-tune the drone's stability (forward/backward, left/right, rotation).
- Power Switch: Turns the controller on/off.
4. Setup
4.1 Charging the Drone Battery
- Connect the 3.7V 500mAh Lipo Battery to the USB Charging Cable.
- Plug the USB Charging Cable into a USB power source (e.g., computer USB port, USB wall adapter).
- The charging indicator light will show the charging status. Charging time is approximately 60-70 minutes.
- Once fully charged, disconnect the battery from the charger.
4.2 Installing Drone Battery
- Ensure the drone is powered off.
- Locate the battery compartment on the drone.
- Carefully insert the charged 3.7V 500mAh Lipo Battery into the compartment.
- Secure the battery cover.

Figure 4.1: Close-up view of the drone's battery compartment, showing the slot where the Lipo battery is inserted. The image illustrates the mechanism for securing the battery.
4.3 Installing Transmitter Batteries
- Open the battery cover on the back of the remote controller.
- Insert 3 x 1.5V AA batteries, ensuring correct polarity (+/-).
- Close the battery cover securely.
4.4 Drone Preparation
- Carefully pull out all four arms of the drone until they are fully extended and locked into place.
- Place the drone on a flat, level surface.
- (Optional) Attach the propeller protection covers for added safety, especially for beginners.

Figure 4.2: Quick start guide showing the initial steps for preparing the drone for flight. This includes unfolding the drone arms and placing it on a flat surface, as well as turning on the remote controller.
5. Operating Instructions
5.1 Pairing the Drone and Controller
- Turn on the drone by pressing the power button. The drone's indicator lights will flash.
- Turn on the remote controller using its power switch.
- Push the left throttle joystick fully up and then pull it fully down. The drone's lights will stop flashing and become solid, indicating successful pairing.
- For more stable flight, it is recommended to calibrate the gyroscope after pairing. Push both joysticks 45 degrees towards the outside bottom corners simultaneously until the lights flash and then become solid again.
5.2 One Key Take Off / Landing

Figure 5.1: Visual guide demonstrating the One Key Take Off and One Key Landing functions. The drone is shown ascending from a launch pad for take-off and descending for landing, simplifying flight control.
- One Key Take Off: After pairing and calibration, press the "One Key Take Off" button. The drone will automatically ascend and hover at a certain altitude.
- One Key Landing: During flight, press the "One Key Landing" button. The drone will slowly descend and land gently on the ground.
5.3 Basic Flight Controls
- Ascend/Descend: Push the left joystick up to ascend, pull down to descend.
- Turn Left/Right: Push the left joystick left to turn left, push right to turn right.
- Forward/Backward: Push the right joystick up to fly forward, pull down to fly backward.
- Fly Left/Right (Sideways): Push the right joystick left to fly left, push right to fly right.
5.4 Special Features
- Altitude Hold Mode: The drone automatically maintains its current altitude, allowing for stable hovering and easier control, especially for photography and videography. This function is achieved by analyzing air pressure data.
- 360° Flip: To perform a 360-degree flip, press the "360° Roll" button and then push the right joystick in the desired flip direction (forward, backward, left, or right). Ensure sufficient altitude before attempting.
- Trajectory Flight: (Requires mobile app connection) Open the dedicated mobile app and select the trajectory flight mode. Draw a desired flight path on your phone screen, and the drone will automatically follow the recorded route.
- Headless Mode: When activated, the drone's orientation becomes irrelevant to the controller's direction. The drone will move relative to the pilot's perspective, making it easier for beginners to control.
- One Key Return: In headless mode, pressing the "One Key Return" button will cause the drone to fly back towards the take-off point.

Figure 5.2: Explanation of the 360° Flip and Altitude Hold features. The image illustrates the drone performing a flip and maintaining a stable height, emphasizing the benefits of the atmospheric pressure sensor for stable hovering.
5.5 Camera Operation (2MP HD)
The drone is equipped with a 2MP HD camera capable of 720P video recording. To utilize the camera features:
- Mobile App Connection: Download and install the recommended mobile application (refer to the product packaging or quick start guide for app name/QR code). Connect your smartphone to the drone's Wi-Fi network.
- Live FPV: Once connected, the live view from the drone's camera will be displayed directly on your phone screen (FPV Range: About 30m).
- Taking Photos: Press the "Photo/Video" button on the remote controller once to take a photo. Photos will be saved to your phone's album via the app.
- Recording Videos: Press and hold the "Photo/Video" button to start video recording. Press and hold again to stop recording. Videos will be saved to your phone's album via the app.
6. Maintenance
- Cleaning: Use a soft, dry cloth to clean the drone and remote controller. Do not use harsh chemicals or solvents.
- Propeller Inspection: Regularly check propellers for damage (bends, cracks). Replace any damaged propellers using the provided spare blades and screwdriver.
- Battery Care: Store batteries in a cool, dry place. Do not store fully charged or completely depleted batteries for extended periods. Charge them to about 50% for long-term storage.
- Storage: When not in use, fold the drone arms and store it in a safe, dry place away from direct sunlight and extreme temperatures.
7. Troubleshooting
| Problem | Possible Cause | Solution |
|---|---|---|
| Drone does not respond to controller. | Not paired; low battery (drone/controller); interference. | Re-pair drone and controller. Charge/replace batteries. Fly in an open area away from other Wi-Fi signals. |
| Drone drifts during flight. | Not calibrated; uneven surface at take-off; wind. | Perform gyroscope calibration on a flat surface. Use trim buttons to adjust. Avoid flying in windy conditions. |
| Propellers not spinning. | Obstruction; motor damage; battery not connected. | Check for tangled hair/debris. Ensure battery is properly connected. Contact support if motors are damaged. |
| Poor camera image/video quality. | Low light; camera lens dirty; unstable flight. | Ensure good lighting. Clean camera lens. Fly in Altitude Hold mode for stability. |
| Short flight time. | Battery not fully charged; old battery; aggressive flying. | Ensure battery is fully charged. Consider replacing old batteries. Fly more gently. |
8. Specifications
| Feature | Detail |
|---|---|
| Item Type | RC Quadcopter |
| Model | sbn (JY019) |
| Flying Time | 7-9 minutes |
| R/C Distance | 80-100 meters |
| FPV Range | Approximately 30 meters |
| Charging Time | 60-70 minutes |
| Quadcopter Battery | 3.7V 500mAh Lipo (Included) |
| Transmitter Battery | 3 x 1.5V AA battery (NOT Included) |
| Frequency | 2.4G |
| Channel | 4ch |
| Gyro | 6 axis |
| Motor | 0720 Coreless Motor |
| Take-off Weight | About 120g |
| Color | Black |
| Camera | 2MP (720P HD) |
| Quadcopter Size (unfolded) | 27cm x 19.5cm x 5cm |
| Quadcopter Size (folded) | 12.5cm x 7.5cm x 5cm |
| Quadcopter Weight (with battery) | 96g |
| Quadcopter Weight (without battery) | 77.5g |
9. Warranty and Support
Specific warranty information for this product is not provided in this manual. Please refer to the product packaging, the seller's website, or contact the retailer where you purchased the drone for details regarding warranty coverage and customer support.
For technical assistance or further inquiries, please contact the product's manufacturer or the authorized distributor.


