1. Introduction
This manual provides detailed instructions for the installation, operation, and maintenance of your LANGGER V Biometric Wall Safe, Model LAWS0002. Please read this manual thoroughly before installation and use to ensure proper function and security.
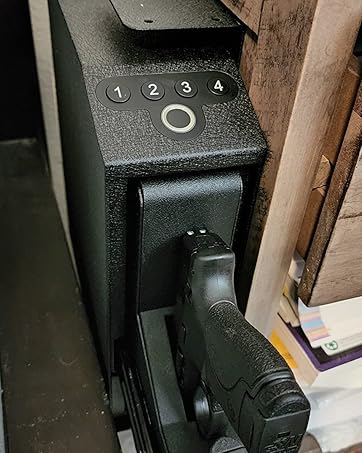
The LANGGER V Biometric Wall Safe is designed for secure storage of valuables, documents, and firearms. It features a heavy-duty carbon-steel construction and multiple access methods including biometric fingerprint, PIN code, and emergency keys.
2. Safety Precautions
- Always keep emergency keys in a secure location away from the safe.
- Do not store the emergency keys inside the safe.
- Ensure the safe is securely mounted according to the installation instructions to prevent unauthorized removal.
- Keep fingerprints and PIN codes confidential.
- Regularly check battery levels to ensure continuous operation.
3. Package Contents
Verify that all components are present before beginning installation:
- LANGGER V Biometric Wall Safe (LAWS0002)
- Emergency Keys (2)
- Removable Shelf (1)
- Mounting Bolts (4)
- User Manual
4. Setup and Installation
4.1. Site Selection
The safe is designed for in-wall installation between standard wall studs (typically 16 inches on center). The door opens to the right.
4.2. Required Wall Opening Dimensions
- Height: 21 inches
- Width: 13.75 inches
- Depth: 4 inches

4.3. Installation Steps
- Locate the desired installation area between two wall studs.
- Carefully cut an opening in the wall according to the required dimensions (21"H x 13.75"W x 4"D). Ensure no electrical wiring or plumbing is present in the cutting area.
- Insert the safe into the wall opening.
- Secure the safe using the provided mounting bolts through the pre-drilled holes. Tighten all bolts firmly.
- Install the removable shelf inside the safe if desired.
4.4. Initial Battery Installation
The safe requires batteries for electronic operation. Locate the battery compartment, typically on the inside of the safe door. Insert the required batteries (usually AA or AAA, refer to the compartment for specifics) ensuring correct polarity.

5. Operating Instructions
The safe offers three methods for access: Fingerprint, PIN Code, and Emergency Key.

5.1. Fingerprint Access
- Registering Fingerprints: Follow the instructions in the dedicated programming section (usually found in the full printed manual) to register up to 100 unique fingerprints.
- Opening the Safe: Place a registered finger firmly on the fingerprint sensor. The safe will unlock if the fingerprint is recognized.
5.2. PIN Code Access
- Setting a PIN Code: Refer to the programming section of the full manual to set your personal identification number (PIN).
- Opening the Safe: Enter your programmed PIN code on the backlit keypad. The safe will unlock upon correct entry.
5.3. Emergency Key Access
In case of battery failure or forgotten codes/fingerprints, the emergency keys provide mechanical access.
- Locate the emergency keyhole, usually hidden behind a cover on the safe's front panel.
- Insert an emergency key and turn it to unlock the safe.

5.4. Silent Mode
The safe features an optional silent mode to disable audible beeps during operation.
- To activate/deactivate silent mode, refer to the specific instructions in your full user manual. This setting is typically changed via a button sequence on the keypad.
6. Maintenance
6.1. Battery Replacement
When the battery level is low, the safe will typically indicate this with a warning light or sound. Replace all batteries simultaneously with new ones of the specified type to ensure optimal performance.
6.2. Cleaning
Clean the safe's exterior with a soft, damp cloth. Avoid abrasive cleaners or solvents that could damage the finish or electronic components. Keep the fingerprint sensor clean and dry for accurate readings.
7. Troubleshooting
7.1. Smart Alarm System
The safe is equipped with a smart alarm system. If an incorrect PIN code is entered 3 times consecutively, the safe will emit an audible alarm and the keypad will temporarily lock to deter unauthorized access.

7.2. Common Issues
- Safe does not open with fingerprint/PIN:
- Ensure batteries are not low or depleted. Replace if necessary.
- Re-enter PIN carefully or re-scan fingerprint. Ensure your finger covers the entire sensor.
- If multiple attempts fail, use the emergency key.
- Keypad is unresponsive:
- Check battery power.
- If the alarm was triggered, the keypad may be temporarily locked. Wait for the lockout period to expire.
- Safe door does not close properly:
- Ensure no items are obstructing the door or locking bolts.
- Check for any physical damage to the door or frame.
8. Specifications
| Feature | Detail |
|---|---|
| Brand | LANGGER V |
| Model Number | LAWS0002 |
| Product Dimensions (D x W x H) | 4"D x 15.1"W x 21.8"H |
| Chamber Width | 21 Inches |
| Chamber Depth | 5.12 Inches |
| Lock Type | Electronic, Key |
| Material | Carbon Steel |
| Special Feature | Fingerprint Sensor |
| Mounting Type | Wall Mount |
| Included Components | Wall Safe, Key, Shelf, Bolts |
| Item Weight | 14.63 Kilograms |
| Alarm | Audible |
| Water Resistance Level | Not Water Resistant |
| Control Type | Touchpad Control |
| UPC | 730637435493 |
9. Warranty and Support
LANGGER V is committed to providing quality products and customer satisfaction. For any questions, technical support, or warranty claims, please contact our customer service. Our team is available to assist you.