1. Important Safety Instructions
Please read all instructions carefully before using the Thamtu G10 Robot Vacuum Cleaner. Keep this manual for future reference.
- This appliance is for indoor use only.
- Do not use the robot vacuum on wet surfaces or in environments with standing water.
- Keep the robot vacuum away from open flames and heat sources.
- To avoid danger of suffocation, keep plastic bags away from babies and children. This bag is not a toy.
- Ensure all loose cables, curtains, and other objects that could entangle the robot are secured before operation.
- Do not allow children or pets to ride on the robot vacuum.
- Use only the original power adapter and charging base provided by Thamtu.
2. Product Overview
The Thamtu G10 Robot Vacuum Cleaner is designed for efficient and convenient cleaning of various floor types, including hard floors and low-pile carpets. It features smart navigation, powerful suction, and app control for a seamless cleaning experience.

Figure 2.1: Thamtu G10 Robot Vacuum Cleaner and companion app.
Key Features:
- Smart Navigation: Efficiently maps and cleans your home.
- 2500 Pa Suction: Powerful suction for effective debris and pet hair pickup.
- APP Control: Manage cleaning schedules and modes from your smartphone.
- Voice Control: Compatible with Amazon Echo and Google Home for hands-free operation.
- Auto-Recharge: Automatically returns to the charging base when battery is low.
Product Components:
- Robot Vacuum Unit
- Charging Base
- Power Adapter
- Remote Control (with AAA batteries)
- Side Brushes (2 extra included)
- Cleaning Brush with Cutter
- Sponge Filter and HEPA Filter (1 extra included)
- Magnetic Strip for No-Go Zones
- Adhesive Pads
- User Manual

Figure 2.2: Powerful vacuuming capability on hard floors.

Figure 2.3: Unique suction port design prevents hair entanglement.

Figure 2.4: Compact design allows cleaning in hard-to-reach places.

Figure 2.5: Anti-drop technology prevents falls from stairs and ledges.

Figure 2.6: Ideal for pet owners with powerful suction for pet hair.

Figure 2.7: Up to 120 minutes of running time for extensive cleaning.

Figure 2.8: Easy smart control via the Thamtu app.
3. Setup
3.1 Charging Base Placement
Place the charging base against a wall in an open, uncluttered area. Ensure there is at least 0.5 meters (1.6 ft) of clear space on either side of the charging base and 1.5 meters (4.9 ft) in front of it. Plug the power adapter into the charging base and a wall outlet.

Figure 3.1: Robot vacuum returning to its charging base.
3.2 Initial Charge
Place the robot vacuum on the charging base. Ensure the charging contacts on the robot align with those on the base. The indicator lights on the robot will show charging status. Fully charge the robot before first use (approximately 4-5 hours).
3.3 App Download and Connection
To unlock full features and control your robot vacuum remotely, download the Thamtu app:
- Download and install the "Smart Life" App from your device's app store or scan the QR code below: https://smartapp.tuya.com/smartlife
- Activate Robot Wi-Fi: Power on the robot. Press and hold the HOME + START buttons together for 3 seconds until you hear a beep and the Wi-Fi indicator blinks.
- Open App and Log In: Tap "Add Device".
- Connect to Home Wi-Fi: Enter your home Wi-Fi name and password.
- Finalize Connection: Select your robot vacuum and follow in-app prompts.

Figure 3.2: Steps to connect your robot vacuum to the Smart Life app.
3.4 Using the Magnetic Strip
The magnetic strip is used to set up no-go areas to prevent the robot vacuum from entering specific spaces (e.g., pet food bowls, children's play areas, or areas with loose cords). Cut the magnetic strip to the desired length and width, then peel off the adhesive pads and stick them to one side of the strip. Place the strip on the floor to create a no-go area.
4. Operating Instructions
4.1 Starting/Stopping Cleaning
- Start Cleaning: Press the 'Start/Stop' button on the robot or the 'Auto' button on the remote/app.
- Pause Cleaning: Press the 'Start/Stop' button on the robot or the 'Pause' button on the remote/app during cleaning.
- Stop Cleaning: Press and hold the 'Start/Stop' button on the robot for 3 seconds, or press the 'Home' button on the remote/app to send it back to the charging base.
4.2 Cleaning Modes
- Automatic Cleaning: The robot intelligently navigates and cleans the entire accessible area.
- Spot Cleaning: Direct the robot to a specific dirty area using the remote or app, and it will clean in a spiral pattern for a deep clean.
- Edge Cleaning: The robot will clean along the edges of walls and furniture. Activate via remote or app.
- Timed Cleaning: Set a cleaning schedule through the app for automatic cleaning at specific times.
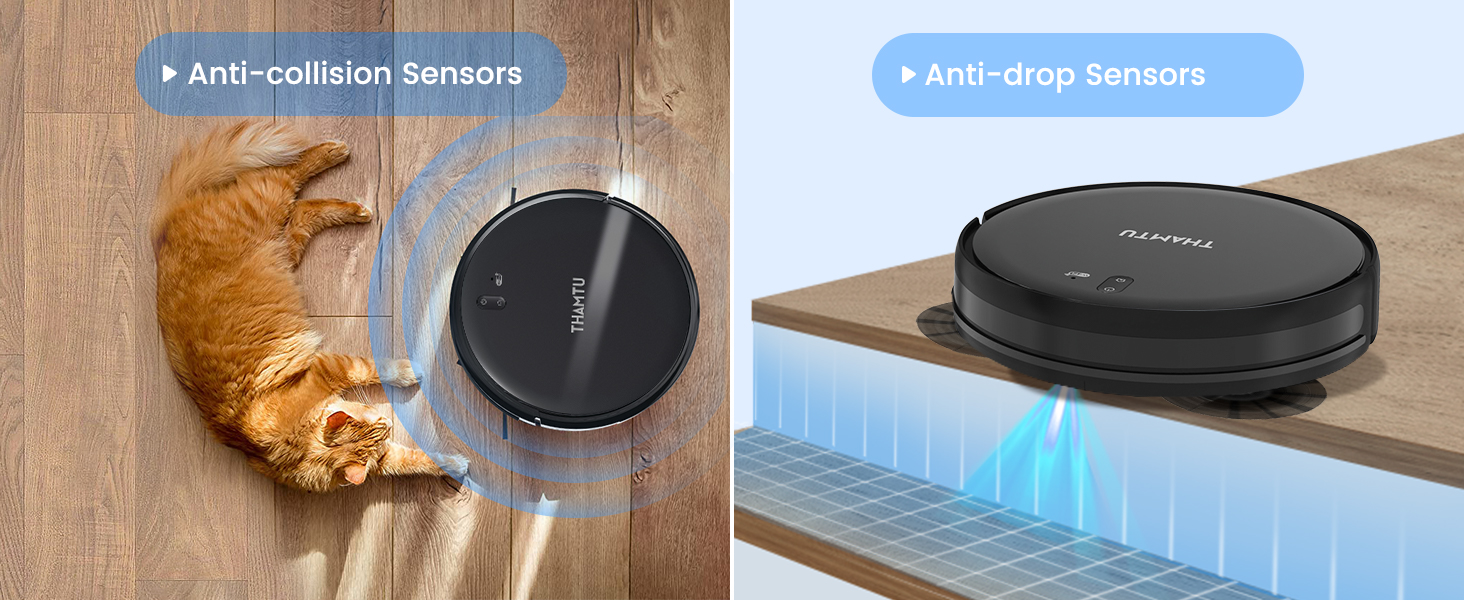
Figure 4.1: Dual side brushes gather dust, and the brushless suction port prevents tangles.
4.3 Suction Power Adjustment
Adjust the suction power (Min/Max) using the remote control or the app to suit different cleaning needs and floor types.
5. Maintenance
Regular maintenance ensures optimal performance and extends the lifespan of your Thamtu G10 Robot Vacuum Cleaner.
5.1 Dust Bin Emptying
It is recommended to empty the dust bin after each use, especially if you have pets or significant debris.
- Press the release button on the side of the robot to pull out the dust bin.
- Open the dust bin lid and empty its contents into a trash can.
5.2 Filter Cleaning and Replacement
Clean the filter once a week. Replace the filter every 3 months or when visibly worn.
- Remove the filter from the dust bin.
- Tap the filter gently to remove dust. Do not wash the HEPA filter with water.
- Reinsert the clean filter into the dust bin.
5.3 Brush Cleaning and Replacement
Clean the side brushes and main brush once a week. Replace side brushes every 3-6 months, and the main brush every 6-12 months.
- Use the provided cleaning tool to cut and remove tangled hair from the brushes.
- Wipe down the brushes with a dry cloth.
5.4 Sensor Cleaning
Wipe the anti-drop sensors and anti-collision sensors with a clean, dry cloth once a week to ensure proper functionality.
5.5 Maintenance Frequency Table
| Part | Cleaning Frequency | Replacement Frequency |
|---|---|---|
| Dust Bin | After each use | N/A |
| Filter | Once a week | Every 3 months |
| Side Brushes | Once a week | Every 3-6 months |
| Main Brush | Once a week | Every 6-12 months |
| Sensors | Once a week | N/A |
6. Troubleshooting
If your robot vacuum encounters an issue, refer to the table below for common problems and solutions. If the problem persists, contact customer support.
| Problem | Possible Cause | Solution |
|---|---|---|
| Robot does not turn on | Low battery; Power switch off | Charge the robot; Turn on power switch. |
| Robot gets stuck frequently | Too many obstacles; Loose cables | Clear the area; Use magnetic strips for no-go zones. |
| Poor suction | Full dust bin; Clogged filter/brushes | Empty dust bin; Clean/replace filter/brushes. |
| Robot does not charge | Charging contacts dirty; Charging base unplugged | Clean charging contacts; Ensure base is plugged in. |
| Robot is noisy | Brushes tangled; Suction set to Max | Clean brushes; Adjust suction power to Min/Medium. |
7. Specifications
| Specification | Value |
|---|---|
| Brand | Thamtu |
| Model Name | Robot Vacuum (G10 Black) |
| Suction Power | 2500 Pa |
| Battery Life | 120 minutes |
| Product Dimensions | 10"L x 8"W x 18"H |
| Item Weight | 9.3 pounds |
| Dust Bin Capacity | 0.6 Liters |
| Control Method | App, Remote, Voice |
| Compatible Devices | Smartphones, Amazon Echo, Google Home |
| First Available Date | August 5, 2021 |
8. Warranty and Support
Thamtu provides a limited warranty for this product. For detailed warranty information, product registration, or technical support, please refer to the official Thamtu website or contact their customer service directly.
Keep your purchase receipt as proof of purchase for warranty claims.