1. Introduction
Thank you for purchasing the MUSE M-175 WI Radio Alarm Clock. This device combines a digital alarm clock with an FM radio, dual alarm functions, and convenient wireless and USB charging capabilities. Please read this manual carefully before operating the unit and retain it for future reference.
2. Safety Information
- Do not expose this appliance to dripping or splashing water.
- Do not place objects filled with liquids, such as vases, on the appliance.
- Ensure proper ventilation around the unit. Do not block any ventilation openings.
- Keep the unit away from direct sunlight, heat sources, and strong magnetic fields.
- Use only the power adapter supplied with the unit.
- Do not attempt to disassemble or modify the unit. Refer all servicing to qualified personnel.
- Clean the unit only with a soft, dry cloth.
3. Package Contents
- MUSE M-175 WI Radio Alarm Clock
- AC Power Adapter
- User Manual (this document)
4. Product Overview
Familiarize yourself with the main components and controls of your MUSE M-175 WI.

Image 1: Front and top view of the MUSE M-175 WI Radio Alarm Clock. The image shows the large white LED display, control buttons on the top panel, and the wireless charging pad indicator.
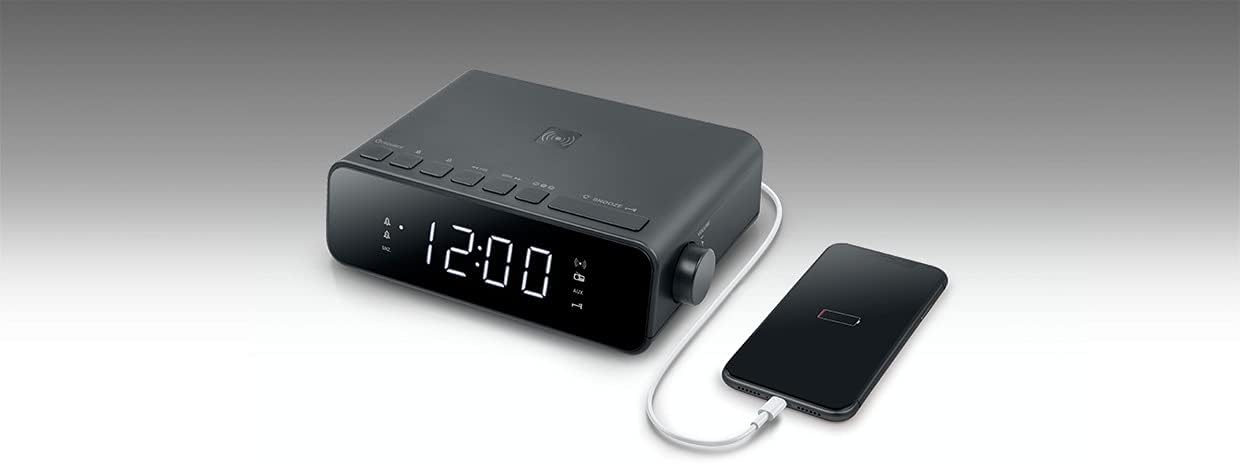
Image 2: Top view of the MUSE M-175 WI Radio Alarm Clock demonstrating a smartphone placed on the wireless charging pad. A USB cable is also connected to the side for wired charging.
Controls and Indicators:
- LED Display: Large white 0.9-inch display for time, radio frequency, and alarm indicators.
- SOURCE Button: To switch between FM radio and AUX input.
- Tuning/Volume Buttons: For adjusting radio frequency or volume.
- Preset Buttons: To save and recall FM radio stations.
- SNOOZE Button: To temporarily silence the alarm.
- DIMMER Button: To adjust display brightness (High / Low / Off).
- Wireless Charging Pad: Located on the top surface for compatible devices.
- USB Charging Port: For wired charging of external devices.
- AUX Input (3.5mm): For connecting external audio sources.
5. Setup
5.1. Connecting Power
- Connect the supplied AC power adapter to the DC IN port on the back of the unit.
- Plug the adapter into a standard wall outlet.
- The LED display will light up, and the clock will be ready for initial setup.
5.2. Setting the Time
Refer to the specific instructions in your full manual for detailed time setting procedures. Generally, there will be a 'TIME SET' or 'CLOCK' button to initiate time adjustment, followed by 'HOUR' and 'MINUTE' buttons.
6. Operating Instructions
6.1. FM Radio Operation
- Press the SOURCE button to select FM radio mode.
- Press the Tuning buttons (e.g., ◀◀ / ▶▶) to manually tune to a desired frequency.
- To auto-scan and save stations, press and hold the Tuning buttons. The radio will scan and store up to 20 preset stations.
- Press the Preset buttons (e.g., M+ / M-) to cycle through saved stations.
- Adjust the volume using the dedicated volume controls.
6.2. Setting and Using Alarms
The M-175 WI features a dual alarm system.
- To set Alarm 1 or Alarm 2, press and hold the respective ALARM 1 or ALARM 2 button.
- Use the HOUR and MINUTE buttons to set the desired alarm time.
- Select the alarm source: Buzzer or Radio. If Radio is selected, the last tuned FM station will be used.
- Press the ALARM button again to confirm and activate the alarm. An alarm indicator will appear on the display.
- When the alarm sounds, press the SNOOZE button to temporarily silence it for a few minutes.
- To turn off the alarm completely, press the corresponding ALARM 1 or ALARM 2 button.
6.3. Wireless Charging (5W)
The top surface of the M-175 WI features a 5W wireless charging pad.
- Place your Qi-compatible smartphone or device directly onto the wireless charging pad.
- Ensure the device is centered on the pad for optimal charging.
- A charging indicator on the display or your device will confirm that charging has begun.
6.4. USB Charging Port
A USB port is provided for charging non-Qi compatible devices or for faster wired charging.
- Connect your device's USB charging cable to the USB port on the unit.
- Connect the other end of the cable to your device.
- Charging will begin automatically.
6.5. AUX Input (3.5mm)
Connect external audio devices using a 3.5mm audio cable.
- Connect one end of a 3.5mm audio cable to the AUX IN port on the unit.
- Connect the other end to the headphone jack or audio output of your external device.
- Press the SOURCE button until 'AUX' is displayed.
- Play audio from your external device.
6.6. Display Brightness
Press the DIMMER button repeatedly to cycle through display brightness levels: High, Low, and Off.
6.7. Sleep Function
The sleep function allows the radio to play for a set duration before automatically turning off. Refer to your full manual for specific steps to activate and adjust the sleep timer.
7. Maintenance
- Cleaning: Disconnect the power adapter before cleaning. Use a soft, dry cloth to wipe the surfaces of the unit. Do not use abrasive cleaners or solvents.
- Storage: If not in use for an extended period, unplug the unit and store it in a cool, dry place.
8. Troubleshooting
| Problem | Possible Cause | Solution |
|---|---|---|
| No power / Display off | Power adapter not connected or faulty outlet. | Ensure the power adapter is securely connected to the unit and a working wall outlet. |
| Radio reception is poor | Weak signal or interference. | Adjust the position of the unit. Extend the FM antenna fully. Move away from other electronic devices. |
| Alarm does not sound | Alarm not activated or set incorrectly. | Verify that the alarm time is set correctly and the alarm is activated (indicator visible on display). Check alarm volume. |
| Wireless charging not working | Device not Qi-compatible, not centered, or foreign objects on pad. | Ensure your device supports Qi wireless charging. Reposition the device on the pad. Remove any metal objects or thick cases. |
| USB charging not working | Cable faulty or device not compatible. | Try a different USB cable. Ensure the device is compatible with USB charging. |
9. Specifications
- Brand: MUSE
- Model: M-175 WI
- Display: 0.9-inch White LED, adjustable intensity
- Radio: PLL FM with 20 preset stations
- Alarm: Dual alarm (Radio or Buzzer), Snooze function, Sleep function
- Wireless Charging: 5W
- USB Charging Port: Yes
- Auxiliary Input: 3.5mm
- Power Input: DC 5V, 2.5A
- Dimensions (H x D x L): 54mm x 130mm x 175mm (approx. 2.1 x 5.1 x 6.9 inches)
- Net Weight: 0.44 kg (approx. 0.97 lbs)
- Power Source: Electrical cable
10. Warranty and Support
MUSE products are designed and manufactured to the highest quality standards. For detailed warranty information and customer support, please refer to the warranty card included with your product or visit the official MUSE website. Keep your proof of purchase for any warranty claims.


