Introduction
This manual provides detailed instructions for the installation, operation, and maintenance of your Dorman 926-140 Rear Passenger Side Pre-Pressed Rear Axle. This product is designed to simplify the replacement of a worn wheel bearing by providing a pre-assembled unit, eliminating the need for time-consuming procedures with a shop press.
The Dorman OE FIX loaded axle includes all critical components already assembled for a fast, simple, and safe installation. It has undergone try-on, corrosion, and material testing to ensure a quality fit and long service life.
Product Overview
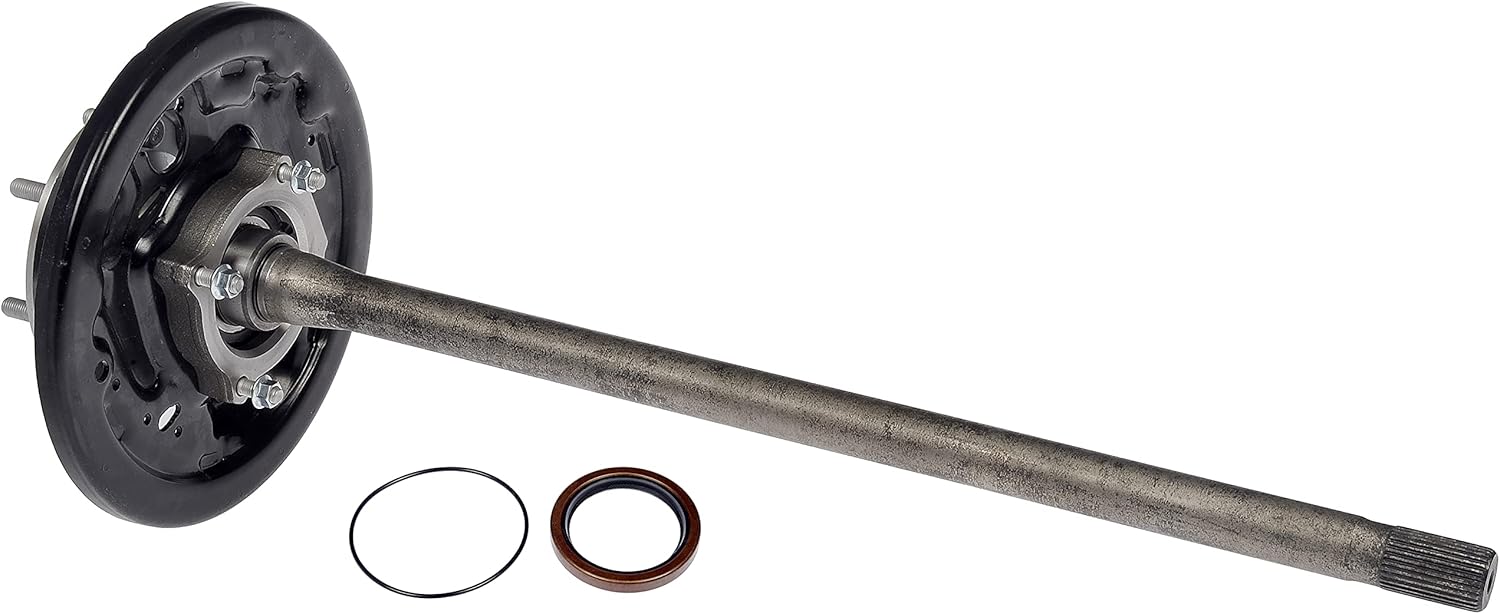
Figure 1: Dorman 926-140 Rear Passenger Side Pre-Pressed Rear Axle assembly, including axle shaft, wheel bearing, hub, and backing plate.
The Dorman 926-140 is a pre-pressed rear axle assembly designed for the passenger side of select Toyota models, specifically Toyota Tacoma (2005-2015). This unit integrates the axle shaft, wheel bearing, hub, and backing plate into a single, ready-to-install component.
Key Features:
- Easier Installation: Includes a pre-assembled new axle shaft, wheel bearing, hub, and backing plate.
- Time Saver: Eliminates frustrating, unpredictable work required to replace bearings without damaging other components.
- Simpler Solution: Eliminates the need to use potentially dangerous shop press to perform complete bearing repair.
- Quality Tested: This part has undergone try-on, corrosion, and material testing to ensure a quality fit and long service life.
What's in the Box
- 1 Axle Shaft and Bearing Assembly
- 1 Axle Seal
- 1 Axle O-ring
Installation Instructions
This installation is considered to be of medium difficulty and may take approximately 1.5 hours per side to perform. It is recommended to consult with an ASE Certified Automotive Professional before any automotive repairs. The entire risk as to the performance of the information contained in this video is assumed by the viewer.
Video 1: Dorman Pre-Pressed Axle Installation Guide. This video demonstrates the step-by-step process for installing the Dorman Pre-Pressed Axle assembly.
Step-by-Step Guide:
- Prepare Vehicle:
- Securely lift the vehicle.
- Remove the wheel.
- Remove the caliper assembly from the axle.
- Secure the caliper on a hook to relieve stress on the brake line.
- Remove Brake Rotor and Parking Brake Mechanism:
- Remove the brake rotor.
- With the rotor removed, carefully disassemble the parking brake mechanism. Keep all parts and hardware for reuse.
- Remove the bolts securing the parking brake cable retainer from the backing shield.
- Disconnect Wheel Speed Sensor and Brake Fluid Line:
- Spray penetrant on the hub retaining bolts.
- Disconnect the wheel speed sensor harness.
- Remove the bolts securing the wheel hub to the axle housing.
- Disconnect the brake fluid line from the brake caliper and cap the line to prevent leaks or contaminants from entering the system.
- Remove Old Axle Assembly:
- Fully withdraw the old axle assembly from the axle housing.
- Transfer Wheel Speed Sensor:
- Remove the wheel speed sensor from the old hub.
- Install the wheel speed sensor into the new hub, torquing the bolts to factory specifications.
- Replace Axle Seal:
- Carefully remove the original axle seal from the axle housing, being careful not to damage the seal surface.
- Install the new axle seal (provided) in the axle housing. Use a seal driver to seat it squarely in position.
- Install New Axle Assembly:
- Remove the old nuts installed on the back of the new hub.
- Insert the new pre-pressed axle assembly into the axle housing. Keep the axle shaft centered in the tube and carefully align the axle splines, which should slip into the pinion gear firmly but with ease.
- Align the new hub with the axle housing and secure it with new nuts.
- Reassembly and Final Steps:
- Reassemble the parking brake hardware in the new assembly. Apply lubricant to the contact points for the brake shoes.
- Reconnect the brake caliper to the brake line, routing the brake line through the opening in the backing plate.
- Reassemble the rear brakes in reverse order of disassembly.
- Bleed the brake system and adjust the parking brake as necessary before reinstalling the wheel and tire.
Operation
The Dorman 926-140 Rear Passenger Side Pre-Pressed Rear Axle is a component of your vehicle's drivetrain and braking system. Once correctly installed, it operates as part of the vehicle's normal function, ensuring proper wheel rotation and braking performance. No specific user operation is required beyond standard vehicle use.
Maintenance
Regular inspection of your vehicle's rear axle assembly is recommended as part of routine vehicle maintenance. Check for:
- Unusual noises (e.g., humming, grinding) from the rear wheels.
- Excessive play in the wheel bearing when the wheel is lifted.
- Signs of lubricant leaks around the axle seal.
- Corrosion or damage to the backing plate or other components.
If any issues are detected, consult a qualified automotive technician for inspection and repair.
Troubleshooting
Common Issues and Solutions:
- Incorrect Fitment: Ensure the correct part number (926-140) is used for the passenger side. Verify vehicle compatibility using the manufacturer's fitment guide. Incorrect part installation (e.g., driver's side part on passenger side) can lead to issues like misaligned wheel speed sensor wiring or brake drum seating problems.
- Brake Drum Not Seating Properly: This could indicate an issue with the metal backing plate's formation. Inspect the backing plate for any deformities and ensure it is correctly aligned during installation.
- Water Intrusion into Bearing Cavity: Some original bearings may show signs of water intrusion through the ABS sensor O-ring seal. When reinstalling the ABS sensor, ensure the O-ring seal is replaced and lubricated. Applying a small amount of silicone around it can also help prevent future water entry.
- Persistent Noise After Installation: If unusual noises persist after installation, re-check all connections and ensure proper torque specifications were met. Verify that the axle splines were correctly aligned and seated.
For complex issues or if you are unsure about any step, it is always best to consult with a professional mechanic.
Specifications
| Brand | Dorman |
| Model Number | 926-140 |
| Material | Carbon Steel |
| Item Dimensions (L x W x H) | 40.16 x 15.75 x 15.75 inches |
| Item Weight | 41.6 pounds |
| Bearing Number | 1 |
| Bearing Type | Roller Bearing or Ball Bearing |
| Compatible Lubricant | Grease |
| Position | Rear |
| UPC | 037495919531 |
| OEM Part Number Equivalents | 42311-04080; 42311-04081; 42311-04082; 4245004010; 47043-04030 |
Warranty and Support
Dorman Products are engineered for quality and reliability. For specific warranty information regarding your 926-140 Rear Passenger Side Pre-Pressed Rear Axle, please refer to the documentation included with your product or visit the official Dorman Products website.
Should you encounter any issues during installation or operation, the Dorman technical support team is available to assist you. Contact information can typically be found on the product packaging or the Dorman Products website.


