
1. Safety Information
Please read this safety information carefully before using the camera. Keep this manual for future reference.
- This product contains small parts and is not suitable for children under 3 years of age. Adult supervision is recommended during use.
- Do not expose the camera to water, moisture, or extreme temperatures.
- Use only the provided USB charging cable to charge the camera.
- Avoid dropping the camera or subjecting it to strong impacts.
- Do not attempt to disassemble or modify the camera.
2. What's in the Box
Verify that all items are present in the package:
- Rohs Blue Kids Digital Camera
- 32GB Micro SD Memory Card
- USB Charging Cable
- Lanyard

Image: Included accessories - 32GB Micro SD card, USB charging cable, and lanyard.
3. Camera Overview
Familiarize yourself with the camera's components and controls.
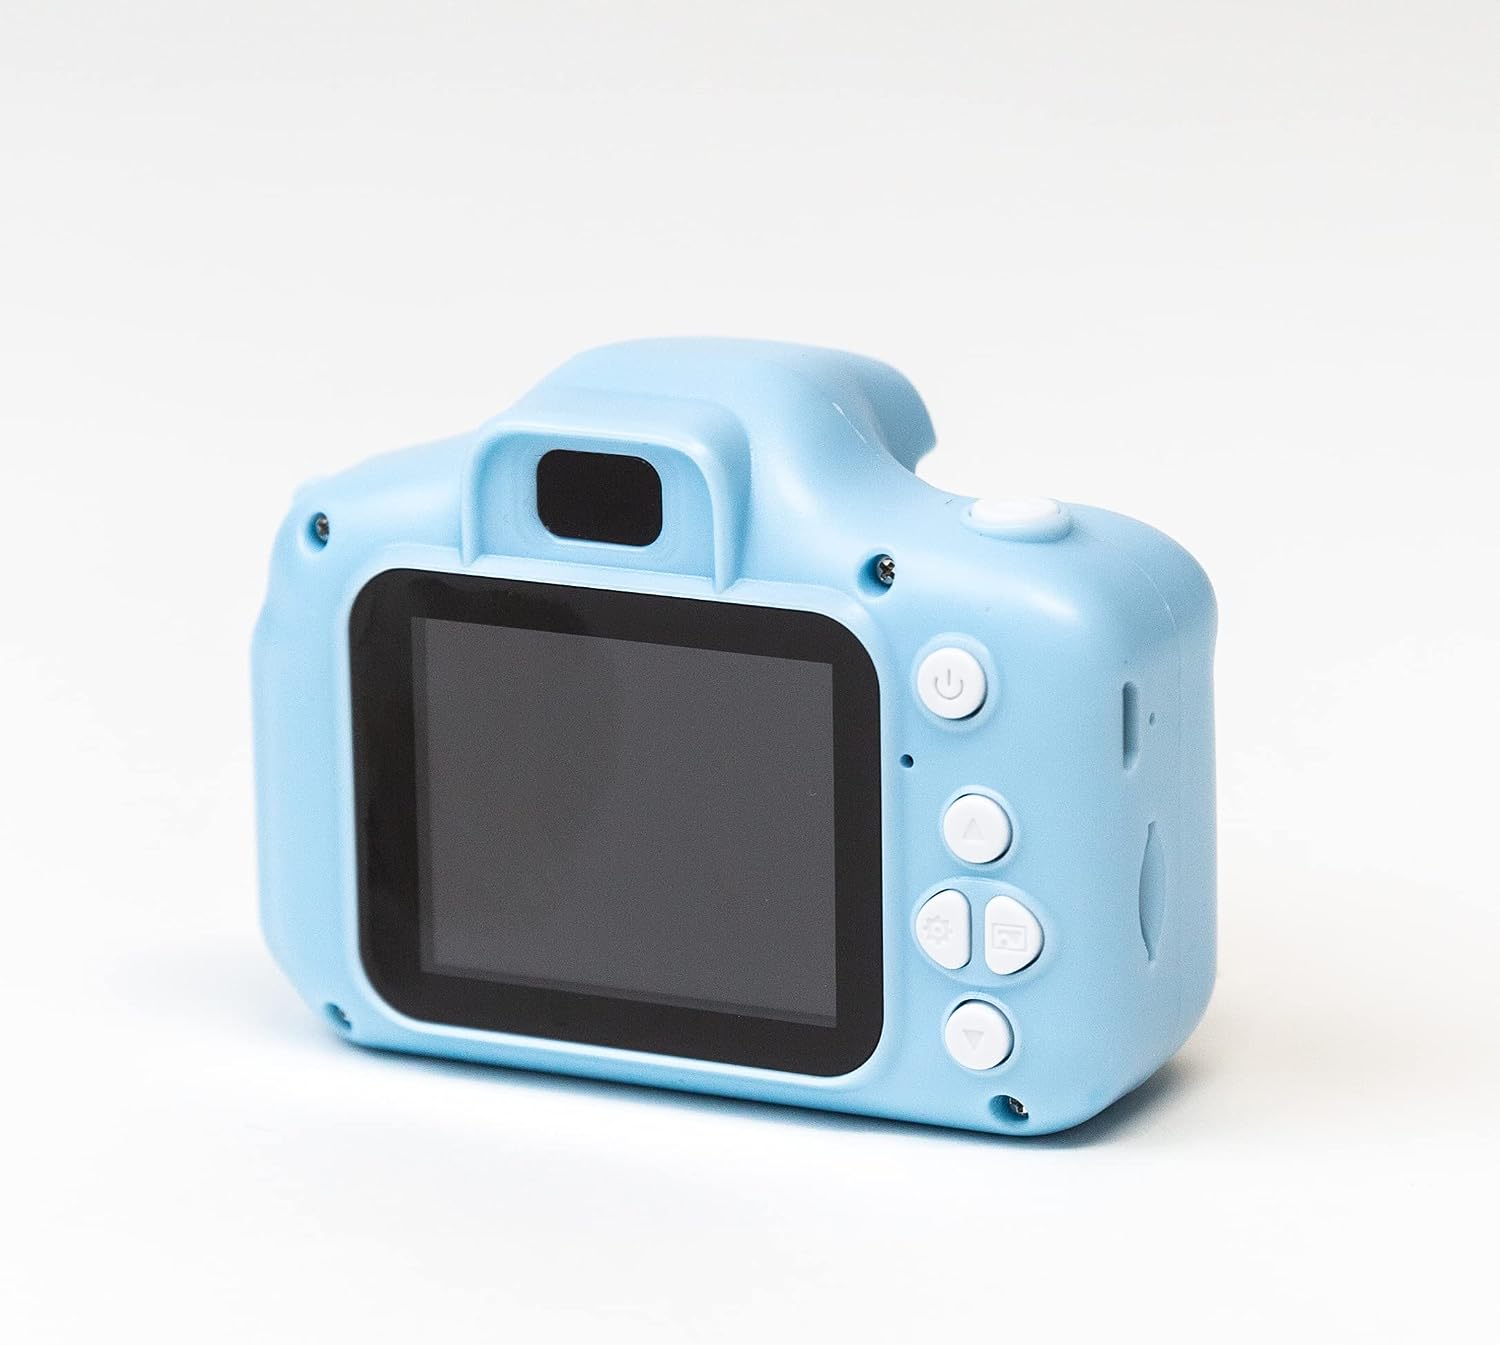
Image: Rear view of the Rohs Blue Kids Digital Camera.
Buttons and Ports
- Power Button: Press and hold to turn the camera on or off.
- Shutter Button: Press to take a photo or start/stop video recording.
- Navigation Buttons (Up/Down/Left/Right): Used to navigate menus and browse photos/videos.
- Menu Button: Accesses the camera's settings menu.
- Playback Button: Switches to playback mode to view captured media.
- OK Button: Confirms selections in menus.
- USB Port: For charging the camera and transferring files to a computer.
- Micro SD Card Slot: Insert the memory card here.
4. Setup
4.1. Charging the Battery
Before first use, fully charge the camera's built-in lithium-ion battery.
- Connect the small end of the USB charging cable to the camera's USB port.
- Connect the larger end of the USB cable to a USB power adapter (not included) or a computer's USB port.
- The charging indicator light will illuminate. It will turn off or change color when charging is complete.
4.2. Inserting the Memory Card
The camera requires a Micro SD card to store photos and videos. A 32GB card is included.
- Locate the Micro SD card slot on the side of the camera.
- Gently insert the 32GB Micro SD card into the slot with the gold contacts facing the front of the camera, until it clicks into place.
- To remove the card, push it in gently until it clicks again, and it will spring out.
4.3. Attaching the Lanyard
Attach the included lanyard to prevent accidental drops.
- Thread the thin loop of the lanyard through the designated lanyard hole on the camera body.
- Pass the larger part of the lanyard through the thin loop and pull to secure.
5. Operating Instructions
5.1. Powering On/Off
Press and hold the Power Button for a few seconds to turn the camera on. Repeat the action to turn it off.
5.2. Taking Photos
- Ensure the camera is in photo mode (usually the default when powered on). If not, use the Mode Button (if available) or navigate through the menu to select photo mode.
- Frame your shot using the screen.
- Press the Shutter Button firmly to take a picture. The camera will save the image to the Micro SD card.
5.3. Recording Videos
- Switch to video recording mode. This may involve pressing a dedicated Mode Button or selecting 'Video' from the menu.
- Press the Shutter Button once to start recording. A timer or indicator will show that recording is in progress.
- Press the Shutter Button again to stop recording. The video will be saved to the Micro SD card.
5.4. Playback Mode
To view your photos and videos:
- Press the Playback Button.
- Use the Navigation Buttons (Left/Right) to scroll through your captured media.
- Press the OK Button to view a video or a larger version of a photo.
- Press the Playback Button again to exit playback mode.
5.5. Menu Settings
Press the Menu Button to access various camera settings, such as:
- Resolution: Adjust photo and video quality.
- Date/Time: Set the current date and time.
- Language: Change the display language.
- Format SD Card: Erase all data on the memory card. (Caution: This will delete all photos and videos.)
Use the Navigation Buttons to select options and the OK Button to confirm.
5.6. Transferring Files to a Computer
- Ensure the camera is powered on.
- Connect the camera to your computer using the USB charging cable.
- The camera should appear as a removable disk or mass storage device on your computer.
- Open the camera's folder to access and copy your photos and videos.
6. Maintenance
- Cleaning: Use a soft, dry cloth to clean the camera body and screen. For the lens, use a specialized lens cleaning cloth. Do not use liquid cleaners.
- Storage: Store the camera in a cool, dry place away from direct sunlight and extreme temperatures when not in use.
- Battery Care: Charge the battery regularly, even if the camera is not used frequently, to maintain battery health. Avoid fully discharging the battery for extended periods.
- Memory Card: Periodically back up your photos and videos to a computer and format the Micro SD card in the camera's menu to ensure optimal performance.
7. Troubleshooting
| Issue | Possible Solution |
|---|---|
| Camera will not turn on. | Ensure the battery is charged. Connect the camera to a power source using the USB cable. |
| Cannot take photos or record videos. | Check if the Micro SD card is inserted correctly and has sufficient free space. Format the card if necessary (after backing up data). |
| Images or videos are blurry. | Ensure the camera lens is clean. Take photos in good lighting conditions. Hold the camera steady. |
| Camera freezes or becomes unresponsive. | Press and hold the Power Button for 10-15 seconds to force a restart. |
| Computer does not recognize the camera. | Ensure the camera is powered on and connected with the original USB cable. Try a different USB port or computer. |
8. Specifications
| Feature | Detail |
|---|---|
| Model Number | R-1092 |
| Brand | Rohs |
| Color | Blue |
| Video Resolution | 1080p |
| Supported File Format | JPEG (Image), AVI (Video) |
| Memory Storage Capacity | 32 GB (Micro SD Card included) |
| Flash Memory Type | Micro SD |
| Battery Type | Lithium Ion (Rechargeable) |
| Connectivity Technology | USB |
| Image Stabilization | Digital |
| Special Feature | Time-lapse |
| Skill Level | Novice |
| Water Resistance Level | Not Water Resistant |
9. Warranty and Support
For warranty information or technical support, please refer to the contact details provided with your purchase or visit the official Rohs website. Keep your proof of purchase for warranty claims.