1. Introduction
This manual provides detailed instructions for the installation, operation, and maintenance of your Retoo M023 7-inch Touchscreen Car Radio. Please read this manual thoroughly before using the product to ensure proper function and safety.
2. Safety Information
- Driving Safety: Do not operate the device or view videos while driving. Distraction can lead to accidents.
- Professional Installation: For optimal performance and safety, professional installation is recommended. Incorrect wiring can damage the device or your vehicle.
- Power Supply: Ensure the device is connected to a 12V DC power supply with negative grounding.
- Temperature: Avoid exposing the device to extreme temperatures or direct sunlight for prolonged periods.
- Moisture: Keep the device away from water and excessive moisture.
3. Package Contents
Verify that all items are present in the package:
- Retoo 7-inch Touchscreen Car Radio Unit
- Remote Control
- Power Wiring Harnesses (ISO cubes)
- RCA Cables
- Rear View Camera (optional, if included in your package)
- Mounting Screws
- User Manual (this document)

Image: Main unit, remote, wiring, and optional rear camera included in the package.
4. Product Overview
4.1 Front Panel Controls

Image: Detailed view of the car radio's front panel with labeled components.
- MIC: Built-in microphone for hands-free calling.
- IR: Infrared receiver for the remote control.
- Play/Pause/Next Track: Controls media playback.
- MENU: Accesses the main menu or settings.
- Previous Track/Rewind: Controls media playback.
- Volume Knob: Adjusts audio volume. Press to power on/off.
- TF Card Slot: Insert a TF (MicroSD) card for media playback.
- AUX Input: 3.5mm audio jack for connecting external audio devices.
- RES (Reset): Small button to reset the unit (requires a thin object like a pen tip).
- USB Port: Connect USB devices for media playback, phone charging, or mirror mode.
4.2 Rear Panel Connections
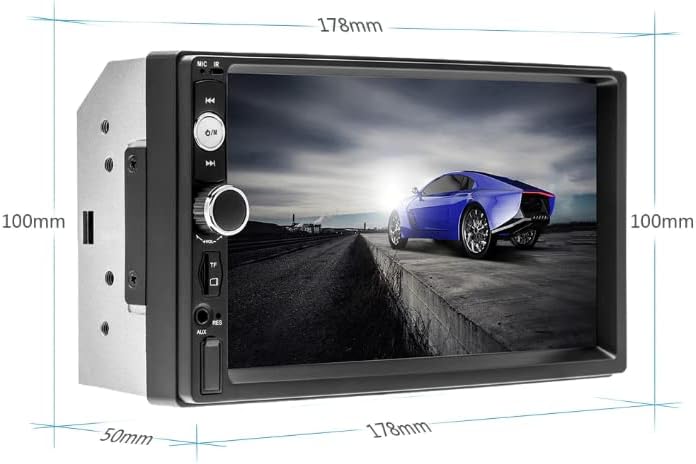
Image: Rear view of the car radio displaying wiring harnesses and RCA ports.
The rear panel features connections for power, speakers, video input/output, and the rear camera. Refer to the wiring diagram provided in the box for specific connections. Key connections include:
- ISO Connectors: For main power and speaker wiring.
- RCA Audio/Video Outputs: For connecting to external amplifiers or monitors.
- CAM IN: Video input for the rear view camera.
- ANT: Antenna input for radio reception.
5. Setup and Installation
Warning: Incorrect installation can cause damage to the unit or vehicle. If you are unsure, seek professional assistance.
5.1 Wiring Connections
- Power and Speakers: Use the provided ISO cubes to connect the car radio to your vehicle's wiring harness. A detailed wiring diagram is typically found on page 2 of the manual included in the product box. If your vehicle does not have ISO connectors, an ISO adapter specific to your car model may be required.
- Rear Camera: Connect the rear camera's video output to the 'CAM IN' port on the car radio. Ensure the camera's power cable is connected to your vehicle's reverse light circuit so it activates automatically when reverse gear is engaged.
- Antenna: Connect your vehicle's radio antenna to the 'ANT' port.
5.2 Mounting the Unit
Secure the car radio into your vehicle's dashboard using the provided mounting brackets and screws. Ensure it is firmly in place and does not obstruct any vehicle controls or airbags.

Image: The car radio unit properly installed in a vehicle's dashboard.
6. Operating Instructions
6.1 Basic Operation and Touchscreen
The unit features a 7-inch pressure-sensitive touchscreen for intuitive control. Tap icons to select functions. The main menu provides access to various modes such as FM Radio, Music, Movie, Photo, Bluetooth, AUX, Settings, and more.

Image: The main menu interface of the car radio, showing various function icons.

Image: Demonstrating the responsive touchscreen interface.
6.2 Radio (FM)
From the main menu, select the 'FM' icon. You can manually tune frequencies or use the auto-scan function to find available stations. Save your favorite stations for quick access.
6.3 Bluetooth Connectivity
To connect your smartphone or other Bluetooth devices:
- Select the 'BT' (Bluetooth) icon from the main menu.
- Enable Bluetooth on your mobile device and search for available devices.
- Select 'Retoo M023' (or similar name) from the list on your phone.
- Confirm pairing if prompted.
Once connected, you can make/receive calls hands-free and stream audio from your device.

Image: Bluetooth interface for hands-free calling and device pairing.
6.4 USB and TF Card Media Playback
Insert a USB drive into the USB port or a TF card into the TF card slot. The unit will automatically detect the media and allow you to browse and play audio or video files. Supported formats include MP3, WMA, WAV, FLAC, OGG, APE for audio, and various video formats up to 1080P.
The USB port also supports phone charging and a mirror mode function. To activate mirror mode, connect your smartphone via USB. On some phone models, USB debugging may need to be enabled in developer settings for this feature to work correctly.

Image: Smartphone screen mirroring feature via USB connection.
6.5 AUX Input
Connect external audio devices (e.g., MP3 players, older smartphones) to the 3.5mm AUX input jack on the front panel using a standard audio cable. Select the 'AUX' option from the main menu to play audio from the connected device.

Image: Connecting an external device using the AUX input.
6.6 Rear Camera Function
If a rear camera is properly connected and installed, the car radio will automatically display the rear view when the vehicle is shifted into reverse gear. This feature enhances parking safety.

Image: Automatic display of the rear camera view when reversing.
6.7 Sound Settings
The unit features a built-in 4x45W MOSFET amplifier and noise reduction. Access the 'Settings' menu to adjust audio parameters such as bass, treble, and channel balance (L&P) to customize your listening experience.
7. Maintenance
- Cleaning the Screen: Use a soft, lint-free cloth to gently wipe the touchscreen. Avoid abrasive cleaners or harsh chemicals.
- General Cleaning: Keep the unit free from dust and debris. Use a dry cloth for the exterior.
- Avoid Liquids: Do not spray liquids directly onto the unit.
8. Troubleshooting
| Problem | Possible Cause | Solution |
|---|---|---|
| No power | Incorrect wiring; Blown fuse; Vehicle battery issue | Check power connections; Inspect and replace fuse if necessary; Verify vehicle battery voltage. |
| No sound | Speaker wires disconnected; Volume too low; Incorrect audio source selected | Check speaker connections; Increase volume; Select correct audio source (FM, BT, USB, AUX). |
| Bluetooth not connecting | Bluetooth not enabled on phone; Device not in pairing mode; Interference | Ensure phone's Bluetooth is on and discoverable; Restart both devices; Try pairing in a different location. |
| Touchscreen unresponsive | System error; Screen calibration needed | Press the RES (Reset) button with a thin object; Check settings for screen calibration options. |
| Rear camera not displaying | Camera not connected; Incorrect wiring to reverse light; Faulty camera | Verify camera connections to 'CAM IN' and reverse light; Test camera functionality. |
9. Specifications
| Feature | Detail |
|---|---|
| Brand | Retoo |
| Model Number | M023 |
| Screen Size | 7 inches |
| Display Type | Touchscreen |
| Connectivity | USB 2.0, Bluetooth, TF Card, AUX, RCA |
| Compatible Devices | Speaker, Tablet, Smartphone |
| Audio Output Mode | Stereo |
| Amplifier | MOSFET 4x45W (180 Watts total) |
| Supported Audio Formats | MP3, WMA, WAV, FLAC, OGG, APE |
| Control Method | Application (via mirror mode), Touchscreen, Remote Control |
| Item Weight | 500 Grams |
| Dimensions (approx.) | 178mm (width) x 100mm (height) x 50mm (depth) |

Image: Approximate dimensions of the car radio unit.
10. Warranty and Support
This Retoo car radio comes with a 2-year manufacturer's warranty. Please retain your proof of purchase for warranty claims.
For technical support, troubleshooting assistance beyond this manual, or warranty inquiries, please contact your retailer or the manufacturer directly. Refer to your purchase documentation for contact details.


