Introduction
The Anova Precision Smart Oven is a versatile countertop appliance designed to bring professional-grade cooking capabilities to your home kitchen. It combines convection, steam, bake, broil, roast, and dehydrate functions, offering precise temperature control for a wide range of culinary tasks. This manual provides essential information for the safe and effective operation and maintenance of your Anova Precision Smart Oven.
For optimal performance and longevity, please read this manual thoroughly before first use and retain it for future reference.
Safety Information
Always follow basic safety precautions when using electrical appliances to reduce the risk of fire, electric shock, and injury to persons.
- Do not touch hot surfaces. Use handles or knobs.
- To protect against electrical shock, do not immerse cord, plugs, or the appliance in water or other liquid.
- Close supervision is necessary when any appliance is used by or near children.
- Unplug from outlet when not in use and before cleaning. Allow to cool before putting on or taking off parts.
- Do not operate any appliance with a damaged cord or plug, or after the appliance malfunctions or has been damaged in any manner.
- The use of accessory attachments not recommended by the appliance manufacturer may cause injuries.
- Do not use outdoors.
- Do not let cord hang over edge of table or counter, or touch hot surfaces.
- Do not place on or near a hot gas or electric burner, or in a heated oven.
- Extreme caution must be used when moving an appliance containing hot oil or other hot liquids.
- Do not use appliance for other than intended use.
Components Overview
Familiarize yourself with the main components of your Anova Precision Smart Oven:
- Oven Cavity: The main cooking chamber.
- Water Tank: Removable tank for steam generation. Located on the side.
- Control Panel: Digital display and knobs for setting temperature, time, and cooking modes.
- Food Probe: Detachable probe for precise internal temperature monitoring.
- Removable Racks: Multiple racks for various cooking needs.
- Baking Pan: Included pan for general baking and roasting.

Figure 1: Front view of the Anova Precision Smart Oven, showing the main oven cavity, control panel, and side-mounted water tank.

Figure 2: Interior view of the Anova Precision Smart Oven, illustrating the two removable racks and the included baking pan.

Figure 3: A user demonstrating the removal of the clear water tank from the side of the Anova Precision Smart Oven for refilling or cleaning.
Setup
Unpacking and Placement
- Carefully remove the oven and all accessories from the packaging.
- Remove any protective film or packaging materials from the oven.
- Place the oven on a stable, level, heat-resistant surface with adequate clearance from walls and other appliances for ventilation. Ensure at least 4 inches of space on all sides and above the oven.
- Ensure the power outlet is easily accessible.
Initial Cleaning
- Before first use, wipe the interior and exterior of the oven with a damp cloth.
- Wash the removable racks, baking pan, and water tank with warm, soapy water. Rinse thoroughly and dry completely.
Water Tank Preparation
- Remove the water tank from its housing on the side of the oven.
- Fill the water tank with distilled water. Do not use tap water as it can lead to mineral buildup.
- Securely reinsert the water tank into its housing until it clicks into place.
Power Connection
Plug the oven into a grounded electrical outlet. The display will illuminate, indicating the oven is ready for use.
Operating Instructions
Control Panel Overview
The Anova Precision Smart Oven features an intuitive control panel with a digital display and rotary knobs for setting cooking parameters. The display shows temperature, time, and current cooking mode.
Connecting to the Anova App
For enhanced control and access to a recipe library, download the Anova Oven app on your smartphone. Follow the in-app instructions to connect your oven via Wi-Fi.
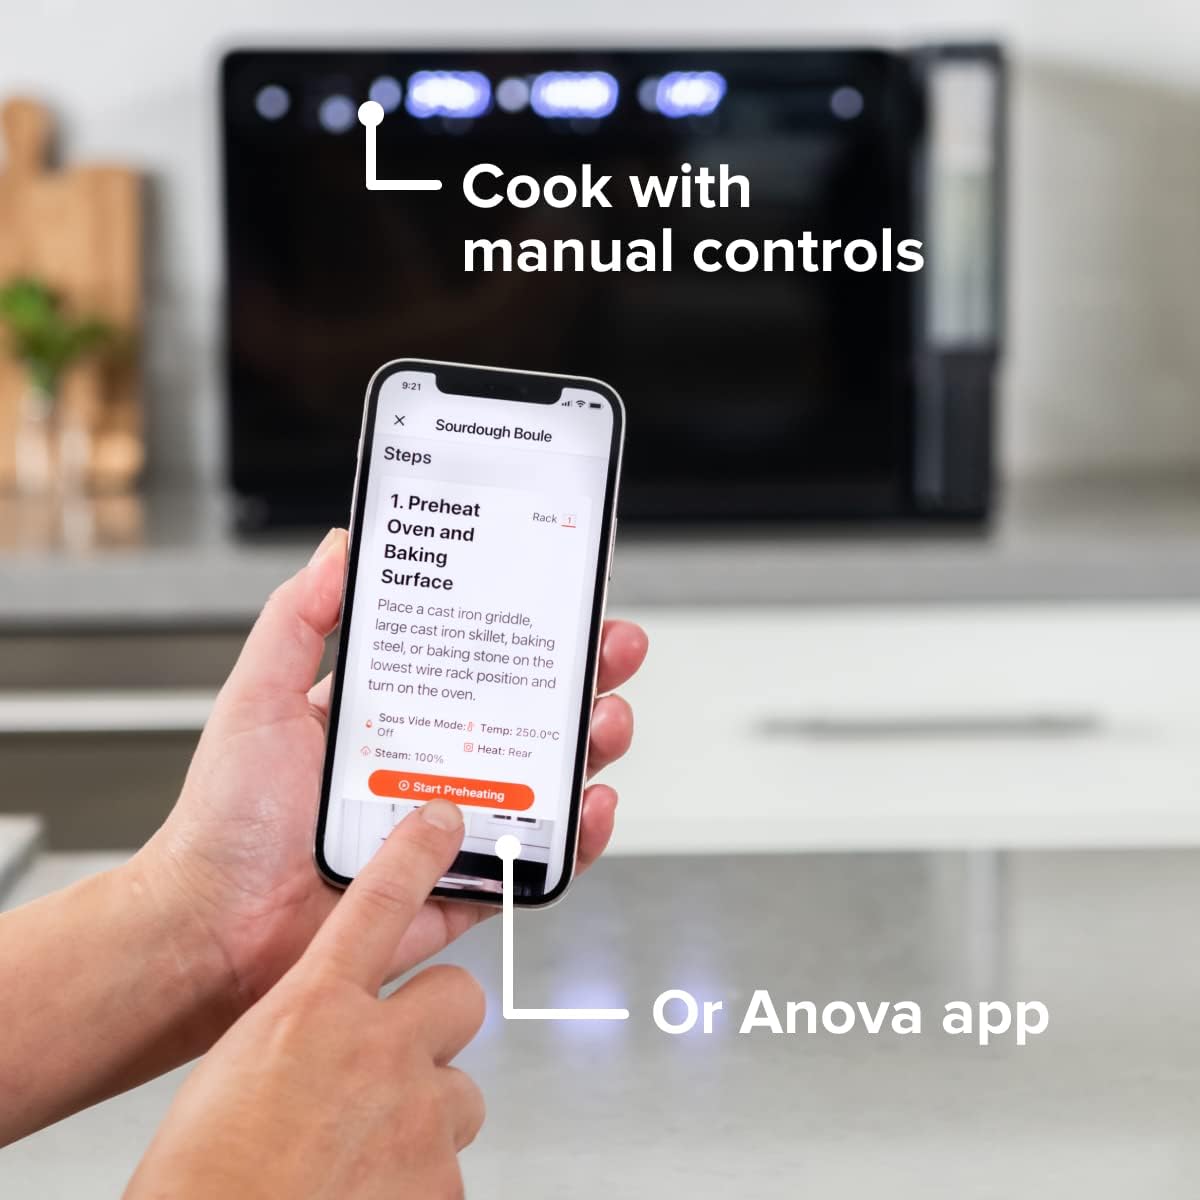
Figure 4: A user interacting with the Anova app on a smartphone, demonstrating remote control capabilities for the oven.
Basic Cooking Modes
The oven offers several cooking modes:
- Convection: Uses a fan to circulate hot air for even cooking and browning.
- Steam: Injects steam into the oven cavity, ideal for baking bread, steaming vegetables, or sous vide style cooking.
- Combi (Convection + Steam): Combines hot air and steam for moist interiors and crispy exteriors.
- Bake/Roast: Standard oven functions for baking and roasting.
- Broil: High heat from the top element for searing and browning.
- Dehydrate: Low heat and fan circulation for drying foods.
Setting a Program (Manual Control)
- Turn the mode knob to select your desired cooking mode.
- Adjust the temperature using the temperature knob.
- Set the cooking time using the time knob.
- Press the Start/Pause button to begin cooking.
- To use the food probe, insert it into the thickest part of your food before starting. The oven will cook until the target internal temperature is reached.
Sous Vide Mode
The Anova Precision Oven can achieve sous vide style results without a water bath. Use the steam function and the food probe to cook food to a precise internal temperature, ensuring tenderness and juiciness.
Steam Injection for Baking
For perfect breads with crispy crusts and soft interiors, utilize the steam injection feature. Ensure the water tank is filled before starting a steam-assisted baking program.

Figure 5: Two loaves of freshly baked bread, showcasing the results of steam injection for a perfect crust and crumb. The Anova Precision Smart Oven is visible in the background.
Maintenance and Cleaning
Regular cleaning and maintenance will ensure the longevity and optimal performance of your Anova Precision Smart Oven.
Daily Cleaning
- After each use, allow the oven to cool completely.
- Wipe down the interior and exterior surfaces with a damp cloth and mild detergent. Avoid abrasive cleaners or scouring pads.
- Remove and clean the racks and baking pan with warm, soapy water.
- Empty and rinse the water tank after each use, especially if using steam functions. Allow it to air dry before reinserting.
Descaling (Steam Function Users)
If you frequently use the steam function, mineral buildup may occur. The oven may indicate when descaling is needed. Refer to the Anova app or online resources for detailed descaling instructions using a descaling solution.
Storage
When not in use for extended periods, ensure the oven is clean and dry. Store it in a cool, dry place.
Troubleshooting
This section addresses common issues you might encounter with your Anova Precision Smart Oven.
| Problem | Possible Cause | Solution |
|---|---|---|
| Oven not turning on. | Not plugged in; power outage; circuit breaker tripped. | Ensure oven is securely plugged into a working outlet. Check household circuit breaker. |
| No steam produced. | Water tank empty or not properly seated; mineral buildup. | Fill water tank with distilled water and ensure it is correctly inserted. Perform descaling if necessary. |
| Food not cooking evenly. | Improper rack placement; overcrowding; fan obstruction. | Refer to recipe for recommended rack position. Avoid overcrowding the oven. Ensure nothing obstructs the convection fan. |
| Wi-Fi connection issues. | Incorrect Wi-Fi password; router too far; network interference. | Double-check Wi-Fi password. Move oven closer to router or use a Wi-Fi extender. Restart oven and router. |
If the problem persists after attempting these solutions, please contact Anova Customer Support.
Specifications
- Brand: Anova Culinary
- Model Name: Precision Oven
- Item Model Number: AN900-10
- Product Dimensions: 18"D x 22"W x 14"H
- Item Weight: 59 pounds
- Color: Black
- Control Type: Knob
- Power Source: Electric
- Included Components: Water tank, pan, temp probe
- Special Feature: Programmable
Warranty and Support
The Anova Precision Smart Oven comes with a manufacturer's warranty. Please refer to the warranty card included with your product or visit the official Anova Culinary website for detailed warranty terms and conditions.
For technical support, troubleshooting assistance, or to inquire about replacement parts, please contact Anova Customer Support:
- Online Support: Visit the Anova Culinary Store on Amazon or their official website.
- User Guide (PDF): A comprehensive user guide is available for download at this link.

Figure 6: The Anova Precision Smart Oven integrated with a smart home assistant (Alexa), demonstrating its connectivity features.


