
KODAK M35
KODAK M35 35mm Reusable Film Camera User Manual
Model: M35
Introduction
This manual provides instructions for the proper use and care of your KODAK M35 35mm Reusable Film Camera. Please read this manual thoroughly before operating the camera to ensure optimal performance and longevity.
The KODAK M35 is a simple-to-use 35mm film camera designed for casual photography. It features a fixed lens, a single shutter speed, and a built-in flash for various lighting conditions.
Parts of the Camera
Familiarize yourself with the main components of your KODAK M35 camera.

Figure 1: Front view of the KODAK M35 camera. Shows the lens, viewfinder, and flash.

Figure 2: Top view of the KODAK M35 camera. Displays the shutter button and film advance wheel.
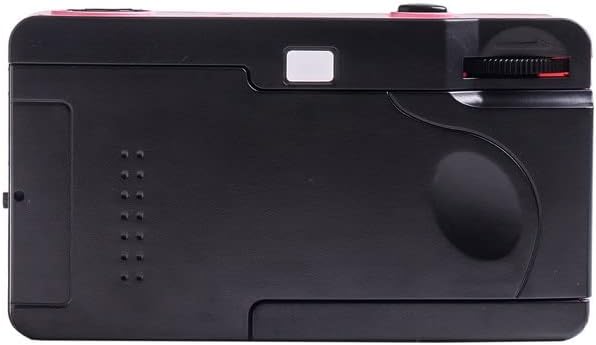
Figure 3: Back view of the KODAK M35 camera. Shows the film counter window and viewfinder eyepiece.

Figure 4: Bottom view of the KODAK M35 camera. Features the battery compartment.

Figure 5: Side view of the KODAK M35 camera, highlighting the film door latch.
Setup
1. Battery Installation
The KODAK M35 requires one AAA alkaline battery to power the built-in flash. The camera operates without a battery for non-flash photography, but the flash will not function.
- Locate the battery compartment on the bottom of the camera (refer to Figure 4).
- Slide the battery compartment cover open.
- Insert one AAA battery, ensuring correct polarity (+/-) as indicated inside the compartment.
- Close the battery compartment cover securely.
Video 1: Instructions on how to change the battery in the Kodak M35 camera. This video demonstrates opening the battery compartment, inserting a new AAA battery, and closing the compartment.
2. Film Loading
The KODAK M35 uses standard 35mm film. Handle film in subdued light to prevent accidental exposure.
- Open the camera back by sliding the film door latch downwards (refer to Figure 5).
- Insert a new roll of 35mm film into the film chamber on the left side of the camera. Ensure the film canister is seated correctly.
- Pull the film leader across the camera body and insert the tip into the take-up spool slot on the right side.
- Rotate the film advance wheel (refer to Figure 2) slightly to ensure the film perforations engage with the take-up spool teeth. The film should lie flat against the camera's center.
- Close the camera back firmly until it clicks shut.
- Advance the film by rotating the film advance wheel and pressing the shutter button (refer to Figure 2) repeatedly until the film counter displays "1". This ensures any exposed film leader is wound onto the take-up spool.
Video 2: Detailed instructions on how to load 35mm film into the Kodak M35 camera. This video guides users through opening the camera back, inserting the film canister, attaching the film leader to the take-up spool, and advancing the film to the first frame.
Operating the Camera
1. Taking a Photo
- Look through the optical viewfinder to compose your shot.
- Press the shutter button firmly to take the picture.
- After each shot, rotate the film advance wheel until it stops to advance the film to the next frame. The film counter will indicate the current frame number.
2. Using the Built-in Flash
The KODAK M35 features a built-in flash for low-light conditions or to add fill light in bright conditions.
- Slide the flash switch (located on the front of the camera, next to the lens) to the "ON" position.
- Wait for the flash ready indicator light (usually red, located near the flash) to illuminate, indicating the flash is charged and ready to fire. This may take a few seconds.
- Take your photo as usual. The flash will fire automatically.
- For best results, ensure subjects are within the effective flash range (typically 1-3 meters).
3. Rewinding and Unloading Film
Once all frames on the film roll have been exposed (the film advance wheel will no longer turn), the film must be rewound back into its canister before opening the camera back.
- Locate the film rewind crank on the top-left side of the camera.
- Unfold the rewind crank and turn it clockwise until you feel the tension release, indicating the film has been fully rewound into the canister.
- Open the camera back by sliding the film door latch downwards.
- Remove the film canister from the film chamber.
- Close the camera back. The exposed film is now ready for development.
Maintenance and Care
- Cleaning: Use a soft, dry cloth to clean the camera body. For the lens and viewfinder, use a lens cleaning cloth and solution specifically designed for optical surfaces. Avoid touching the lens directly with your fingers.
- Storage: Store the camera in a cool, dry place away from direct sunlight and extreme temperatures. Remove the battery if the camera will not be used for an extended period to prevent leakage.
- Handling: Handle the camera with care. Avoid dropping it or exposing it to excessive moisture or dust.
Troubleshooting
Flash Not Firing
- Check Battery: Ensure a fresh AAA battery is correctly installed in the battery compartment with the correct polarity.
- Flash Switch: Verify that the flash switch is in the "ON" position.
- Charging Time: Allow a few seconds for the flash to charge after turning it on. The flash ready indicator light should illuminate when ready.
Film Not Advancing
- Film Leader: Ensure the film leader is properly engaged with the take-up spool teeth. Re-open the camera back (in subdued light), re-seat the film, and try advancing again.
- End of Roll: If the film advance wheel does not turn, the film roll might be at its end. Check the film counter. If it shows the maximum number of frames, rewind the film.
- Obstruction: Check for any obstructions in the film path.
Light Leaks on Photos
- Camera Back: Ensure the camera back is securely closed.
- Film Door Latch: Verify the film door latch is fully engaged.
- Film Handling: Always load and unload film in subdued light.
Specifications
| Feature | Detail |
|---|---|
| Brand | KODAK |
| Model Name | M35 |
| Film Format Type | 35mm |
| Item Weight | 127 g |
| Dimensions (L x W x H) | 1.75 x 8.4 x 6.25 inches |
| Special Feature | Built-in Flash |
| Minimum Shutter Speed | 1/120 seconds |
| Maximum Shutter Speed | 1/120 seconds |
| ISO Range | 100-800 |
| Viewfinder | Optical |
| Color | Candy Pink |
| Included Components | Camera Body Only |
Warranty and Support
For warranty information or technical support, please refer to the documentation included with your purchase or contact KODAK customer service directly. Keep your proof of purchase for warranty claims.
Manufacturer: Sino Promise Group
Additional Resources
Video 3: An overview of the Kodak M35 35mm Film Camera. This video provides a general look at the camera's features and design.
Related documentsM35


Ask a question about this manual
Ask about setup, troubleshooting, compatibility, parts, safety, or missing instructions. Manuals+ will review the question and use this page’s manual context to help answer it.