
1. Important Safeguards
To ensure safe operation and prevent damage, please read all instructions before using this appliance. Keep this manual for future reference.
- Electrical Safety: Ensure the power outlet matches the voltage requirements (120V). Do not immerse the appliance, power cord, or plug in water or other liquids.
- Placement: Place the ice maker on a stable, level surface away from direct sunlight, heat sources, and corrosive gases. Allow at least 6 inches of clearance around the unit for proper ventilation.
- Water Quality: Use only potable water. Do not use distilled water as it may affect ice production.
- Children and Pets: Keep the appliance out of reach of children and pets. Supervise children to ensure they do not play with the appliance.
- Maintenance: Unplug the ice maker before cleaning or performing any maintenance. Do not attempt to repair the appliance yourself; contact qualified service personnel.
2. Product Overview
Familiarize yourself with the components and control panel of your Zlinke Portable Ice Maker.
Components
- Ice Maker Unit
- Ice Basket
- Ice Scoop
- Drain Plug (located at the bottom)
Control Panel and Indicators
The control panel provides easy access to functions and status indicators.
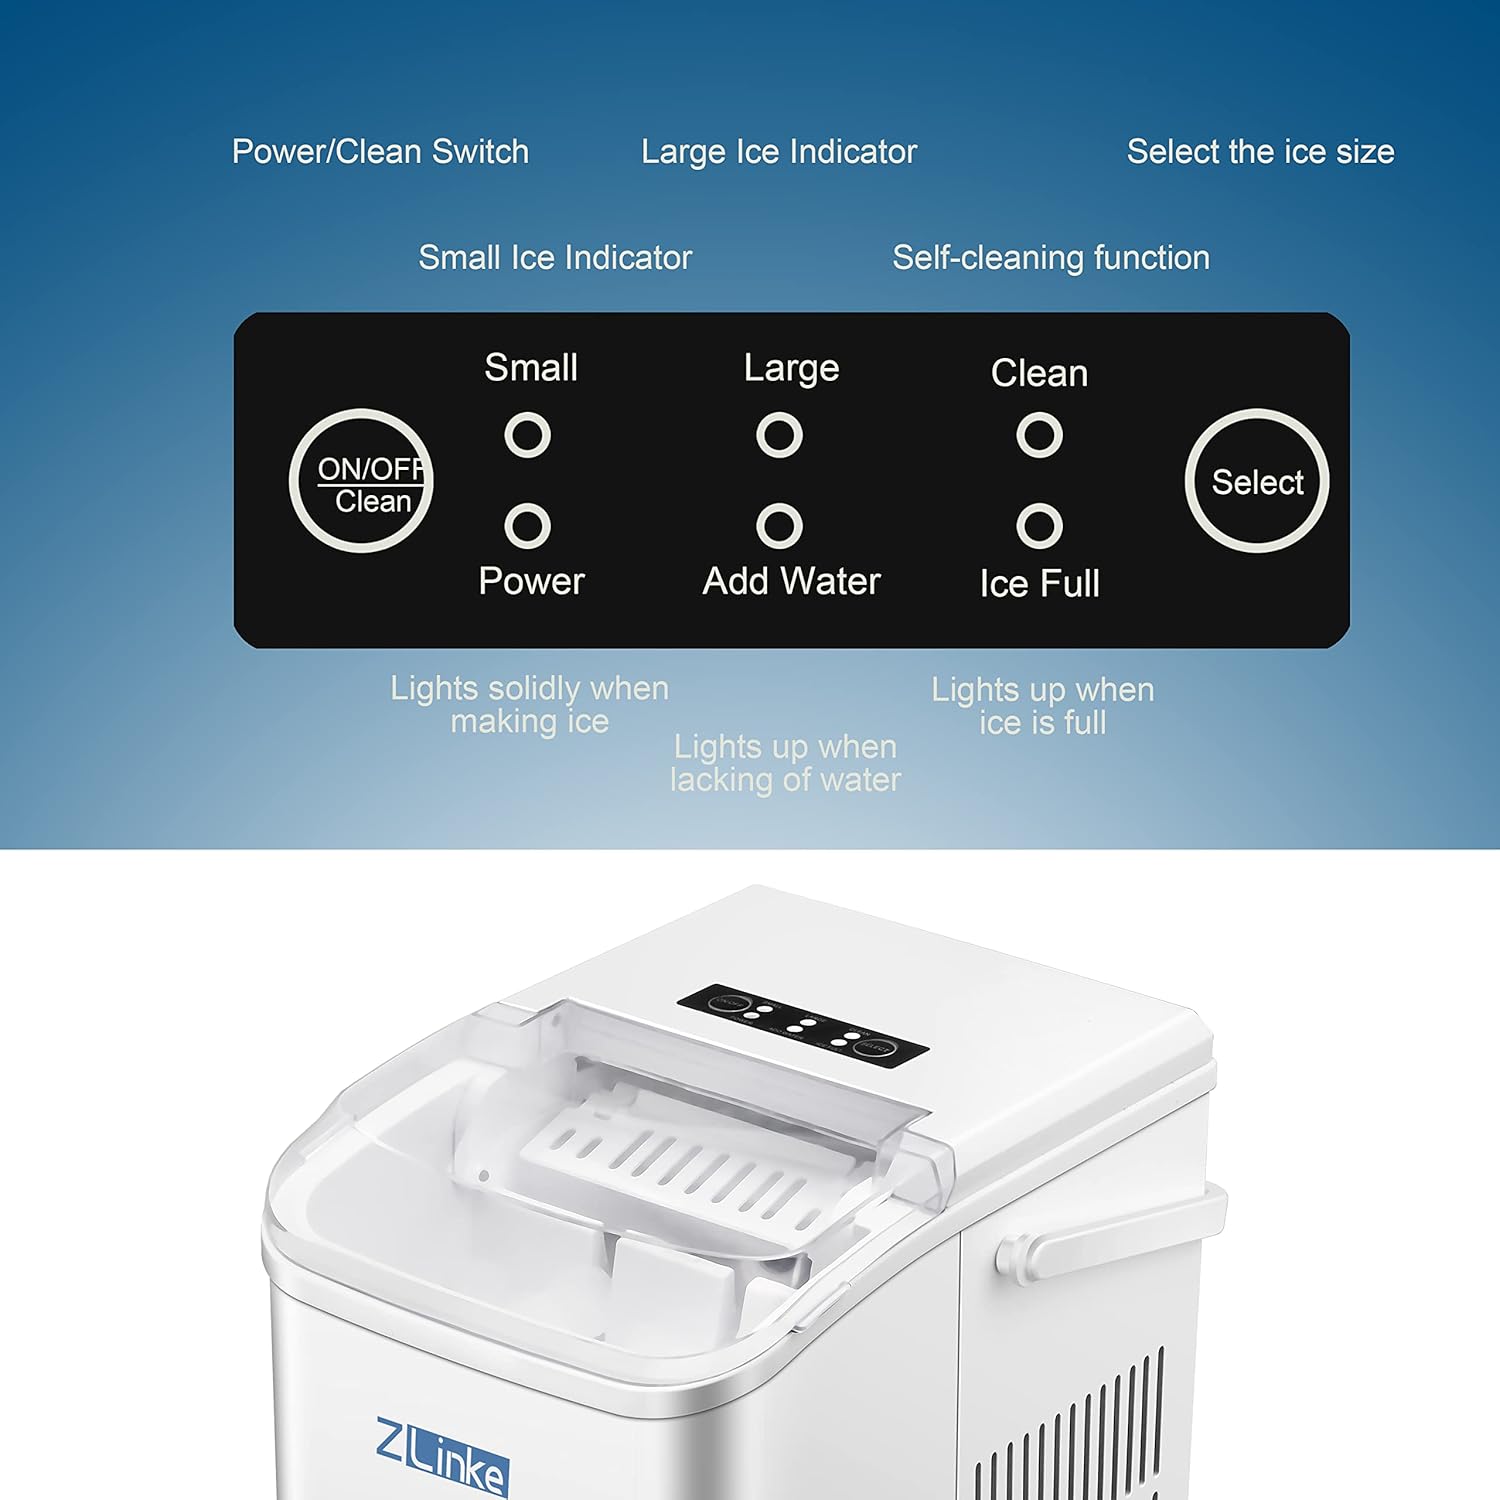
Image Description: A close-up of the Zlinke ice maker's control panel. It features an 'ON/OFF Clean' button, a 'Select' button, and indicator lights for 'Small Ice', 'Large Ice', 'Power', 'Add Water', 'Ice Full', and 'Clean'. The lights illuminate to show the current status or selected ice size.
- ON/OFF Clean Button: Press to turn the unit on or off. Hold to activate the self-cleaning function.
- Select Button: Press to choose between small or large ice cube sizes.
- Small Ice Indicator: Lights up when small ice cube size is selected.
- Large Ice Indicator: Lights up when large ice cube size is selected.
- Power Indicator: Lights up when the unit is powered on.
- Add Water Indicator: Lights up when the water reservoir needs refilling.
- Ice Full Indicator: Lights up when the ice basket is full.
- Clean Indicator: Lights up when the self-cleaning cycle is active.

Image Description: A white Zlinke countertop ice maker with its dimensions labeled: 13 inches deep, 10 inches wide, and 12 inches high. The image also shows various settings where the ice maker can be used, such as a party, apartment, kitchen, and RV.
3. Setup
Follow these steps to set up your ice maker for the first time.
- Unpack: Carefully remove the ice maker from its packaging. Remove all packing materials, including any tape or protective film.
- Position: Place the ice maker on a flat, stable, and level surface. Ensure there is at least 6 inches (15 cm) of space around the unit for proper air circulation. Avoid placing it near heat sources or in direct sunlight.
- Initial Cleaning: Before first use, clean the interior of the ice maker. Refer to the 'Cleaning and Maintenance' section for detailed instructions.
- Add Water: Open the top lid and fill the water reservoir with potable water up to the 'MAX' fill line. Do not overfill.
- Connect Power: Plug the power cord into a grounded electrical outlet.
4. Operating Instructions
Learn how to operate your Zlinke Portable Ice Maker to produce ice efficiently.
Starting Ice Production
- Ensure the water reservoir is filled and the unit is plugged in.
- Press the ON/OFF Clean button to turn on the ice maker. The 'Power' indicator light will illuminate.
- Press the Select button to choose your desired ice cube size: Small Ice or Large Ice. The corresponding indicator light will illuminate.
- The ice maker will begin the ice-making cycle. The first batch of 9 bullet-shaped ice cubes will be ready in approximately 6-7 minutes, depending on water temperature and ambient conditions.
During Operation
- Add Water Indicator: If the 'Add Water' indicator light illuminates, the water reservoir is low. Add more potable water to the reservoir. The ice maker will automatically resume operation once water is added.
- Ice Full Indicator: If the 'Ice Full' indicator light illuminates, the ice basket is full. Remove ice from the basket. The ice maker will automatically resume operation once space is cleared.
- Viewing Window: The large viewing window allows you to monitor the ice-making process without opening the lid.

Image Description: An internal view of the ice maker showing bullet-shaped ice cubes forming on the evaporator rods. This illustrates the initial stage of ice production.
Video: Ice Making Process
Video Description: This video demonstrates the Zlinke Portable Ice Maker in operation, showing the internal mechanism as it produces bullet-shaped ice cubes. It highlights the speed and efficiency of the ice-making process.
5. Cleaning and Maintenance
Regular cleaning and maintenance ensure optimal performance and longevity of your ice maker.
Self-Cleaning Function
- Ensure the water reservoir is filled with clean water.
- With the unit powered on, press and hold the ON/OFF Clean button for 3-5 seconds. The 'Clean' indicator light will illuminate, and the unit will begin a self-cleaning cycle.
- The cycle typically lasts for a few minutes. Once complete, the unit will stop, and the 'Clean' light will turn off.
- Drain the water from the reservoir by removing the drain plug at the bottom of the unit.
Manual Cleaning
- Unplug: Always unplug the ice maker from the power outlet before cleaning.
- Drain Water: Remove the drain plug to empty any remaining water from the reservoir.
- Clean Interior: Use a soft cloth dampened with a mild detergent solution to wipe the interior surfaces, including the ice basket and water reservoir. Rinse thoroughly with clean water.
- Clean Exterior: Wipe the exterior of the unit with a soft, damp cloth. Do not use abrasive cleaners or solvents.
- Dry: Ensure all parts are completely dry before plugging the unit back in or storing it.
Storage
If the ice maker will not be used for an extended period, clean it thoroughly, drain all water, and store it in a dry, well-ventilated area.
6. Troubleshooting
Refer to this section for common issues and their solutions.
| Problem | Possible Cause | Solution |
|---|---|---|
| Ice maker not producing ice. | No water in reservoir; 'Add Water' indicator on. | Fill the water reservoir with potable water. |
| Ambient temperature too high. | Move the ice maker to a cooler location. | |
| Air vents blocked. | Ensure adequate clearance around the unit for ventilation. | |
| 'Ice Full' indicator on, but basket is not full. | Ice cubes blocking the infrared sensor. | Gently move or remove ice cubes that are obstructing the sensor. |
| 'Add Water' indicator on, but reservoir is full. | Water level sensor malfunction or mineral buildup. | Perform a self-cleaning cycle. If the issue persists, contact customer support. |
| Ice cubes are too small or soft. | Water temperature too high or ambient temperature too high. | Use colder water. Ensure the unit is in a cool environment. Select 'Large Ice' size. |

Image Description: A close-up view of the infrared sensor located inside the ice maker, which detects when the ice basket is full. Proper functioning of this sensor is crucial for continuous ice production.
7. Specifications
Technical details of the Zlinke Portable Ice Maker Model ZBJ.
- Model: ZBJ
- Dimensions (D x W x H): 13" x 10" x 12" (33 cm x 25.4 cm x 30.5 cm)
- Weight: Approximately 17 lbs (7.7 kg)
- Ice Production Capacity: Up to 26 lbs (12 kg) per 24 hours
- Ice Production Cycle: 9 cubes in 6-7 minutes
- Water Reservoir Capacity: 2 Liters (68 oz)
- Ice Basket Capacity: Approximately 1.5 lbs (0.7 kg)
- Voltage: 120V / 60Hz
- Wattage: 160 Watts
- Refrigerant: R134a
- Material: Stainless Steel enclosure
8. Warranty and Support
For warranty information, technical support, or service inquiries, please contact Zlinke customer service. Refer to your purchase documentation for specific warranty terms and contact details.
Customer Service: Please visit the official Zlinke website or refer to the contact information provided with your product packaging.


