1. Introduction
This manual provides detailed instructions for the installation, operation, and maintenance of your EZoneTronics Android Car Radio Stereo, Model RMCT-VW-GLF7-2G32. Please read this manual thoroughly before using the product to ensure proper functionality and safety. This device is designed for specific Volkswagen Golf 7 models manufactured between 2012 and 2020.
2. Safety Information
Observe the following safety precautions to prevent damage to the device or injury to yourself and others:
- Professional Installation Recommended: Due to the complexity of car electrical systems, professional installation is highly recommended. Incorrect installation can lead to vehicle damage or malfunction.
- Power Supply: Ensure the device is connected to a 12V DC power supply with negative grounding.
- Wiring: Do not modify or cut any wires unless explicitly instructed. Incorrect wiring can cause short circuits or fire.
- Operation While Driving: Do not operate the device in a way that distracts you from driving. Always prioritize road safety.
- Temperature: Avoid exposing the device to extreme temperatures or direct sunlight for prolonged periods.
- Moisture: Keep the device away from water and excessive moisture.
- Cleaning: Use a soft, dry cloth for cleaning. Do not use abrasive cleaners or solvents.
3. Package Contents
Verify that all components are present in the package:
- EZoneTronics Android Car Radio Stereo Unit (Model RMCT-VW-GLF7-2G32)
- Vehicle-specific mounting frame and harness for VW Golf 7
- GPS Antenna
- USB Cables
- Power Cable
- RCA Cables (Audio/Video input/output)
- User Manual (this document)
- Additional accessories as per specific model variant
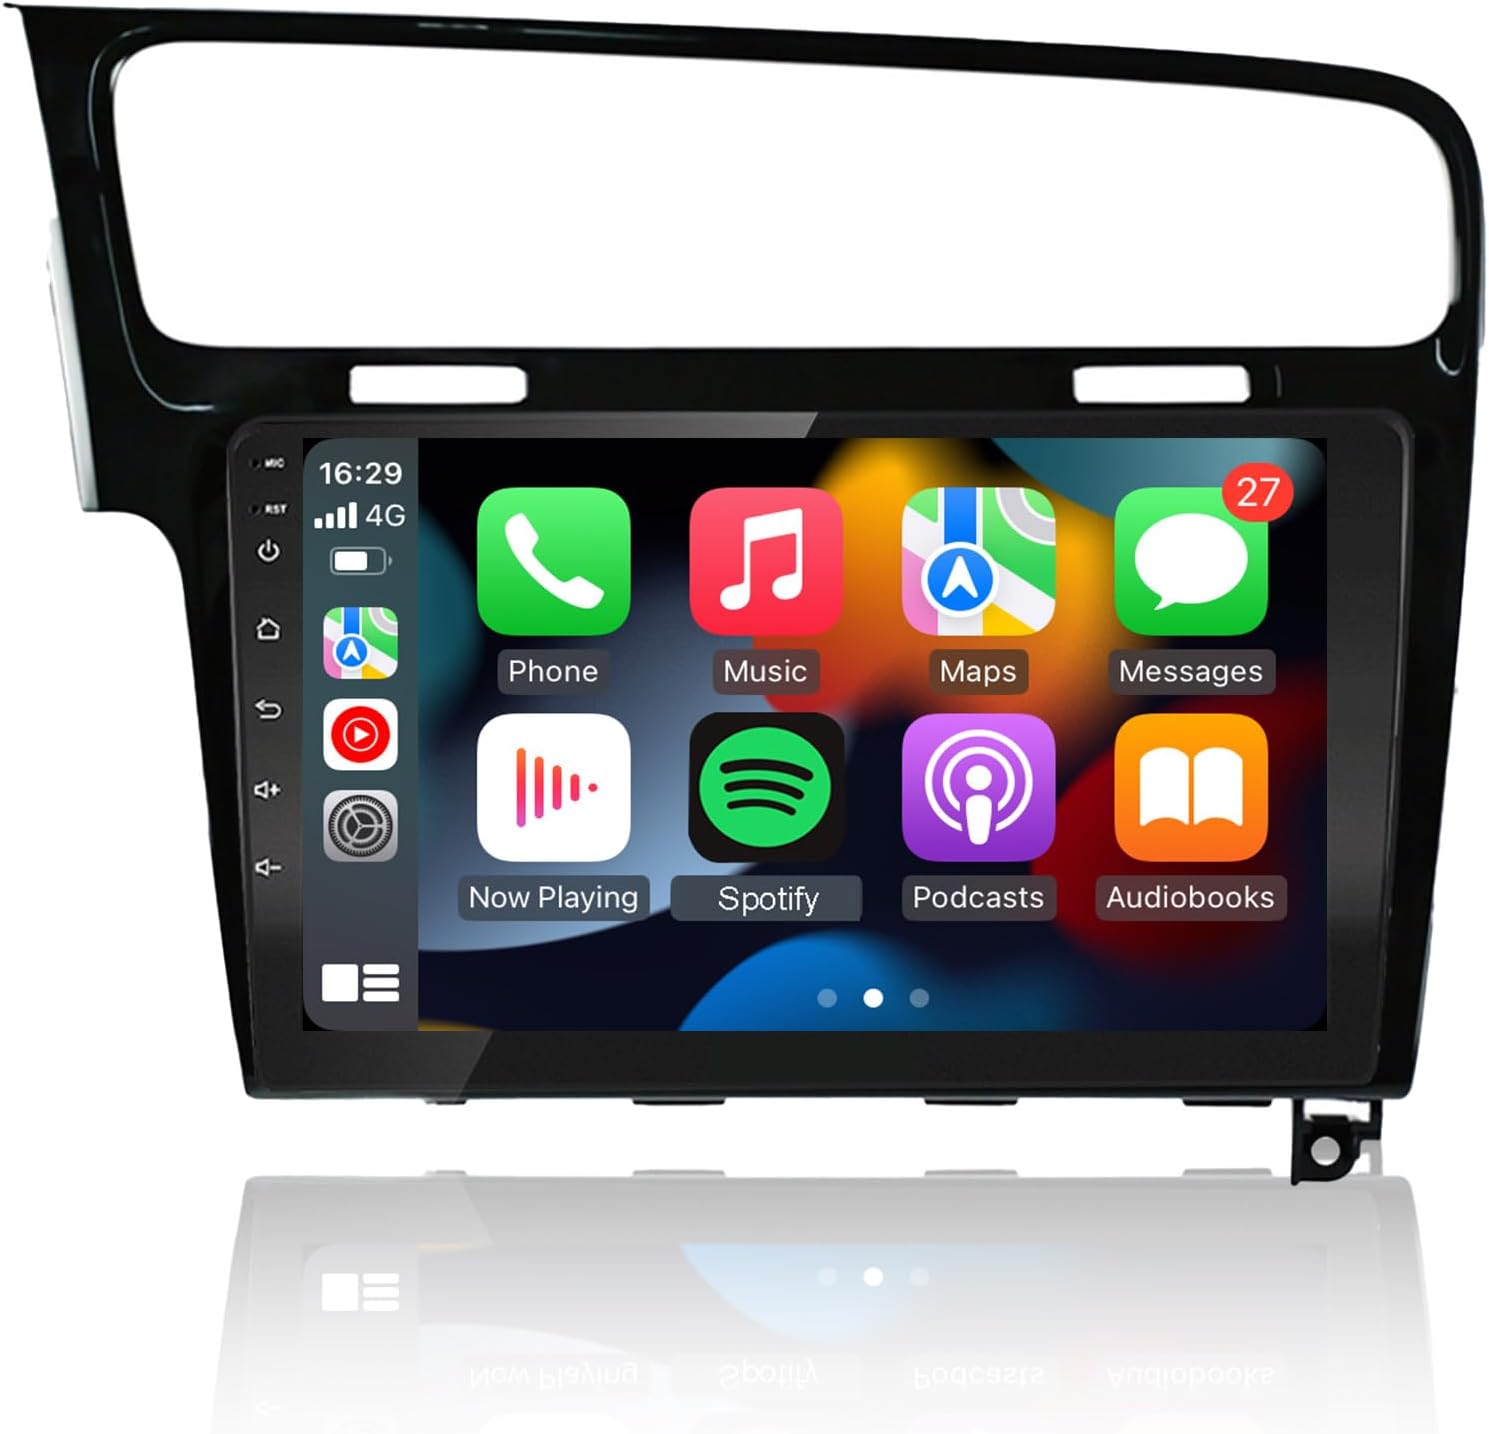
Image 3.1: The EZoneTronics Android Car Radio Stereo unit, including the integrated mounting frame designed for VW Golf 7 models. This image displays the front of the unit with its 10.1-inch touchscreen and physical control buttons on the left side.
4. Installation Guide
This section provides a general overview of the installation process. Specific steps may vary depending on your vehicle's configuration. Professional installation is strongly recommended.
- Preparation:
- Park your vehicle on a level surface and engage the parking brake.
- Turn off the engine and remove the key from the ignition.
- Disconnect the negative terminal of the car battery to prevent electrical shorts.
- Gather necessary tools (e.g., trim removal tools, screwdrivers, wire strippers).
- Remove Existing Head Unit:
- Carefully remove the trim panels surrounding your factory radio using plastic trim removal tools to avoid damage.
- Unscrew and remove the existing head unit from the dashboard.
- Disconnect all wiring harnesses and antenna cables from the factory radio.
- Connect New Head Unit:
- Connect the provided vehicle-specific wiring harness to the EZoneTronics unit.
- Connect the other end of the wiring harness to your vehicle's factory wiring. Ensure all connections are secure.
- Connect the GPS antenna and position it in a location with a clear view of the sky (e.g., on the dashboard).
- Connect any additional accessories such as USB cables, external microphone, or reverse camera input as required.
- Test Functionality:
- Before fully reassembling, temporarily reconnect the car battery.
- Turn on the ignition and power on the EZoneTronics unit.
- Test basic functions: power on/off, audio output, radio reception, touchscreen response, and steering wheel controls.
- If any issues arise, disconnect the battery and recheck all connections.
- Reassembly:
- Once all functions are verified, disconnect the battery again.
- Carefully mount the EZoneTronics unit into the dashboard opening, securing it with screws.
- Reinstall all trim panels.
- Reconnect the negative terminal of the car battery.
5. Operating Instructions
This section details the various features and how to operate your EZoneTronics Android Car Radio Stereo.
5.1. Basic Operation
- Power On/Off: Press and hold the power button (usually on the left side of the unit) to turn the device on or off. A short press typically mutes/unmutes audio.
- Volume Control: Use the volume buttons or the touchscreen interface to adjust audio levels.
- Home Screen: Tap the Home icon to return to the main Android interface.
- Navigation: Swipe left/right on the screen to access different app pages. Tap icons to launch applications.
5.2. CarPlay and Android Auto
The unit supports both Apple CarPlay and Android Auto for seamless smartphone integration.
- Connection: Connect your smartphone to the unit via a USB cable. The system should automatically detect and launch CarPlay or Android Auto.
- Functionality: Access navigation, music, calls, and messages directly from your phone's interface displayed on the car stereo screen.

Image 5.2.1: The car stereo displaying the CarPlay and Android Auto interfaces. This image illustrates how a smartphone can be integrated to project its navigation, music, and communication apps onto the larger car display, enhancing convenience and safety.
5.3. FM & RDS Radio
Tune into your favorite radio stations with clear reception and RDS information.
- Accessing Radio: Tap the "Radio" icon on the home screen.
- Scanning: Use the scan function to automatically find and save available stations.
- Presets: Save up to 18 FM stations for quick access.
- RDS (Radio Data System): Displays station information such as song title, artist, or traffic announcements where available.

Image 5.3.1: The car stereo displaying the FM radio interface with RDS information. This image shows the frequency display, preset buttons, and options for scanning and adjusting radio settings.
5.4. Split Screen Functionality
Multitask efficiently by running two applications simultaneously on the screen.
- Activating Split Screen: While an app is open, press and hold the recent apps button or drag an app to one side of the screen. Select another app to fill the other half.
- Usage: For example, use navigation on one side and play music or a video on the other.

Image 5.4.1: The car stereo screen demonstrating the split-screen feature. One half displays a navigation map, while the other half shows a video playback, illustrating the device's multitasking capability.
5.5. GPS Navigation
Utilize integrated GPS for accurate and reliable navigation.
- Online/Offline Maps: Supports various online navigation apps (e.g., Google Maps) and can also use offline maps.
- GPS Antenna: Ensure the GPS antenna is properly installed and positioned for optimal signal reception.
- Route Planning: Enter your destination to receive turn-by-turn directions and real-time traffic updates (with online maps).

Image 5.5.1: The car stereo displaying the GPS navigation interface. This image shows a detailed map with route information, estimated time of arrival, and distance to destination, along with icons for various navigation applications.
5.6. Steering Wheel Control (SWC)
Integrate with your vehicle's existing steering wheel buttons for convenient control.
- Configuration: The unit is designed to support original car steering wheel buttons. Configuration may be required in the system settings menu.
- Functions: Control volume, change tracks, answer calls, and more without taking your hands off the wheel.

Image 5.6.1: The car stereo displaying a music playback interface, with an inset showing a car's steering wheel buttons. This image highlights the integration of steering wheel controls for managing audio and other functions, promoting safer driving.
5.7. Bluetooth 4.0
Connect your smartphone wirelessly for hands-free calling and audio streaming.
- Pairing: Enable Bluetooth on your smartphone and search for the EZoneTronics device. Select it and confirm the pairing code.
- Hands-free Calls: Make and receive calls directly through the car stereo. Sync contacts for easy dialing.
- Bluetooth Music: Stream audio from your phone to the car speakers.

Image 5.7.1: The car stereo displaying the Bluetooth interface, showing options for hands-free calls, contact synchronization, call records, and Bluetooth music playback. An illustration of a phone connected via Bluetooth is also present.
5.8. Picture-in-Picture (PIP)
Enhance your user experience with floating screen playback settings.
- Activating PIP: Specific applications may support Picture-in-Picture mode, allowing a video or navigation window to float over other applications.
- Customization: Adjust the size and position of the PIP window as needed.

Image 5.8.1: The car stereo displaying the Picture-in-Picture feature, where a small video window is overlaid on the main home screen interface, demonstrating enhanced multitasking capabilities.
5.9. AHD Camera Support
Connect a high-definition AHD reversing camera for improved visibility when backing up.
- Automatic Display: When a compatible AHD camera is connected and the vehicle is put into reverse, the screen will automatically switch to the camera view.
- Settings: Adjust camera settings, such as parking lines and volume during reversing, through the system menu.
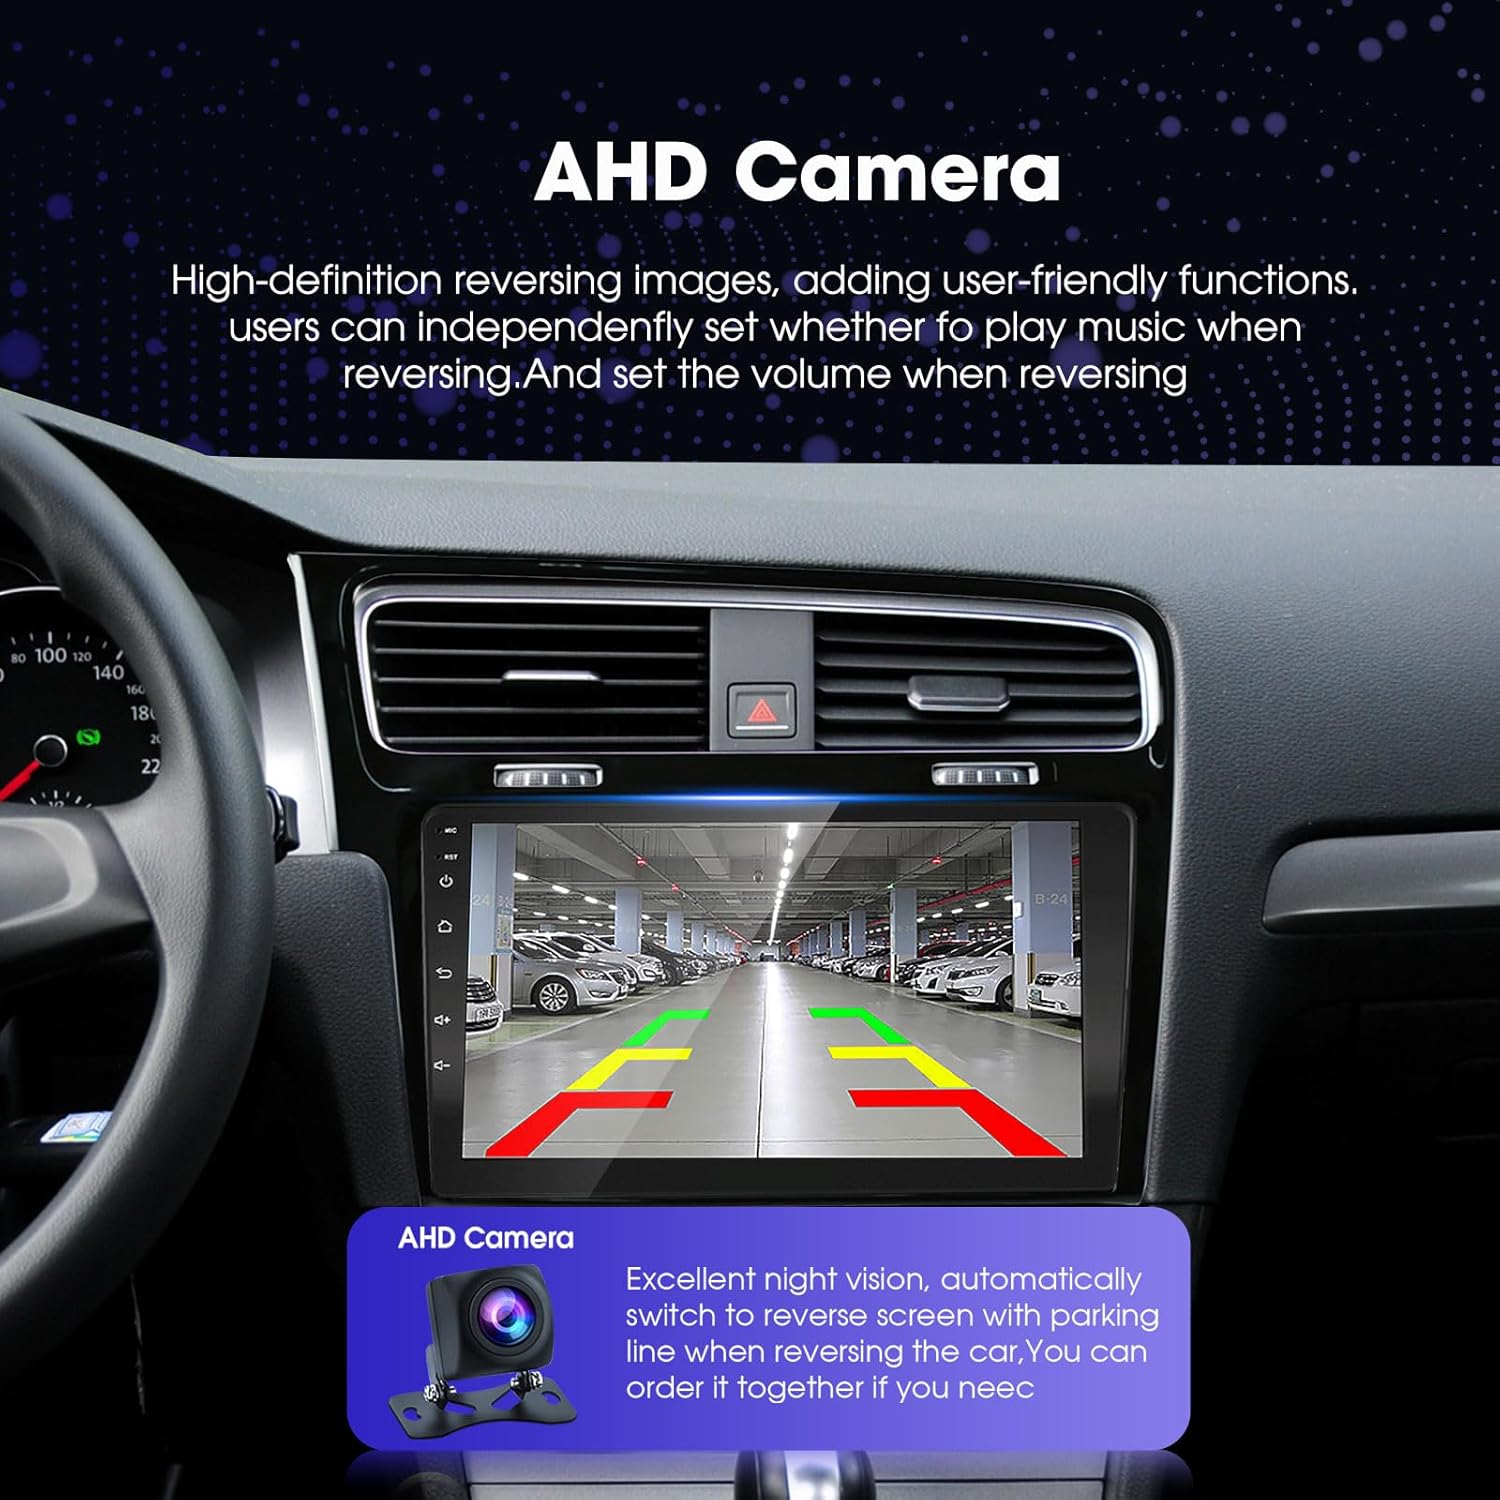
Image 5.9.1: The car stereo displaying the view from an AHD reversing camera. The image shows a clear, wide-angle view of a parking lot with overlaid parking guidelines, indicating enhanced safety features.
6. Maintenance
Proper maintenance ensures the longevity and optimal performance of your car stereo.
- Screen Cleaning: Use a soft, lint-free cloth to gently wipe the touchscreen. For stubborn smudges, slightly dampen the cloth with water or a screen-safe cleaner. Avoid harsh chemicals.
- Software Updates: Periodically check for software updates through the system settings or the manufacturer's website to ensure you have the latest features and bug fixes.
- Ventilation: Ensure the ventilation openings on the unit are not blocked to prevent overheating.
- Environmental Conditions: Avoid exposing the unit to extreme temperatures, direct sunlight, or high humidity for extended periods.
7. Troubleshooting
Refer to this section for common issues and their solutions. If the problem persists, contact customer support.
| Problem | Possible Cause | Solution |
|---|---|---|
| No Power | Loose power connection, blown fuse, incorrect wiring. | Check power cables and connections. Inspect vehicle's fuse box and the unit's fuse. Ensure correct wiring. |
| No Sound | Volume muted, speaker wires disconnected, incorrect audio settings. | Check volume level and mute status. Verify speaker wire connections. Adjust audio output settings in the system menu. |
| GPS Signal Lost/Inaccurate | GPS antenna improperly placed or disconnected, environmental interference. | Ensure GPS antenna has a clear view of the sky and is securely connected. Avoid parking in covered areas. |
| Bluetooth Connection Issues | Device not in pairing mode, incorrect pairing code, interference. | Ensure both devices are in pairing mode. Re-pair the devices. Clear previous Bluetooth connections. |
| Touchscreen Unresponsive | Software glitch, screen calibration issue, physical damage. | Restart the unit. Check for screen calibration options in settings. If physically damaged, contact support. |
| Steering Wheel Controls Not Working | Incorrect wiring, software configuration. | Verify SWC wiring connections. Access system settings to configure or re-learn steering wheel buttons. |
8. Specifications
| Feature | Detail |
|---|---|
| Brand | EZoneTronics |
| Model | RMCT-VW-GLF7-2G32 |
| Operating System | Android 10 |
| Screen Size | 10.1 Inches |
| Human Interface Input | Touchscreen |
| Output Wattage | 45 Watts |
| Number of Channels | 4 |
| RAM | 2GB |
| ROM (Internal Storage) | 32GB |
| Bluetooth Version | 4.0 |
| Product Dimensions | 30 x 22 x 16 cm |
| Item Weight | 1.64 kg |
| Compatibility | VW Golf 7 / Golf VII (2012-2020) |

Image 8.1: Product label showing compliance marks (FC, CE, RoHS), manufacturer name (EZoneTronics), country of origin (Made in China), and WEEE (Waste Electrical and Electronic Equipment) recycling symbol. It also includes EC REP contact information.
9. Warranty and Support
For warranty information, technical support, or service inquiries, please refer to the documentation included with your purchase or contact EZoneTronics customer service directly. Contact details can typically be found on the manufacturer's official website or on the product packaging.
Please have your model number (RMCT-VW-GLF7-2G32) and purchase date ready when contacting support.


