Akasa Newton CTN Fanless Case for Intel 11th Gen NUC Core i3 (A-NUC75-M1B)
Instruction Manual
1. Product Overview
The Akasa Newton CTN (model A-NUC75-M1B) is a compact, fanless aluminum case specifically designed for Intel 11th Generation NUC Core i3 (Tiger Canyon) boards, including models NUC11TNKi3, NUC11TNHi3, and NUC11TNBi3. This case provides a completely silent computing experience by utilizing passive CPU cooling technology to efficiently dissipate heat. Its robust and compact design, measuring 1.06 liters, supports VESA mounting and includes space for one M.2 SSD. The Newton CTN is ideal for applications requiring silent operation, such as digital signage, remote offices, or any environment where multiple displays are used and an uncluttered desk is desired.
Image 1.1: Akasa Newton CTN fanless case, showcasing its design and compatibility with Intel 11th Gen NUC Core i3.
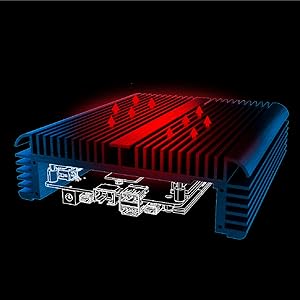
Image 1.2: Diagram illustrating the passive cooling technique used by the Akasa Newton CTN case to dissipate heat without a fan.
2. Package Contents
Before beginning installation, please verify that all components are present in your package:
Akasa Newton CTN Fanless Case
Thermal Compound (syringe)
Thermal Pads
Thermal Module (for CPU)
Anti-Static Wristband
Screws for Motherboard (M3) & Washers
Case Feet Kit (feet and screws)
Internal cables (e.g., power button, USB headers)
Instruction Manual (this document)
Image 2.1: Overview of the Akasa Newton CTN case and its various components included in the package.
3. Setup and Installation
Follow these steps to properly install your Intel NUC board into the Akasa Newton CTN fanless case. It is recommended to wear an anti-static wristband during the installation process to prevent damage to sensitive electronic components.
3.1 Preparation
Unpack the Case: Carefully remove the Akasa Newton CTN case and all accessories from its packaging.
Remove Case Cover: Unscrew the four screws on the bottom of the case and gently slide off the bottom cover.
Prepare NUC Board: Ensure your Intel NUC board is clean and free of dust. Remove any existing thermal solution from the CPU.
Apply Thermal Pads: Apply the provided thermal pads to the designated areas on the NUC motherboard, typically around the CPU and other heat-generating components.
Apply Thermal Compound: Apply a small amount of the thermal compound to the center of the CPU on the NUC board.
Attach Thermal Module: Carefully place the thermal module onto the CPU, ensuring it aligns with the mounting holes. Secure it with the provided screws.
Image 3.1: Intel NUC motherboard with thermal pads correctly positioned.
3.2 NUC Board Installation
Insert NUC Board: Carefully slide the prepared NUC board into the Akasa Newton CTN case, ensuring all ports align with the case cutouts.
Secure NUC Board: Use the provided M3 screws and washers to secure the NUC board to the standoffs inside the case. Do not overtighten.
Install M.2 SSD: If applicable, insert your M.2 SSD into the corresponding slot on the NUC board and secure it with the provided screw.
Install RAM: Insert the RAM modules into their respective slots on the NUC board until they click into place.
Apply Thermal Gap Filler (for M.2 SSD): If your M.2 SSD requires additional cooling, apply the thermal gap filler and thermal module (if provided) to the SSD.
Image 3.2: Intel NUC motherboard securely installed within the Akasa Newton CTN case.
3.3 Final Assembly
Connect Internal Cables: Connect any necessary internal cables, such as the power button cable, to the NUC board.
Close Case: Slide the bottom cover back onto the case and secure it with the four screws removed earlier.
Attach Case Feet: Screw the provided case feet onto the bottom of the case.
3.4 Installation Video Guide
For a visual guide on the installation process, please refer to the official Akasa Newton CTN Installation video below:
Video 3.1: Official Akasa Newton CTN Installation Guide. This video demonstrates the step-by-step process of assembling the Intel NUC board into the fanless case, including thermal management and component installation.
4. Operating Instructions
The Akasa Newton CTN case is designed for passive cooling, meaning it relies on its aluminum chassis to dissipate heat. To ensure optimal performance and longevity:
Placement: Position the case in an area with good airflow. Avoid enclosing it in tight spaces or placing it directly against other heat-generating devices.
Orientation: The case can be placed horizontally or mounted vertically using VESA mounts. Ensure the fins are not obstructed.
Power On/Off: Use the power button on the front of the case to turn the system on or off.
Connectivity: Utilize the available USB 2.0, USB 3.0, HDMI, and Type-C ports for connecting peripherals and displays.
Image 4.1: The Akasa Newton CTN case VESA mounted behind a monitor, demonstrating its space-saving capabilities for an uncluttered workspace.
Image 4.2: Detailed view of the Akasa Newton CTN case's front and rear panels, highlighting the various ports and features like Kensington lock hole and antenna holes.
5. Maintenance
Minimal maintenance is required for the Akasa Newton CTN fanless case due to its passive cooling design. However, regular checks can ensure optimal performance:
Dust Removal: Periodically wipe the exterior of the case with a soft, dry cloth to remove dust. Ensure the cooling fins are clear of obstructions.
Connection Check: Occasionally check all external cable connections (power, display, USB) to ensure they are secure.
Thermal Paste/Pads: While designed for long-term use, if you notice a significant increase in operating temperature over time, consider reapplying thermal paste and replacing thermal pads. This is typically not required under normal operating conditions.
6. Troubleshooting
If you encounter issues with your Akasa Newton CTN case, refer to the following common troubleshooting steps:
System Not Powering On:
Verify the power adapter is correctly connected to both the wall outlet and the NUC board.
Ensure the internal power button cable is securely connected to the NUC board.
Check that the NUC board is properly seated and all screws are tightened (but not overtightened).
Overheating Issues:
Confirm that the thermal compound and thermal module are correctly installed and making good contact with the CPU.
Ensure the thermal pads are properly placed on other heat-generating components.
Check for adequate airflow around the case; avoid placing it in enclosed spaces.
Verify that the case screws are tightened sufficiently to ensure proper contact between the thermal module and the case.
No Display Output:
Ensure the display cable (HDMI, Type-C) is securely connected to both the NUC and the monitor.
Check that the monitor is powered on and set to the correct input source.
Verify that the NUC board is fully powered on.
Some users have reported slight port misalignment; ensure cables are firmly inserted.
USB or Other Port Malfunction:
Ensure the peripheral is functioning correctly by testing it on another device.
Verify that the NUC board is properly seated and not obstructing the ports.
If problems persist after following these steps, please contact Akasa customer support for further assistance.
2.19 x 6.64 x 2.19 inches (approx. 5.56 x 16.87 x 5.56 cm)
Cooling Method
Heatsink (Fanless Passive Cooling)
USB 2.0 Ports
2
USB 3.0 Ports
2
M.2 SSD Support
Yes, supports one M.2 SSD
VESA Mounting
Yes
Serial Port
Yes, one rear serial port
8. Warranty and Support
For warranty information, technical support, or to report any issues not covered in this manual, please visit the official Akasa website or contact their customer service department. Keep your proof of purchase for warranty claims.
Akasa Newton TN Fanless Case User Manual User manual for the Akasa Newton TN fanless case, providing installation instructions, safety precautions, and component details for Intel NUC models.
Akasa A-NUC103-M1B User Manual: Installation Guide for ASUS NUC Comprehensive user manual and installation guide for the Akasa A-NUC103-M1B fanless case, designed for ASUS NUC 14/15 Pro, NUC 12/13 Pro, and NUC 11 Pro. Includes safety precautions, parts list, and step-by-step installation instructions.
Akasa A-NUC101-M1B Turing RC Pro NUC Chassis User Manual User manual and installation guide for the Akasa A-NUC101-M1B Turing RC Pro compact fanless chassis. Features detailed assembly steps, component lists, and safety information for Intel NUC systems.