Introduction
This manual provides instructions for the installation and maintenance of the Fodsports Accessory Clamp Kits, designed for use with Fodsports FX6, FX6S, and FX-S Motorcycle Bluetooth Intercom Headsets. Please read this manual thoroughly before installation to ensure proper use and longevity of the product.
Product Overview
The Fodsports Accessory Clamp Kit offers versatile mounting solutions for your Fodsports intercom unit. It includes both a traditional clamp and an adhesive mount, along with necessary hardware, to securely attach your intercom to various helmet types.
What's in the Box
The Fodsports Accessory Clamp Kit includes the following components:
- Clamp Bracket
- Adhesive Mount Base
- Mounting Screws
- L-shaped Screwdriver
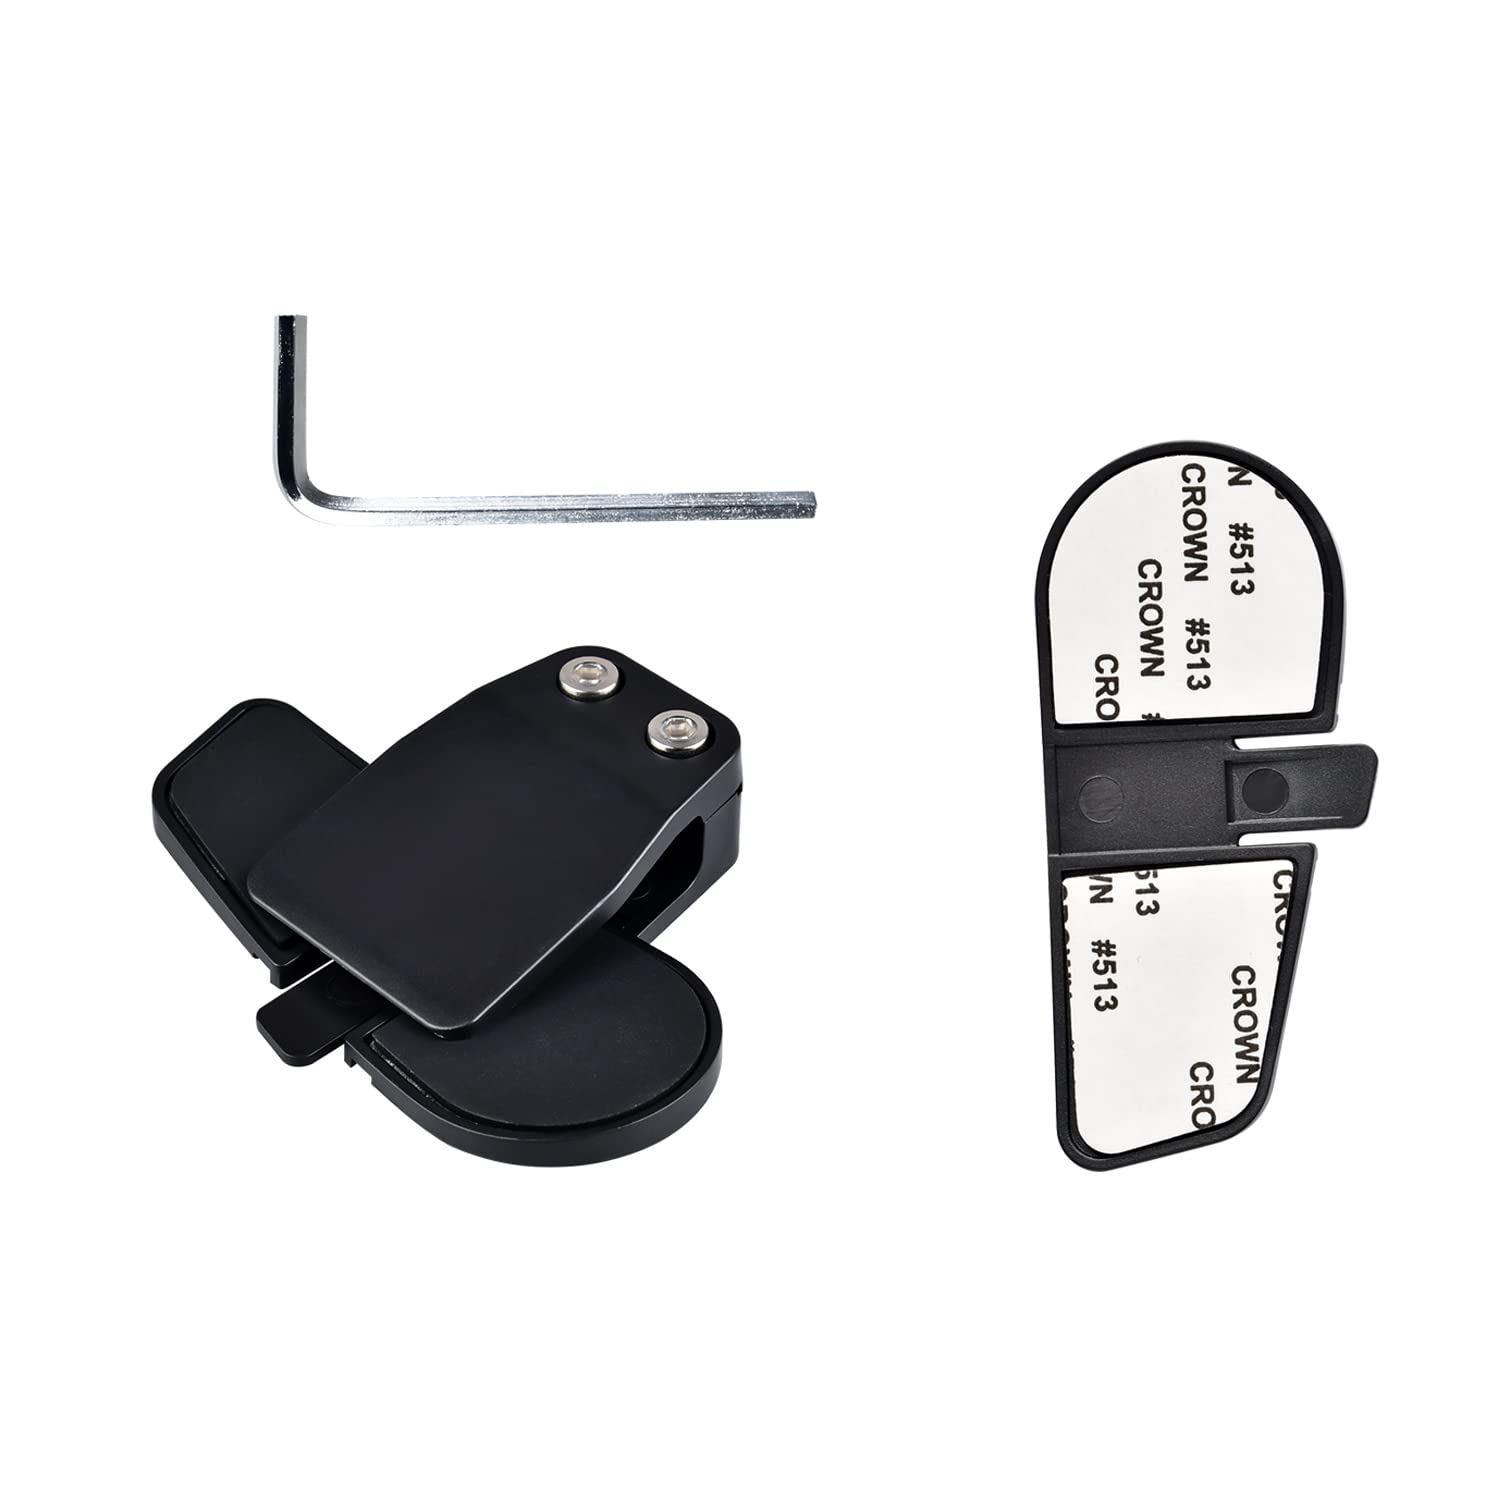
Image description: A complete view of the Fodsports Accessory Clamp Kit components, including the clamp bracket, adhesive mount base, screws, and an L-shaped screwdriver.
Setup and Installation
Before installation, ensure your helmet surface is clean and dry.
Choosing Your Mounting Method
The kit provides two primary methods for attaching your intercom unit to your helmet: the clamp bracket or the adhesive mount base.
Clamp Bracket Installation
- Locate a suitable position on the left side of your helmet, typically between the outer and inner shells, where the clamp can securely grip.
- Loosen the screws on the clamp bracket using the provided L-shaped screwdriver.
- Slide the clamp bracket onto the edge of your helmet, ensuring it is firmly seated.
- Tighten the screws to secure the clamp bracket in place. Do not overtighten.
- Slide your Fodsports intercom unit onto the installed clamp bracket until it clicks into place.

Image description: A close-up view of the Fodsports clamp bracket, showing its design for gripping the helmet edge.
Adhesive Mount Base Installation
- Select a flat, clean area on the left side of your helmet for the adhesive mount. Ensure the surface is free from dirt, grease, or moisture.
- Peel off the protective backing from the adhesive mount base.
- Press the adhesive mount base firmly onto the chosen helmet surface for at least 30 seconds.
- Allow the adhesive to cure for at least 24 hours before attaching the intercom unit to ensure maximum bond strength.
- Slide your Fodsports intercom unit onto the installed adhesive mount base until it clicks into place.

Image description: A close-up view of the Fodsports adhesive mount base, showing the adhesive backing.
Securing the Intercom Unit
Once the clamp or adhesive base is securely attached, slide your Fodsports FX6, FX6S, or FX-S intercom unit onto the mounting bracket. Ensure it is fully engaged and feels stable.

Image description: A Fodsports intercom unit securely mounted on the side of a motorcycle helmet using the clamp kit.
Operating the Clamp Kit
The clamp kit itself does not have operational controls. Its function is to provide a stable and secure mounting point for your Fodsports Bluetooth intercom unit. Once the intercom is attached, refer to the specific user manual for your Fodsports FX6, FX6S, or FX-S intercom for operational instructions regarding its features (e.g., power, pairing, volume, communication).
Maintenance
- Regularly inspect the clamp bracket or adhesive mount for any signs of wear, damage, or loosening.
- Ensure all screws on the clamp bracket remain tight. Re-tighten with the L-shaped screwdriver if necessary, but avoid overtightening.
- Clean the clamp kit components with a soft, damp cloth. Avoid using harsh chemicals or abrasive materials that could damage the plastic or adhesive.
- If using the adhesive mount, periodically check the bond strength. If the adhesive shows signs of weakening, consider replacing the mount or using the clamp bracket.
Troubleshooting
Intercom Unit Feels Loose on Mount
- Check Clamp Screws: If using the clamp bracket, ensure the screws are sufficiently tightened.
- Verify Intercom Engagement: Make sure the intercom unit is fully slid onto the mounting bracket until it locks securely.
- Inspect for Damage: Examine both the clamp kit and the intercom's mounting slot for any cracks or deformities that might prevent a secure fit.
Adhesive Mount Not Sticking
- Surface Preparation: Ensure the helmet surface was thoroughly cleaned and dried before application.
- Curing Time: Allow the adhesive to cure for the recommended 24 hours before attaching the intercom unit.
- Temperature: Apply the adhesive in a moderate temperature environment (e.g., room temperature) for optimal bonding. Extreme cold or heat can affect adhesion.
- Surface Type: The adhesive works best on smooth, non-porous surfaces.
Clamp Bracket Does Not Fit Helmet Edge
- Helmet Compatibility: Some helmet designs may have edges that are too thick or shaped unusually for the standard clamp bracket. In such cases, the adhesive mount base is the recommended alternative.
Specifications
| Feature | Detail |
|---|---|
| Model Name | Clamp Kits for FX6 FX6S FX-S |
| Brand | Fodsports |
| Material | Plastic |
| Included Components | Clamp with Screw, Adhesive Mount |
| Compatible Devices | Fodsports FX6, FX6S, FX-S Motorcycle Bluetooth Intercom Headsets |
| Item Weight | 0.986 ounces (approx. 0.03 Kilograms) |
| Package Dimensions | 6.77 x 5.04 x 0.67 inches |
Note: Specifications are subject to change without prior notice.
Warranty and Support
For warranty information or technical support regarding your Fodsports Accessory Clamp Kit, please refer to the documentation included with your original Fodsports intercom unit or visit the official Fodsports website. You may also contact Fodsports customer service directly for assistance.
Official Fodsports Store on Amazon: Fodsports Store