1. Introduction
Thank you for choosing the SHUA Commercial Spin Bike SH-B8860s. This manual provides essential information for the safe and effective assembly, operation, and maintenance of your new spin bike. Please read this manual thoroughly before using the equipment and keep it for future reference.

Figure 1: SHUA Commercial Spin Bike SH-B8860s. This image shows the complete spin bike from a side angle, highlighting its robust frame, flywheel, seat, and handlebars.
2. Safety Information
Before beginning any exercise program, consult with your physician. It is important to understand all safety precautions before operating this equipment.
- Ensure all bolts and nuts are securely tightened before each use.
- Keep children and pets away from the equipment during operation.
- Place the spin bike on a flat, stable surface.
- Wear appropriate exercise attire and footwear.
- Do not exceed the maximum user weight of 150 kg.
- If you feel faint, dizzy, or experience pain, stop exercising immediately.
- The resistance knob also functions as an emergency brake. Push it down firmly to stop the flywheel immediately.
3. Package Contents
Carefully unpack all components and verify that all parts are present. If any parts are missing or damaged, contact SHUA customer service immediately.
- Main Frame Assembly
- Handlebar Post and Handlebars
- Seat Post and Seat
- Front and Rear Stabilizers
- Pedals (Left and Right)
- Electronic Meter (LCD)
- Hardware Kit (bolts, washers, nuts, tools)
- User Manual (this document)
4. Setup and Assembly
Assembly typically requires two people. Follow these general steps. Refer to the included assembly diagram for detailed instructions.
- Attach Stabilizers: Secure the front and rear stabilizers to the main frame using the provided bolts and washers.
- Install Pedals: Identify the left (L) and right (R) pedals. The left pedal screws counter-clockwise, and the right pedal screws clockwise. Ensure they are tightly secured to the crank arms.

Figure 2: Close-up of the spin bike pedal with foot straps. Note the 'L' or 'R' marking for correct installation.
- Mount Seat Post and Seat: Insert the seat post into the main frame and secure it. Attach the seat to the seat post.
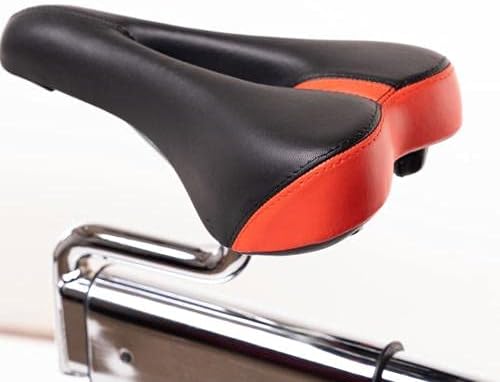
Figure 3: Ergonomic seat design for the spin bike, showing its black and red cushioning.
- Install Handlebar Post and Handlebars: Insert the handlebar post into the frame and attach the handlebars.
- Connect Electronic Meter: Attach the electronic meter to the handlebar post and connect any necessary sensor cables.
- Final Check: Double-check all connections and ensure the bike is stable before first use.
5. Operating Instructions
5.1 Adjusting Seat and Handlebars
- Seat Height: Adjust the seat height so that your leg has a slight bend at the knee when the pedal is at its lowest point.
- Seat Forward/Backward: Adjust the seat horizontally so that your knee is directly above the pedal axle when the pedals are horizontal.
- Handlebar Height: Adjust the handlebars to a comfortable height, typically level with or slightly higher than the seat for beginners.
5.2 Adjusting Resistance and Braking
The SH-B8860s features a manual rotary resistance system.
- Increase Resistance: Turn the resistance knob clockwise to increase the pedaling resistance.
- Decrease Resistance: Turn the resistance knob counter-clockwise to decrease the pedaling resistance.
- Emergency Brake: Press the resistance knob down firmly to engage the emergency brake and stop the flywheel immediately.

Figure 4: Close-up of the red resistance knob, which also functions as an emergency brake.
5.3 Using the Electronic Meter
The LCD electronic meter displays various workout data.
- Functions: Typically displays Time, Speed, Distance, Calories, and Pulse (via hand pulse sensors).
- Operation: Consult the separate manual for the electronic meter for detailed instructions on its functions and settings.
6. Maintenance
Regular maintenance ensures the longevity and safe operation of your spin bike.
- Cleaning: Wipe down the bike with a damp cloth after each use to remove sweat and dust. Do not use abrasive cleaners.
- Lubrication: Periodically check and lubricate moving parts as recommended in the assembly guide.
- Tightness Check: Regularly inspect all nuts, bolts, and connections for tightness. Tighten as necessary.
- Flywheel and Brake Pad: Keep the flywheel clean. Check the brake pad for wear and replace if necessary.
7. Troubleshooting
| Problem | Possible Cause | Solution |
|---|---|---|
| Squeaking/Noisy Operation | Loose parts, lack of lubrication, worn brake pad. | Check and tighten all bolts. Lubricate moving parts. Inspect and replace brake pad if worn. |
| Inconsistent Resistance | Resistance mechanism issue, dirty flywheel. | Clean the flywheel. Check the resistance pad for proper contact. |
| Pedals feel loose | Pedals not tightened correctly. | Ensure pedals are fully threaded and tightened (remember left pedal is reverse threaded). |
| Electronic Meter not working | Dead battery, loose connection. | Replace batteries. Check all sensor cable connections. |
8. Specifications
| Feature | Detail |
|---|---|
| Model Name | SH-B8860s |
| Resistance System | Manual Rotary System |
| Wheel Weight | 20 kg (Plating Wheel) |
| Maximum User Weight | 150 kg |
| Dimensions (L x W x H) | 1503 x 717 x 1384 mm (approx. 150 x 75 x 140 cm) |
| Net Weight | 68 kg |
| Electronic Meter | 136 x 71 mm LCD with Hand Pulse Sensor |
| Crank Length | 25 x 182 mm |
| Material Type | Aluminum |
| Color | Black |
| Features | Adjustable Seat, Speed Monitor |
9. Warranty and Support
SHUA products are manufactured to high-quality standards. For specific warranty details, please refer to the warranty card included with your product or visit the official SHUA website.
For technical support, spare parts, or service inquiries, please contact SHUA customer service.
- Brand: SHUA
- Manufacturer: SHUA
- Model Number: SH-B8860s
- Website: www.shua.com (Note: This is a placeholder URL, please refer to your product documentation for the official support contact.)


Figure 5: SHUA Brand Logo and ACSM Certification, indicating commitment to quality and health standards.


