
1. Product Overview
The HALO HLBSL6099FS351EMWR is a 6-inch white, round LED direct mount retrofit kit. This lighting fixture is designed for straightforward installation into drywall ceilings, specifically accommodating thicknesses between 1/2 inch and 1-1/4 inches, utilizing its integrated spring clips. It is suitable for direct contact with insulation, though its use with spray foam insulation is not recommended. The kit includes a remote control for convenient operation.
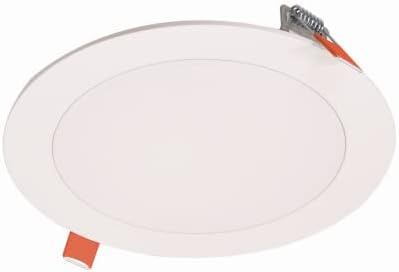
Figure 1: HALO HLBSL6099FS351EMWR 6-inch Round LED Direct Mount Kit. This image displays the white, round LED light fixture with its integrated spring clips visible on the side, indicating its design for direct ceiling mounting.
2. Safety Information
Please read and understand all instructions before beginning installation. Failure to follow these instructions may result in electric shock, fire, or other hazards that could cause personal injury or property damage.
- Always disconnect power at the circuit breaker before installation or servicing.
- Ensure all electrical connections comply with local codes and ordinances, as well as the National Electric Code (NEC).
- This product must be installed in accordance with the applicable installation code by a person familiar with the construction and operation of the product and the hazards involved.
- Do not use with spray foam insulation.
- Do not modify the fixture in any way.
- Consult a qualified electrician if you are unsure about any part of the installation process.
3. Package Contents
Verify that all components are present before proceeding with installation.
- HALO HLBSL6099FS351EMWR 6-inch Round LED Direct Mount Kit (Quantity: 4)
- Remote Control (Quantity: 1)
- Installation Guide (This manual)
4. Setup and Installation
This LED kit is designed for direct installation into drywall ceilings. Ensure the power is OFF at the circuit breaker before starting.
- Prepare the Opening: Cut a 6-inch diameter hole in the drywall ceiling at the desired installation location. Ensure the drywall thickness is between 1/2 inch and 1-1/4 inches.
- Wiring: Connect the fixture's wiring to the building's electrical supply wires. Follow standard electrical wiring practices:
- Connect the black wire from the fixture to the black (hot) wire from the supply.
- Connect the white wire from the fixture to the white (neutral) wire from the supply.
- Connect the green or bare copper wire from the fixture to the green or bare copper (ground) wire from the supply.
- Mount the Fixture: Gently push the LED fixture into the prepared ceiling opening. The attached spring clips will automatically engage and secure the fixture to the drywall. Ensure the fixture is flush with the ceiling surface.
- Restore Power: Once the fixture is securely installed and all connections are made, restore power at the circuit breaker.
Important Note: This fixture can come into direct contact with insulation. However, it is not recommended for use with spray foam insulation.
5. Operating Instructions
The HALO HLBSL6099FS351EMWR LED kit is operated via a wall switch or the included remote control.
5.1. Wall Switch Operation
Simply toggle the wall switch connected to the fixture to turn the light ON or OFF.
5.2. Remote Control Operation
The included remote control provides additional functionality. Refer to the remote control's specific instructions for pairing and advanced features, if applicable. Typical remote functions include:
- ON/OFF: Power the light on or off.
- Dimming: Adjust the brightness level.
- Color Temperature Adjustment: Change the light's color temperature (e.g., warm white to cool white), if supported by the model.
Ensure the remote control has working batteries and is within range of the fixture for proper operation.
6. Maintenance
The HALO HLBSL6099FS351EMWR LED fixture requires minimal maintenance.
- Cleaning: Disconnect power before cleaning. Wipe the fixture with a soft, damp cloth. Do not use abrasive cleaners or solvents, as these may damage the finish or electrical components.
- LED Longevity: The integrated LED light source is designed for long life and does not require bulb replacement.
7. Troubleshooting
If you experience issues with your HALO LED fixture, refer to the following common troubleshooting steps:
| Problem | Possible Cause | Solution |
|---|---|---|
| Light does not turn ON. |
|
|
| Light flickers or dims unexpectedly. |
|
|
| Remote control not working. |
|
|
If the problem persists after trying these steps, contact HALO customer support or a qualified electrician.
8. Specifications
| Model Number | HLBSL6099FS351EMWR |
| Brand | HALO |
| Light Source Type | LED |
| Shape | Round |
| Color | White |
| Voltage | 120 Volts |
| Material Type | Plastic |
| Number of Pieces | 4 (per kit) |
| Connectivity Technology | USB (likely for remote or specific feature) |
| Manufacturer | Cooper Lighting LLC |
| UPC | 080083916382 |
9. Warranty and Support
For warranty information and customer support, please refer to the official HALO Lighting website or contact their customer service directly. Keep your purchase receipt for warranty claims.
Manufacturer: Cooper Lighting LLC


