
1. Introduction
Thank you for choosing the DayPlus 4.6L Fire-Resistant Steel Wall Safe. This manual provides essential information for the safe and efficient operation of your new security product. Please read these instructions carefully before installation and use, and retain them for future reference.
This safe is designed to protect your valuables, such as cash, jewelry, important documents, and other personal items, from theft. It features a robust steel construction, an electronic combination lock, and an emergency override key system.

Image 1.1: The DayPlus 4.6L Steel Wall Safe, showing its compact dimensions of approximately 23cm (9.06 inches) wide, 17cm (6.70 inches) deep, and 17cm (6.70 inches) high. The image also displays the two override keys and anchoring bolts included with the safe.
2. Safety Information
Please observe the following safety precautions to ensure proper use and prevent injury or damage:
- Keep Override Keys Secure: Always store the override keys in a secure location away from the safe. Do not store them inside the safe.
- Battery Safety: Use only the specified battery type (4 x AA 1.5V). Do not mix old and new batteries or different battery types. Remove batteries if the safe will not be used for an extended period.
- Mounting: Ensure the safe is securely mounted to a solid structure (wall, floor, or cabinet) using the provided anchoring bolts to prevent unauthorized removal.
- Children: Keep the safe and its keys out of reach of children.
- Fire Resistance: While the safe is fire-resistant, it is not fireproof. Extreme temperatures may still damage contents.
3. Product Features
- Material: Solid steel construction with a 2mm thick body and a 4mm thick front door for enhanced security.
- Locking Mechanism: Electronic digital PIN code (3-8 digits) and emergency override key.
- Security Features: Internal tamper-proof hinges, lockout period after 3 incorrect PIN attempts.
- Interior: Soft velvet padding on the bottom to protect contents.
- Mounting: Pre-drilled holes and anchoring bolts for secure installation on walls, floors, or inside cabinets.
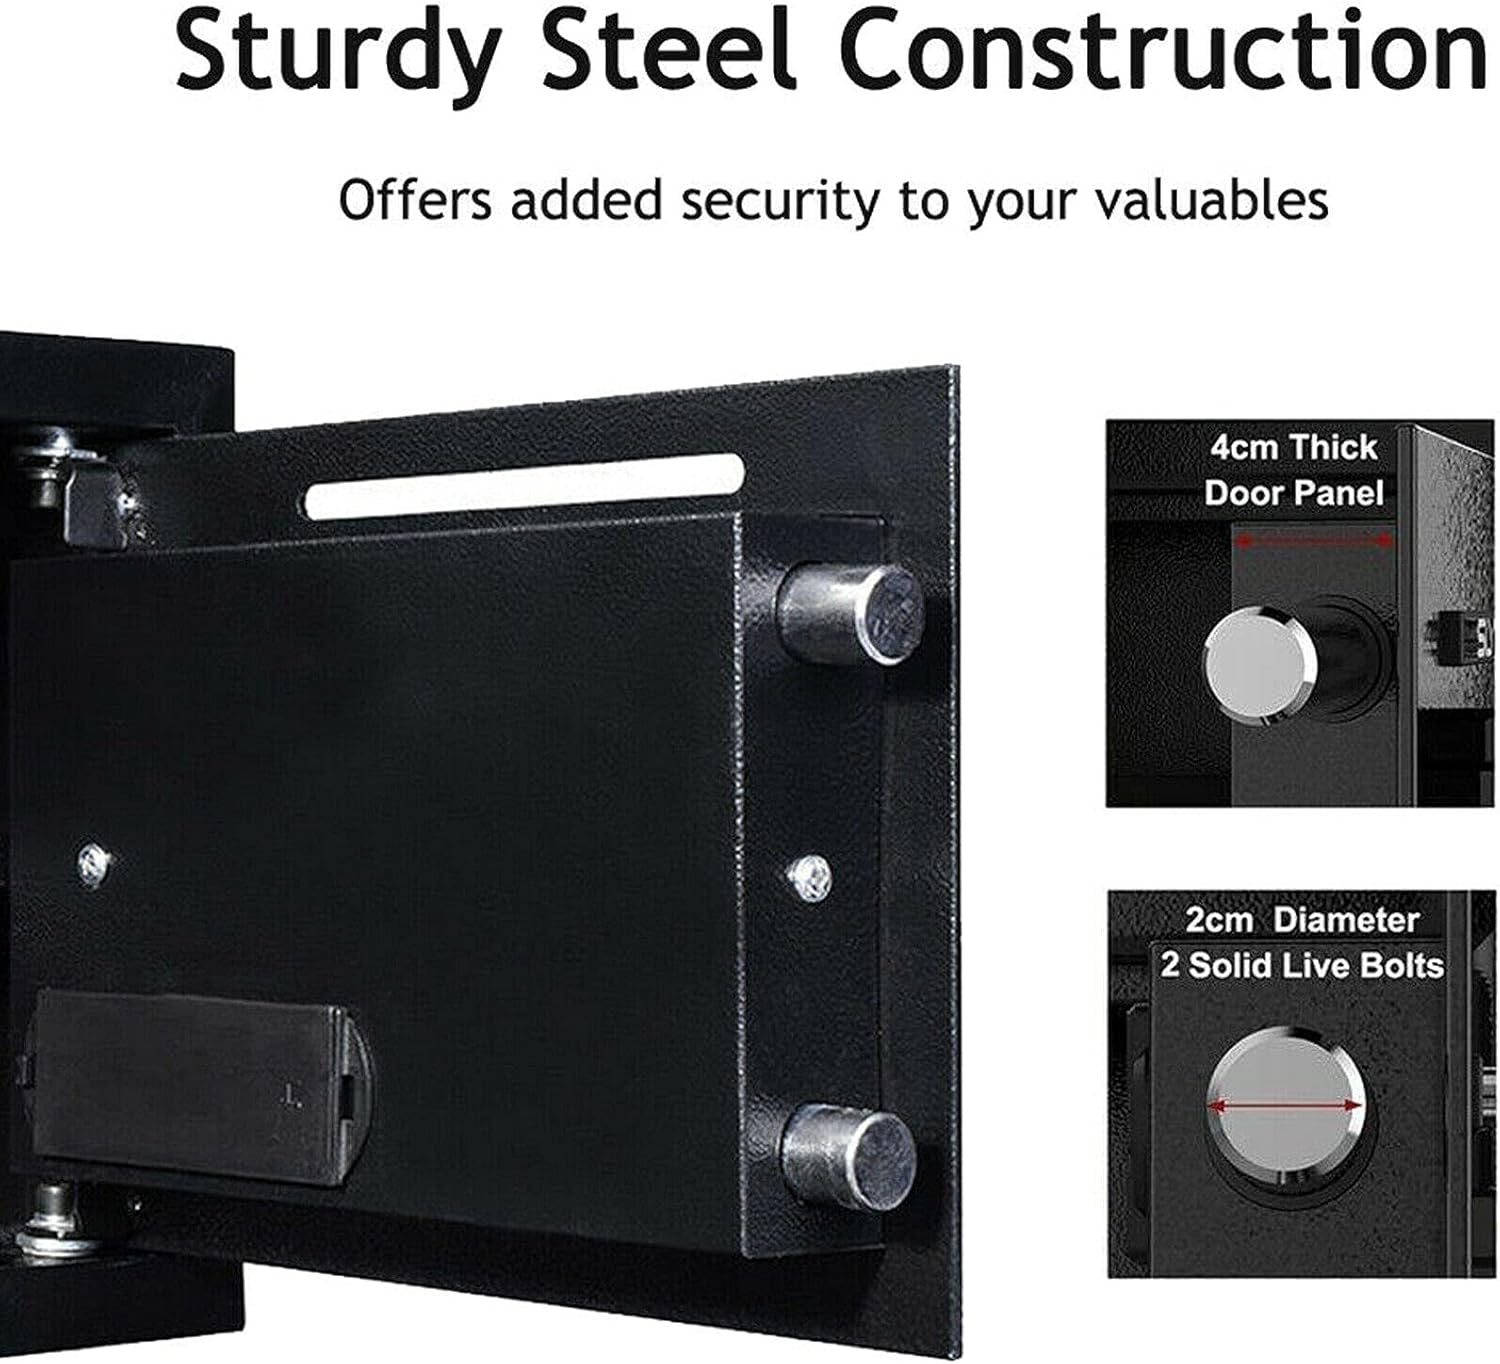
Image 3.1: A close-up view highlighting the sturdy steel construction of the safe. It shows the 4cm thick door panel and two 2cm diameter solid live bolts that secure the door when locked, providing robust protection.

Image 3.2: An illustration demonstrating the layered construction of the safe's material, which includes alloy steel, an anti-rust coating, and environmentally-friendly paint, ensuring durability and protection.
4. Setup and Installation
4.1. Battery Installation
- Locate the battery compartment on the inside of the safe door.
- Insert 4 x AA 1.5V batteries (not included), ensuring correct polarity (+/-).
- Close the battery compartment cover.
4.2. Initial Opening (First Use)
For the first opening, use the override key:
- Insert one of the provided override keys into the keyhole, usually hidden behind a small cover on the keypad.
- Turn the key clockwise.
- Rotate the knob on the keypad clockwise to open the safe door.
4.3. Mounting the Safe
The safe can be mounted to a wall, floor, or inside a cabinet. Choose a discreet and secure location.
- Position the safe in the desired location.
- Mark the positions of the pre-drilled holes on the mounting surface.
- Drill pilot holes into the mounting surface using an appropriate drill bit.
- Align the safe with the drilled holes and secure it using the two 5cm anchoring bolts provided. Ensure the bolts are tightened firmly.
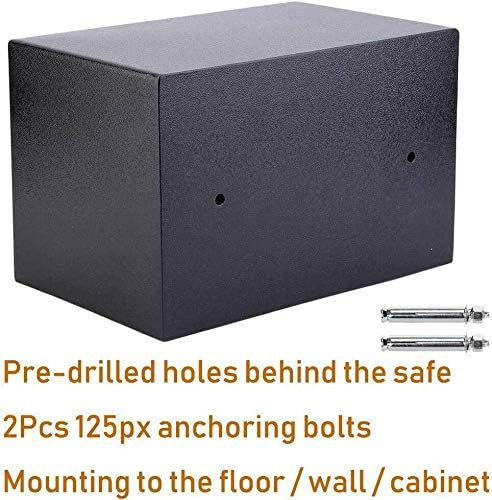
Image 4.1: The rear view of the safe showing the pre-drilled holes for mounting. Below the safe are the two anchoring bolts, approximately 5cm long, used to secure the safe to a wall, floor, or cabinet.
5. Operating Instructions
5.1. Setting Your Personal PIN Code
You can set a security code of 3 to 8 digits using any number from 0 to 9.
- With the safe door open, press the red reset button located on the inside of the door, near the hinges. You will hear a beep, and the yellow indicator light on the keypad will illuminate.
- Enter your desired 3 to 8 digit PIN code.
- Press the 'E' or '#' button to confirm. You will hear a beep, and the yellow light will turn off, indicating the new code is set.
- Test the new code: With the door still open, enter your new PIN code, then press 'E' or '#', and turn the knob to ensure it works before closing the door.
5.2. Opening the Safe with Your PIN Code
- Enter your 3 to 8 digit PIN code on the keypad.
- Press the 'E' or '#' button. The green indicator light will illuminate.
- Within 5 seconds, turn the knob clockwise to open the safe door.

Image 5.1: This image illustrates the two methods of opening the safe: using the digital PIN keypad or the override key. It shows a hand interacting with the keypad, emphasizing the 3-8 digit security code feature.
5.3. Opening the Safe with the Override Key (Emergency)
If you forget your PIN code or the batteries are depleted, you can use the override key:
- Remove the small cover on the keypad to reveal the keyhole.
- Insert the override key and turn it clockwise.
- Turn the knob clockwise to open the safe door.
5.4. Closing and Locking the Safe
- Close the safe door.
- Turn the knob counter-clockwise to engage the locking bolts. The safe is now locked.
5.5. Lockout Period
If 3 incorrect PIN codes are entered consecutively, the safe will enter a lockout period, during which the keypad will be unresponsive for a short time (typically 20-30 seconds). Wait for the lockout period to end before attempting to enter the code again.

Image 5.2: This image displays various items that can be securely stored inside the safe, including cash, jewelry, and important documents. It also reiterates that the safe opens with a digital PIN or override key and supports 3-8 digit security codes.
6. Maintenance
- Cleaning: Wipe the safe's exterior with a soft, damp cloth. Avoid abrasive cleaners or solvents.
- Battery Replacement: Replace batteries promptly when the low battery indicator (if available) illuminates, or if the keypad becomes unresponsive. Always replace all four batteries at once.
- Keyhole Maintenance: Periodically check the keyhole for any obstructions. Do not lubricate the lock mechanism with oil, as this can attract dust and cause issues.
7. Troubleshooting
- Safe does not open with PIN:
- Ensure batteries are fresh and correctly installed.
- Verify you are entering the correct PIN code.
- Check if the safe is in lockout mode (wait for the lockout period to end).
- Try using the override key.
- Keypad is unresponsive:
- Replace batteries.
- Check for any physical damage to the keypad.
- Door does not close properly:
- Ensure no items are obstructing the door or locking bolts.
- Check if the safe is mounted on a level surface.
- Forgotten PIN code:
- Use the override key to open the safe.
- Once open, reset the PIN code following the instructions in Section 5.1.
8. Specifications
| Feature | Specification |
|---|---|
| Model | SBO4.6G-G |
| Capacity | 4.6 Liters |
| Dimensions (External) | 17D x 17H x 23W cm (approx.) |
| Material | Alloy Steel |
| Door Thickness | 4 mm |
| Body Thickness | 2 mm |
| Lock Type | Electronic Combination (3-8 digits), Key Override |
| Power Source | 4 x AA 1.5V Batteries (not included) |
| Mounting Type | Wall Mount (surface mount) |
| Color | Grey |
| Special Feature | Robust construction |

Image 8.1: This image illustrates the versatility of the safe, showing it in various settings such as a home, hotel, store, and office, highlighting its suitability for diverse security needs.
9. Warranty and Support
Information regarding specific warranty terms and availability of spare parts for this product is not provided. For any issues or inquiries, please refer to your point of purchase or contact the retailer for assistance.