
1. Introduction
Thank you for choosing the jar-owl 21V Brushless Cordless Drill Set. This manual provides essential information for the safe and effective operation, maintenance, and care of your new tool. Please read these instructions thoroughly before first use and keep them for future reference.

Image 1.1: The jar-owl 21V Brushless Cordless Drill Set, including the drill, battery, charger, and a comprehensive accessory kit within its carrying case.
2. Safety Information
Always observe basic safety precautions to reduce the risk of fire, electric shock, and personal injury when using power tools. Keep this manual for important safety and operating instructions.
General Power Tool Safety Warnings
- Work Area Safety: Keep your work area clean and well-lit. Cluttered or dark areas invite accidents. Do not operate power tools in explosive atmospheres, such as in the presence of flammable liquids, gases, or dust.
- Electrical Safety: Avoid body contact with earthed or grounded surfaces such as pipes, radiators, ranges, and refrigerators. There is an increased risk of electric shock if your body is earthed or grounded.
- Personal Safety: Always wear eye protection. Use appropriate safety equipment such as dust masks, non-skid safety shoes, hard hats, or hearing protection when necessary. Dress properly; avoid loose clothing or jewelry.
- Tool Use and Care: Do not force the power tool. Use the correct power tool for your application. Disconnect the plug from the power source and/or remove the battery pack from the power tool before making any adjustments, changing accessories, or storing power tools.
Battery Pack Safety Warnings
- Do not disassemble, open, or shred battery packs.
- Do not expose battery packs to heat or fire. Avoid storage in direct sunlight.
- Do not short-circuit a battery pack. Store battery packs away from metal objects that could make a connection between the terminals.
- In case of battery leakage, avoid contact with the skin and eyes. If contact occurs, wash the affected area with plenty of water and seek medical advice.
3. Package Contents
Your jar-owl 21V Brushless Cordless Drill Set includes the following items:
- 1 x 21V Cordless Drill
- 1 x 1.5Ah Lithium-Ion Battery
- 1 x Charger
- 1 x Carrying Case
- 1 x Claw Hammer
- 1 x Water Pump Plier
- 1 x Wire Stripper
- 4 x Precision Screwdrivers
- 8 x Metric and Inch Allen Wrenches
- 10 x Screwdriver Bits
- 1 x Utility Knife
- 1 x Extension Bar
- 1 x Screwdriver Handle
- 1 x Saw
- 3 x Twist Drills (4/5/6mm)
- 3 x Multi-function Drills (4/5/6mm)
- 10 x Steel Blades
- 1 x Digital Voltage Tester
- 1 x 1/4" Bit Connector
- 1 x Measuring Tape (10-foot)
- 1 x Electrical Tape
- 1 x Diagonal Plier
- 1 x Joint Plier
- 1 x Nose Plier
- Hardware Accessories Kit (various screws and anchors)

Image 3.1: All components of the jar-owl 21V Brushless Cordless Drill Set laid out for identification.
4. Product Features
- Brushless Motor: Provides increased efficiency, longer motor life, and reduced maintenance compared to brushed motors.
- High Torque: Delivers up to 319 in-lb (36 N.m) of maximum torque for demanding tasks.
- Variable Speed Control: Two-speed settings (0-350 RPM and 0-1350 RPM) with a pressure-sensitive trigger for precise control.
- 25+1 Clutch Settings: Allows for precise torque adjustment to prevent over-driving screws and damage to materials. The '+1' setting is for drilling mode.
- 3/8" Keyless Chuck: Facilitates quick and easy bit changes without the need for a chuck key.
- 21V 1.5Ah Li-ion Battery: Rechargeable lithium-ion battery with over-voltage, over-temperature, overload, and over-charge protection.
- Integrated LED Light: Illuminates the work area for improved visibility in dimly lit conditions.
- Forward/Reverse Switch: Enables easy switching between driving and removing fasteners.

Image 4.1: The 21V 1.5Ah Li-ion battery, highlighting its multiple protection features for extended lifespan and safety.
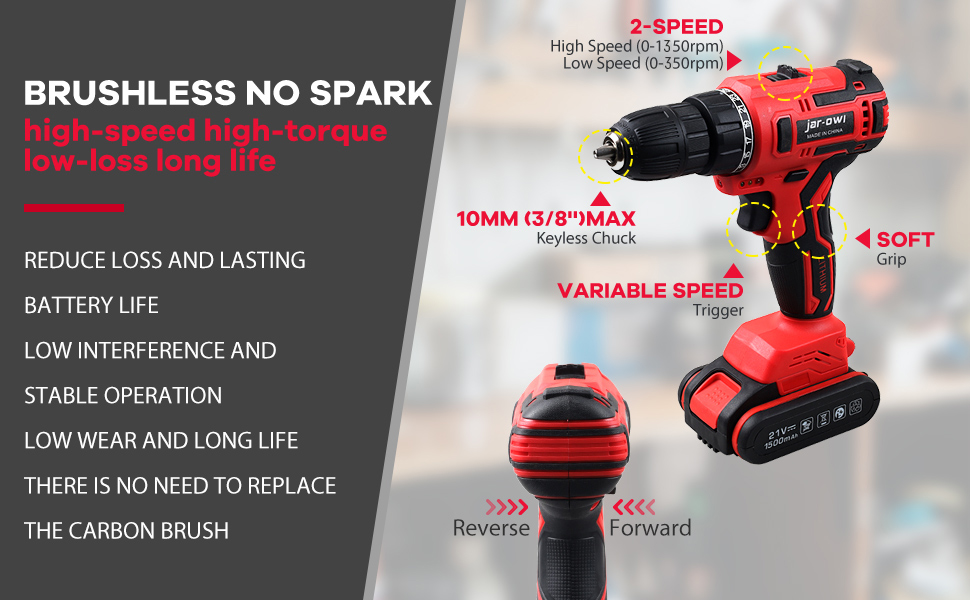
Image 4.2: An illustration detailing the brushless motor technology, emphasizing its benefits such as reduced loss, longer battery life, low interference, stable operation, and extended lifespan without carbon brush replacement.
5. Setup
5.1. Battery Charging
- Remove the battery from the drill by pressing the release button and sliding the battery out.
- Connect the charger to a standard power outlet.
- Insert the battery into the charger. The charging indicator light on the charger will turn red during charging.
- Once fully charged (approximately 1.5 hours), the indicator light will turn green. Disconnect the battery from the charger and unplug the charger from the outlet.

Image 5.1: Visual guide for removing the battery from the drill and connecting it to the charger. The charging display shows a red light for charging and a green light for a full charge.
5.2. Installing and Removing Bits
- Ensure the drill is off and the forward/reverse switch is in the center (locked) position.
- To open the chuck, rotate the front collar of the chuck counter-clockwise until the jaws are wide enough to insert the bit.
- Insert the desired drill bit or screwdriver bit into the chuck. Ensure the bit is inserted as far as possible for a secure grip.
- To tighten the chuck, rotate the front collar clockwise until the bit is firmly secured. Do not overtighten.
- To remove a bit, rotate the front collar counter-clockwise until the jaws open, then pull the bit out.

Image 5.2: A three-step visual guide demonstrating how to adjust the chuck for bit installation and removal. The toggle button on the drill's top allows for forward, reverse, and locked positions.
6. Operation
6.1. Powering On/Off and Speed Control
- To start the drill, press the trigger switch. The speed of the drill is controlled by the amount of pressure applied to the trigger.
- To stop the drill, release the trigger switch.
- The drill features two mechanical speed settings: Low Speed (0-350 RPM) for higher torque applications like driving screws, and High Speed (0-1350 RPM) for faster drilling. Select the desired speed using the speed selector switch located on top of the drill.
6.2. Forward/Reverse Switch
The forward/reverse switch is located above the trigger. Push the switch to the left for forward rotation (driving screws/drilling) and to the right for reverse rotation (removing screws). For safety, place the switch in the center position to lock the trigger and prevent accidental starting.
6.3. Clutch Settings
The clutch ring, located behind the chuck, allows you to adjust the torque output. There are 25 torque settings plus a drill mode setting. Rotate the clutch ring to the desired setting:
- Lower numbers (1-5) are for driving small screws or working with soft materials.
- Higher numbers (6-25) are for driving larger screws or working with harder materials.
- The drill symbol setting is for drilling applications, providing maximum torque without clutch slippage.

Image 6.1: The jar-owl cordless drill being used for different tasks, including drilling into wood, a wall, and metal, demonstrating its versatility.
7. Maintenance
7.1. Cleaning
- Keep the ventilation slots of the tool clean to prevent overheating.
- Use a soft, damp cloth to clean the exterior of the tool. Do not use harsh chemicals or abrasive cleaners.
- Periodically clean the chuck jaws to ensure proper gripping of bits.
7.2. Storage
- Store the drill and accessories in the provided carrying case in a dry, secure location, away from direct sunlight and extreme temperatures.
- Ensure the battery is partially charged (not fully depleted or fully charged) before long-term storage to prolong its lifespan.
7.3. Battery Care
- Do not store batteries in discharged condition. Recharge them as soon as possible after use.
- Avoid exposing batteries to moisture or water.
- If the battery becomes hot during charging or use, allow it to cool down before further use or charging.
8. Troubleshooting
| Problem | Possible Cause | Solution |
|---|---|---|
| Drill does not start | Battery not charged or improperly inserted. Forward/reverse switch in center (locked) position. | Charge battery and ensure it is fully inserted. Move forward/reverse switch to forward or reverse position. |
| Battery not charging | Charger not plugged in. Faulty battery or charger. | Check power connection. Contact customer support if problem persists. |
| Bit slips in chuck | Chuck not tightened sufficiently. Bit shank is dirty or damaged. | Retighten chuck firmly. Clean or replace bit. |
| Drill lacks power | Battery low. Incorrect speed or clutch setting. | Recharge battery. Select higher speed or clutch setting. |
9. Specifications
| Feature | Specification |
|---|---|
| Brand | jar-owl |
| Model | 21V Brushless Motor |
| Power Source | Battery Powered |
| Voltage | 21 Volts |
| Battery Capacity | 1.5 Ah Lithium Ion |
| Maximum Rotational Speed | 1350 RPM |
| Speed Settings | 2 (0-350 RPM / 0-1350 RPM) |
| Maximum Torque | 319 Inch Pounds (36 N.m) |
| Chuck Size | 3/8 Inches (10mm) Keyless |
| Clutch Settings | 25+1 |
| Drilling Capacity (Wood) | 0.24 Inches |
| Drilling Capacity (Metal) | 0.24 Inches |
| Item Weight | 11 Pounds (including case and accessories) |
| Product Dimensions | 17.3"L x 12.6"W x 4.7"H |
10. Warranty and Support
The jar-owl 21V Brushless Cordless Drill Set comes with a 3-year warranty. For warranty claims, technical support, or any questions regarding your product, please refer to the contact information provided at the point of purchase or visit the official jar-owl website.