1. Introduction
The LAFVIN Smart Home IoT Learning Kit is an educational set designed to introduce users to the principles of smart home technology through hands-on programming and assembly. This kit provides a comprehensive platform for students to explore electronics, Internet of Things (IoT) concepts, and graphical programming, compatible with the Arduino IDE.
The kit primarily utilizes an R3 main control board and high-quality wooden components for DIY assembly, complemented by a diverse range of sensor modules. Through a series of project-based learning activities, users can develop smart home models and gain proficiency in open-source hardware programming.
A detailed tutorial is included, providing all necessary programs, code examples, and instructions for software and driver installation. This guide will assist users through the entire assembly process of the Smart Home House Kit.
2. Product Overview
The LAFVIN Smart Home IoT Learning Kit includes the following components:
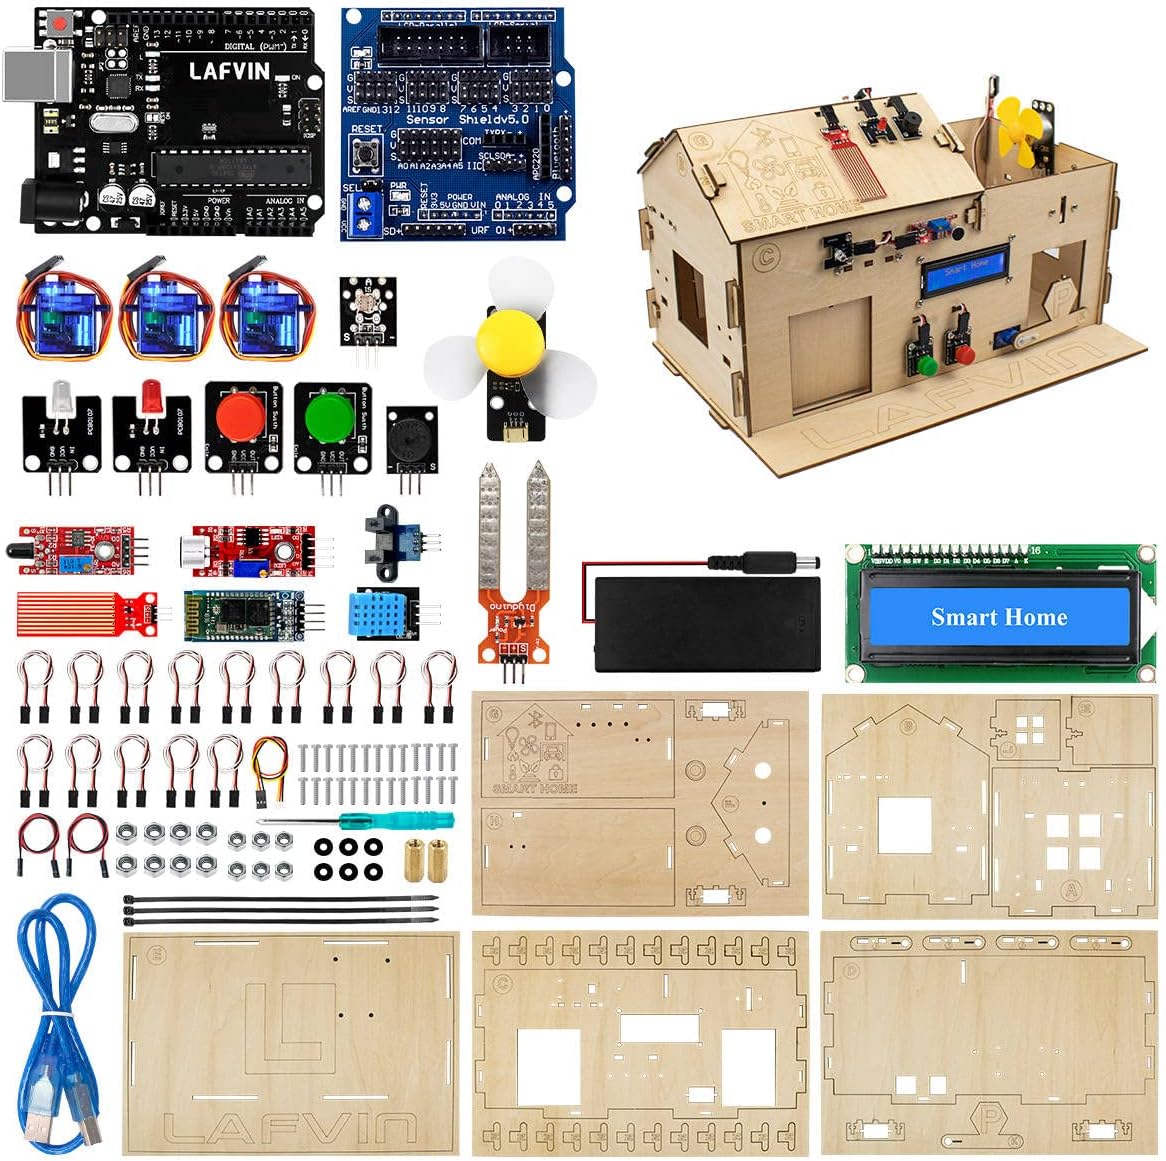
Figure 2.1: All components included in the LAFVIN Smart Home IoT Learning Kit.
2.1. Package Contents
- 1 x R3 Board
- 1 x V5 Expanding Board
- 1 x LCD 1602 Module
- 1 x Soil Humidity Sensor
- 1 x Flame Sensor
- 1 x Big Sound Sensor
- 1 x Water Level Detection Sensor
- 1 x Photoelectric Interrupt Module
- 1 x LED (White)
- 1 x LED (Red)
- 1 x Button (Red)
- 1 x Button (Green)
- 1 x DHT11 Temperature and Humidity Sensor
- 1 x Photoresistive Sensor
- 1 x Fan
- 1 x Passive Buzzer
- 1 x Battery Case
- 3 x SG90 Servo Motors
- 15 x M2 Screw 8mm
- 4 x M3 Screw 6mm
- 40 x M3 Screw 10mm
- 15 x M2 Nuts
- 40 x M3 Nuts
- 6 x Plastic Gaskets
- 2 x Copper Cylinders
- 1 x Screwdriver
- 14 x Female-to-Female Wire 3Pin
- 2 x Female-to-Female Wire 2Pin
- 1 x Female to PH 2.0 Wire 3Pin
- 1 x USB Cable
- 3 x Ties
- 5 x Wood Boards (for house assembly)

Figure 2.2: Assembled Smart Home House with various sensors and modules indicated.
3. Setup
3.1. Hardware Assembly
Begin by assembling the wooden components to form the Smart Home house structure. Refer to the detailed instructions provided in the included tutorial CD for step-by-step guidance on connecting the various sensors, modules, and wiring to the R3 main control board and V5 Expanding Board. Ensure all connections are secure and correctly oriented to prevent damage.
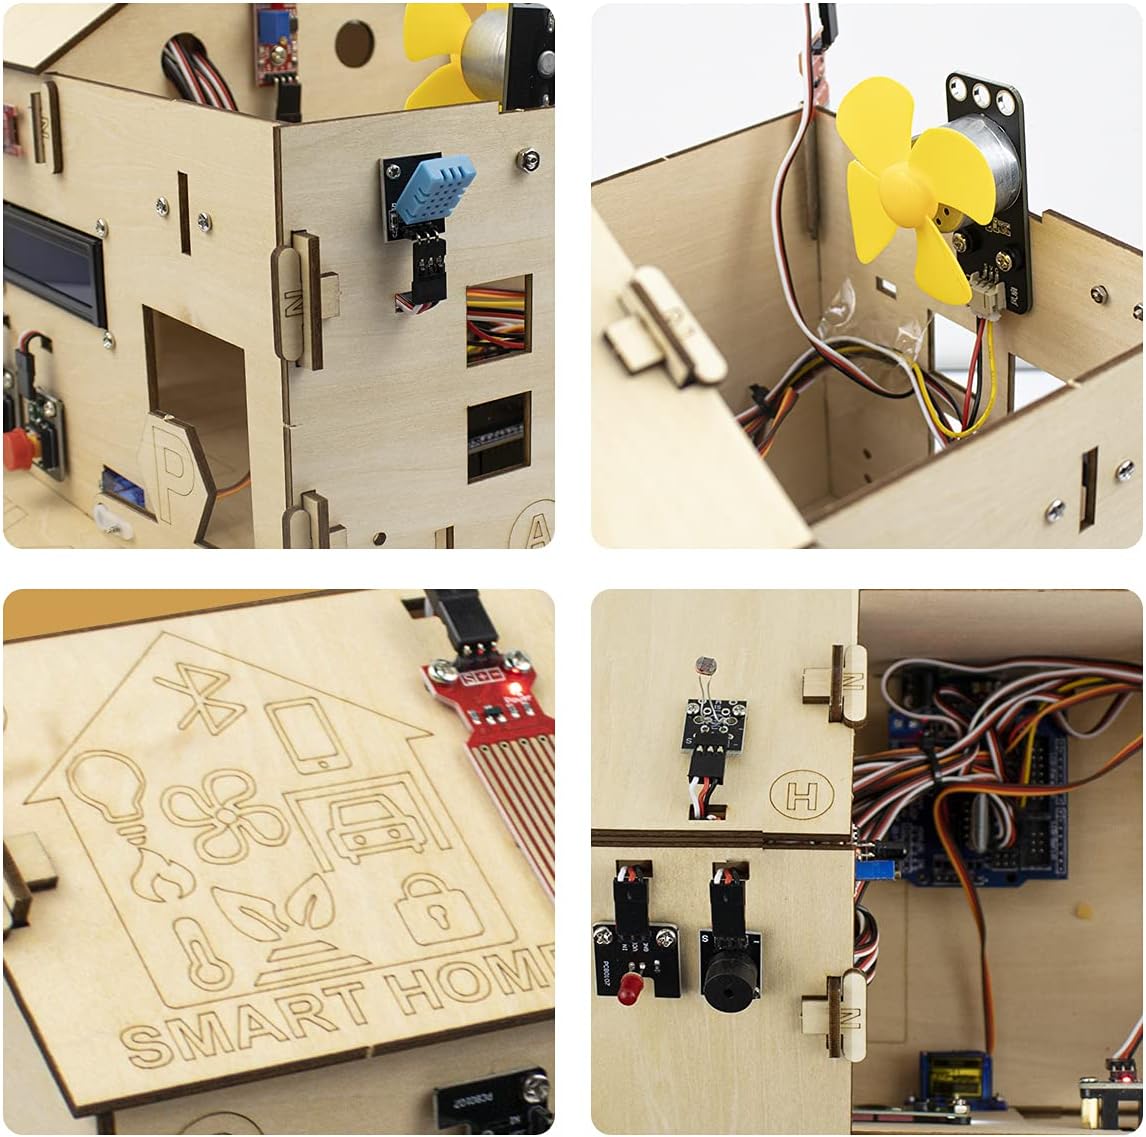
Figure 3.1: Detailed views of the Smart Home house during assembly, showing component placement and wiring.
3.2. Software and Driver Installation
Install the necessary software and drivers from the provided tutorial CD. This typically includes the Arduino IDE and any specific libraries required for the kit's modules. Follow the installation instructions carefully to ensure proper communication between your computer and the R3 board.
3.3. Initial Programming Environment Setup
Once the hardware is assembled and software installed, connect the R3 board to your computer using the provided USB cable. Open the Arduino IDE and configure the correct board type (Arduino Uno R3 or compatible) and serial port. You can then upload example sketches from the tutorial to test individual components.

Figure 3.2: Illustration of both graphical programming blocks and traditional Arduino IDE code for the kit.
4. Operating Instructions
The LAFVIN Smart Home IoT Learning Kit supports both graphical programming and traditional Arduino C++ programming. The included tutorial provides various projects to guide you through operating the different modules.
4.1. Basic Control and Monitoring
Utilize the provided code examples to control the kit's components. For instance, you can program the system to:
- Turn LEDs on/off based on sensor input or app commands.
- Control the fan for temperature regulation.
- Operate the servo motors to open/close doors or windows.
- Monitor environmental conditions using the DHT11 (temperature/humidity), soil humidity, and water level sensors.
- Detect motion with the photoelectric interrupt module.
4.2. App-Based Control
The kit supports app-based control, allowing you to interact with your smart home model wirelessly. Follow the tutorial to set up the mobile application and connect it to your R3 board via Bluetooth or Wi-Fi (if applicable to your specific R3 board version). The app interface typically provides controls for lights, fans, doors, and displays sensor data.

Figure 4.1: Screenshot of the mobile application used to control various functions of the Smart Home kit, including lights, fan, and door.
4.3. Video Tutorial: Installation and Use
Video 4.1: A demonstration of the installation and basic use of the LAFVIN Smart Home IoT Learning Kit, showcasing its functionalities.
5. Maintenance
To ensure the longevity and optimal performance of your LAFVIN Smart Home IoT Learning Kit, follow these maintenance guidelines:
- Cleaning: Gently wipe the wooden components and electronic modules with a dry, soft cloth. Avoid using liquids or abrasive cleaners, as they can damage the components.
- Storage: Store the kit in a cool, dry place away from direct sunlight, moisture, and extreme temperatures. Keep components organized in their original packaging or a suitable storage container to prevent loss or damage.
- Handling: Handle electronic components with care to avoid electrostatic discharge. Always ensure the power is disconnected before making or changing any wiring connections.
- Battery Care: If using batteries, remove them from the battery case when the kit is not in use for extended periods to prevent leakage.
6. Troubleshooting
If you encounter issues with your kit, consider the following common troubleshooting steps:
- Power Issues: Ensure the R3 board is correctly powered via USB or the barrel jack. Check battery connections if using the battery case.
- Connection Problems: Verify all wiring connections are secure and correctly inserted into the appropriate pins on the R3 and V5 boards. Loose connections are a common cause of malfunction.
- Code Upload Failure: Confirm that the correct board type and serial port are selected in the Arduino IDE. Reinstall drivers if necessary.
- Component Malfunction: Test individual components with simple, isolated code examples to determine if a specific module is faulty.
- Software Errors: Double-check your code for syntax errors or logical flaws. Refer to the tutorial and online Arduino resources for debugging tips.
7. Specifications
Key specifications for the LAFVIN Smart Home IoT Learning Kit:
- Main Control Board: R3 Board (compatible with Arduino IDE)
- RAM: DDR2
- Wireless Type: Bluetooth
- Operating System Compatibility: Linux (for programming environment)
- Connectivity Technology: Bluetooth, USB
- Processor Brand: ARM
- Number of Processors: 1
- Item Weight: Approximately 2.2 pounds
- Package Dimensions: 13.62 x 8.94 x 2.24 inches
- Included Tutorials: Provided on CD with programs, codes, software, and driver installation files.
8. Warranty and Support
LAFVIN is committed to customer satisfaction. We strive to provide comprehensive support and resolve any issues you may encounter with your Smart Home IoT Learning Kit. For assistance, please refer to the contact information provided in your product packaging or the included tutorial materials.
While specific warranty details are not provided in this manual, LAFVIN aims to ensure the quality and functionality of its products. Please retain your proof of purchase for any potential support inquiries.


